One of the primary reasons DevOps processes have not been widely adopted across the enterprise is that building pipelines across all the tools required is a painstaking effort. As a result, most pipelines today are constructed using manual pipelines. However, Atlassian has announced it is now making available pre-configured Bitbucket Pipelines that DevOps teams can access via a simple drag-and-drop interface.
Harpreet Singh, head of product for Bitbucket Cloud at Atlassian, said DevOps teams that rely on the Atlassian Bitbucket continuous integration/continuous deployment (CI/CD) platform will be able to employ a series of pre-configured Bitbucket Pipelines built by Atlassian or one of its third-party partners, rather than having to manually build every pipeline.
The goal is to make it much easier for DevOps teams to incorporate, for example, a new cloud platform into an existing set of DevOps processes without waiting for someone on the DevOps team to write, test and validate a script, said Singh. IT vendors that have worked with Atlassian to create Bitbucket Pipelines include Google Cloud, Microsoft, Slack and Amazon Web Services (AWS).

One of the ironies of DevOps is that while CI/CD platforms make it easier to build and deploy applications, constructing the CI/CD platform can be exceedingly complex. A recent survey conducted by Atlassian found DevOps teams rely on 4.3 tools to move code from development into production environments. A full 62 percent of respondents reported they resort to performing manual testing due to insufficient automated test coverage, additional manual processes or a lack of build/deployment pipeline automation.
While some organizations might have the engineering resources required to build pipelines, he noted, the average IT organization can’t afford to hire operations specialists that have the requisite programming skills required to build pipelines manually.
Best of all, noted Singh, the pre-configured Bitbucket Pipelines that Atlassian makes available will be maintained and updated by their original authors.
It’s too early to say to what impact pre-configured pipelines is likely to have on DevOps adoption in the enterprise. But most enterprise IT organizations won’t significantly alter their process until it becomes relatively easy to make that transition. Enterprise IT organizations have relied on administrators to manage IT for decades, and most of those administrators wouldn’t know where to begin if asked to manually construct a pipeline. The few enterprise developers who might be able to build those pipelines are simply to busy writing application code. The result is a paralysis that prevents organizations from modernizing their application development and deployment processes.
Of course, any meaningful change in the enterprise also involves a chicken-and-egg debate. Lacking skills and tools, enterprise IT organizations are unable to overcome internal inertia, which in turn results in conservative IT organizations preferring to rely on known processes no matter how inefficient they might be. The real challenge facing IT leaders trying to advance DevOps adoption is to remove as many excuses for resisting change whenever and wherever possible, starting with how pipelines are constructed and maintained.


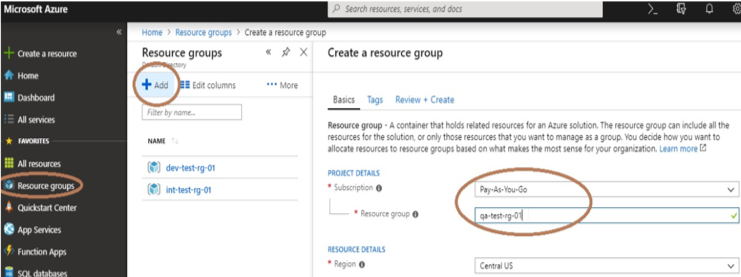 Once you have a subscription in Azure, you need to create a resource group to manage resources in Azure. The best practice is to maintain a separate resource group for each environment (DEV, INT, QA, STAG, PERF, PROD) and follow the proper naming conventions. To create a resource group, select Resource Group from left-side blade, click on +Add, then select Subscription, give a proper name to the resource group and click on Review + Create.
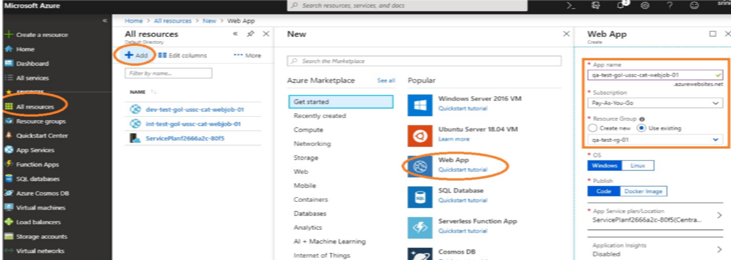 Click on All resources from the left-side blade of the panel and click on Add, then select Web App and give a proper name to your app service. Then select Subscription and select the existing resource group. Keep the remaining option as default. and click on Create.
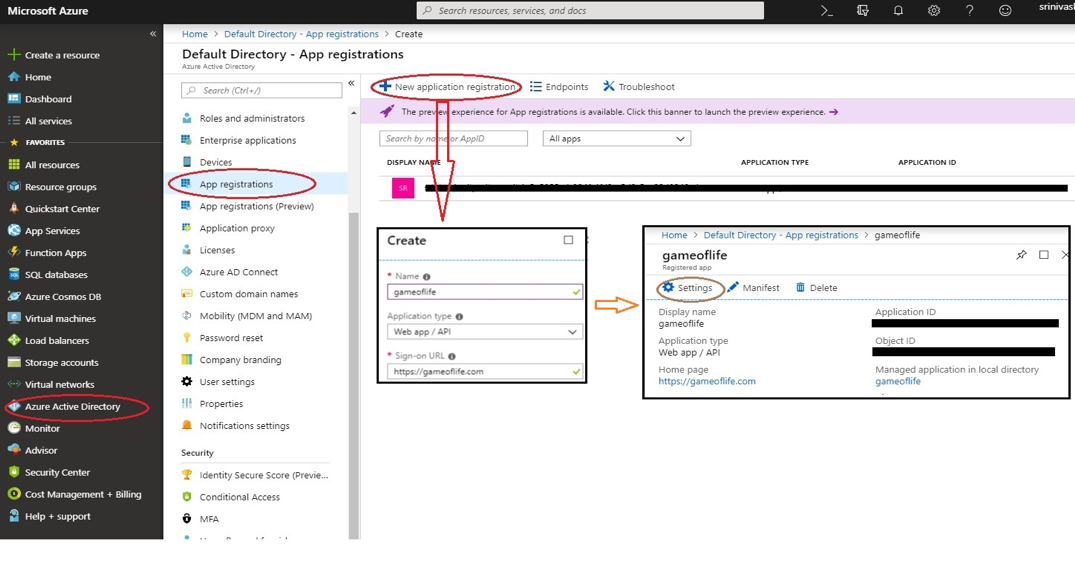

 To create a new project, click on Create new project, give a proper name to your project and select create. Then go to Repos, click on Import, then select source type, type in the above URL in the Clone URL tab and select Import. The source code will import into your repository.
 We need give service connections to our project, so go to project settings from the bottom of blade in our project home directory and then select Service Connections -> New Service connection -> Azure Resource Manager. Click on “Use the full version of the service connection dialog” from the pop-up, then paste the Application ID into the Service principal client ID tab and the secret key value into the Service principal key tab (which you saved during app registration creation). Then click OK.
 Creating a Continuous Integration (CI) Build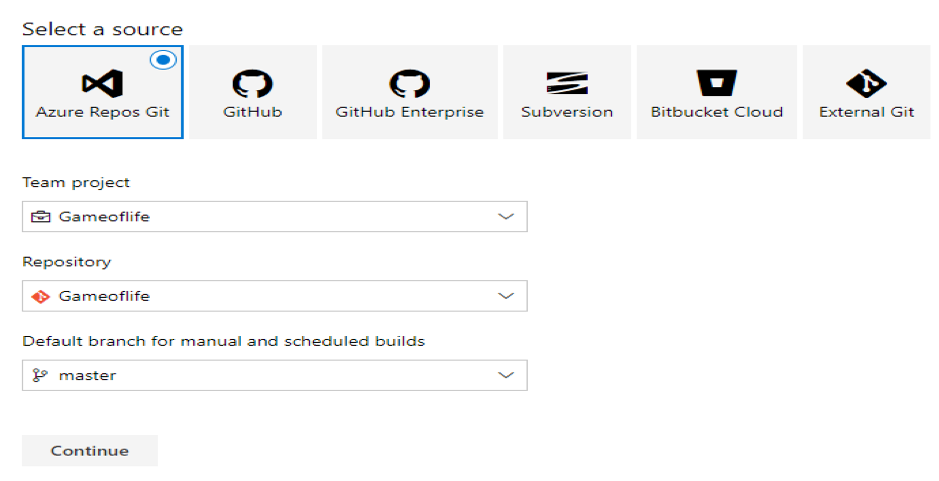

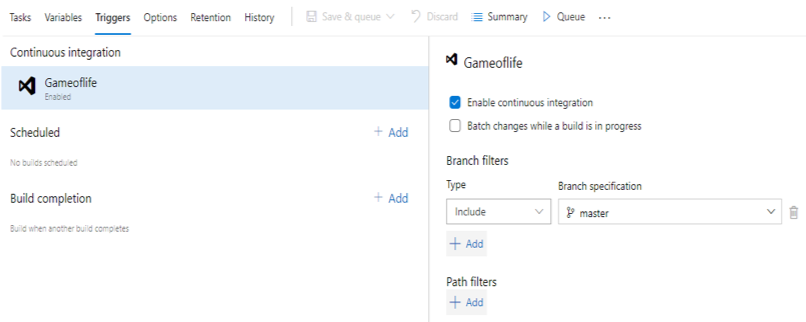 Next, select a template Maven, type in the pipeline name and select Hosted VS2017 for the Agent pool, and click on pom.xml in the Maven POM file. There you can list the goal(s) as Clean Package and select Copy Files. At the contents section please enter **/*.war then go to Publish Artifact: drop, list the artifact name as Gameoflife and keep all remaining options as default values. Then, under Triggers, select Enable continuous integration and give branch filters listed at right, which enables the continuous integration feature. Once a developer commits their changes into master, the CI build will trigger automatically.
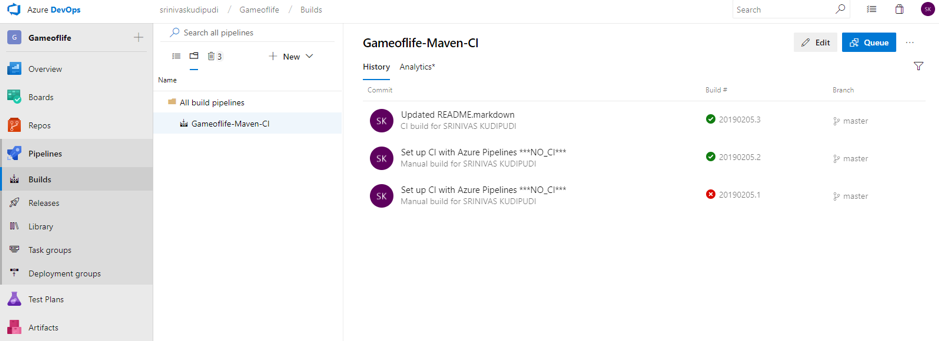 Once the configuration is complete, click on Save and Queue from top of pipeline to trigger a CI build. (Every commit into master will trigger a new build.)
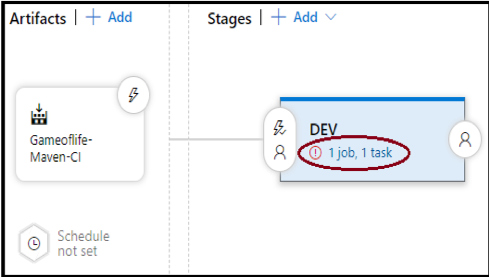 Go to Pipelines -> Releases -> New Release Pipeline, then select the template Azure App Service deployment, list the stage name as DEV and click on Add an artifact. Select project and source (build pipeline), then select default version as Latest, click on Add. Cick on Task (below the DEV), select Run on agent and select agent pool as Hosted VS2017, then click on the plus(+) symbol, search for template File Rename and select the .war file from source file and give it the new name ROOT.war.
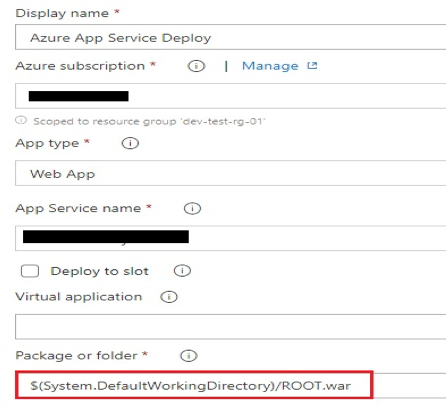
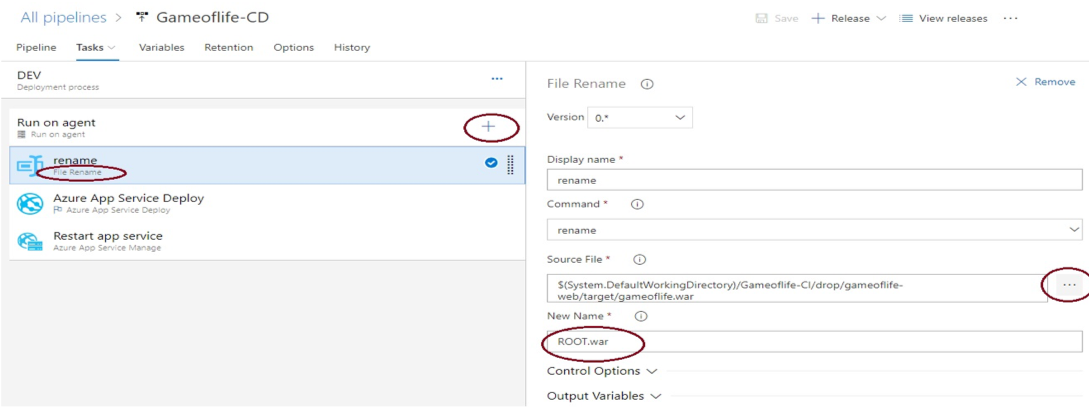 In the Display name box, list Azure App Service Deploy. In the Azure subscription field, you need to select a service principal name to authorize the resources. Then choose the App type and App Service name. In the Package or folder selection, select war file and rename it ROOT.war, because for java-based applications we need to deploy our app into a proper directory structure.
 Finally, select the template Azure App service manager and select the Restart option, making sure to select the same subscription and app service name you selected in the Azure app service deploy window. Click on Save, then click on Release -> Create a release -> select artifact build number -> create. Build will then trigger and deploy into the app service.