DevOps’ ultimate aim is to create efficiencies in the software delivery process. But it doesn’t always work out that way. Sometimes DevOps initiatives lead to mistakes—something we lovingly call a “DevOoops.” CloudBees recently polled some colleagues and came up with five examples of a DevOoops in action. Following is a discussion submitted by solution architect Will Refvem about siloed departments.
Scenario:
One of the biggest challenges in DevOps is SCM. Early in my career, being given access to Git repositories was a bit like handing a belt-fed machine gun to a drunken toddler. My biggest DevOoops moment came when I was trying to master the basics of Git in a project that used Git submodules—don’t, just don’t—and had a series of bash scripts that implemented a primitive CI/CD workflow by running in the environments we were deploying to (seriously). I can’t tell you how many merge conflicts and detached HEADs I encountered, or how I got out of them. Fortunately, we were using the fork-PR model, so I did no real damage.
Software configuration management (SCM) is key not only for versioning, but also for providing a shared view of code and other assets, from development through to production. Giving proper consideration to your SCM structure, branching and merging model, access controls, etc., will support collaboration, reliability and traceability—all key for DevOps success.
In the 2019 DevOps and Jenkins Community Report, 66 percent of organizations respondents reported the use of modern solutions SCMs, specifically GIT-based solutions GitHub or BitBucket. But the older SCM solutions aren’t going away completely—45 percent of all organizations still use pre-GIT, pre-DVCS (distributed version control systems) such as Perforce, Subversion and CVS. While it’s possible to apply DevOps practices using these legacy solutions, it is important (and more challenging) to design a branching/merging model and surrounding workflow, which supports the key aspects of DevOps such as peer review, collaboration and short-lived branches.
Modern SCMs such as GitHub have features that inherently support collaboration, including the game-changing Pull Request, making it much easier to implement processes that best support CD and DevOps.
Poorly designed CD workflows or inadequate CD systems create friction multiple ways. If the interactions are too cumbersome, users will not commit code to the pipeline frequently enough. If it’s difficult to access the pipeline and create visibility into the process, it can lead to unresolved conflicts.
You need to pick the right tool. If you don’t have the option to get the modern tool, you need to take the time to design a legacy tool.
It’s also important to consider two other issues in relation to this DevOoops example: branching and acquiring the appropriate level of DevOps skills.
- Branching: A proper branching and merging model is required to ensure you are feeding the appropriate inputs into your DevOps pipeline, such that you are able to continuously integrate, test and ultimately deploy changes. A simple guide here is encapsulated in the KISS (keep it simple, stupid) principle. If you need a full-wall whiteboard or a spreadsheet fit for an accountant to list your active branches, you need to rethink things. Get as close to the ideal of mainline trunk development as possible, with short-lived feature branches, minimal application versions, etc.
- Skills: As organizations seek to implement DevOps, most likely new tools and practices will be implemented simultaneously. It’s important to understand and accommodate the fact that there will be bumps and bruises as you learn to use these new tools and practices. For instance, shifting from centralized version control such as Apache Subversion (SVN) to distributed version control such as Git is a paradigm shift that can be difficult to fully grasp and result in destructive mistakes, such as deletion of nodes from the change history, overwriting changes or misconfiguration access control. Consider hiring for these new skills and/or account for time and training.
Takeaways
- A proper branching and merging model are required to ensure that you are feeding the appropriate inputs into your DevOps pipeline to let you continuously integrate, test and ultimately deploy changes.
- If you are using a pre-Git legacy SCM solution, develop a branching and merging strategy within the legacy solution to achieve appropriate velocity in your DevOps model.
- Consider that you will need to develop new skills to adopt new SCM tools and practice and account for this in your plan.


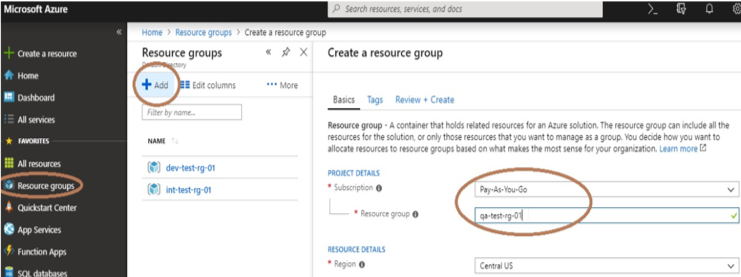 Once you have a subscription in Azure, you need to create a resource group to manage resources in Azure. The best practice is to maintain a separate resource group for each environment (DEV, INT, QA, STAG, PERF, PROD) and follow the proper naming conventions. To create a resource group, select Resource Group from left-side blade, click on +Add, then select Subscription, give a proper name to the resource group and click on Review + Create.
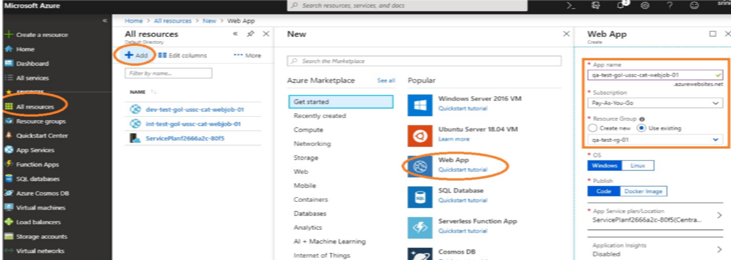 Click on All resources from the left-side blade of the panel and click on Add, then select Web App and give a proper name to your app service. Then select Subscription and select the existing resource group. Keep the remaining option as default. and click on Create.

 To create a new project, click on Create new project, give a proper name to your project and select create. Then go to Repos, click on Import, then select source type, type in the above URL in the Clone URL tab and select Import. The source code will import into your repository.
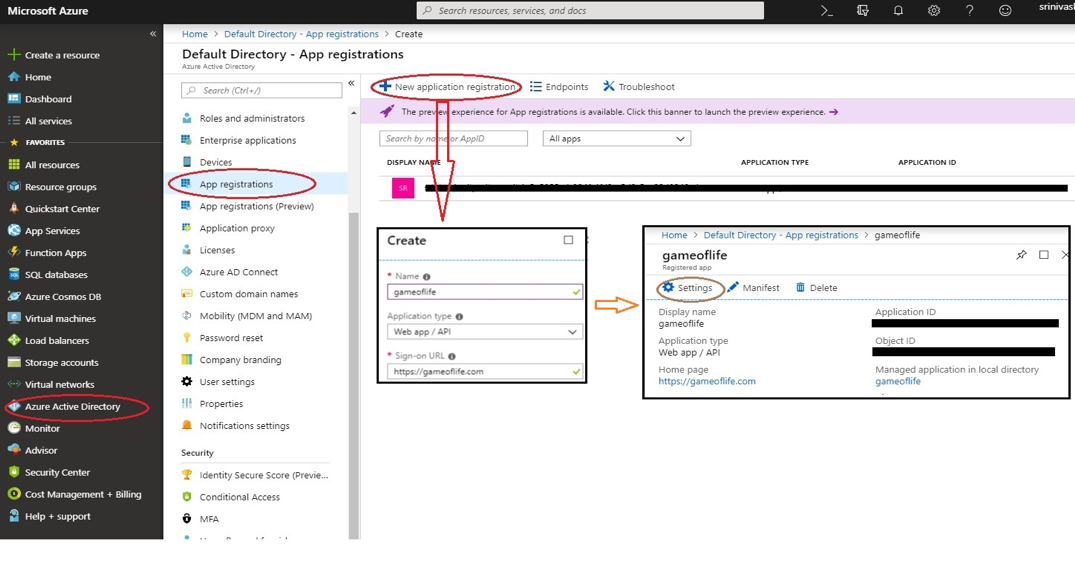
 We need give service connections to our project, so go to project settings from the bottom of blade in our project home directory and then select Service Connections -> New Service connection -> Azure Resource Manager. Click on “Use the full version of the service connection dialog” from the pop-up, then paste the Application ID into the Service principal client ID tab and the secret key value into the Service principal key tab (which you saved during app registration creation). Then click OK.
 Creating a Continuous Integration (CI) Build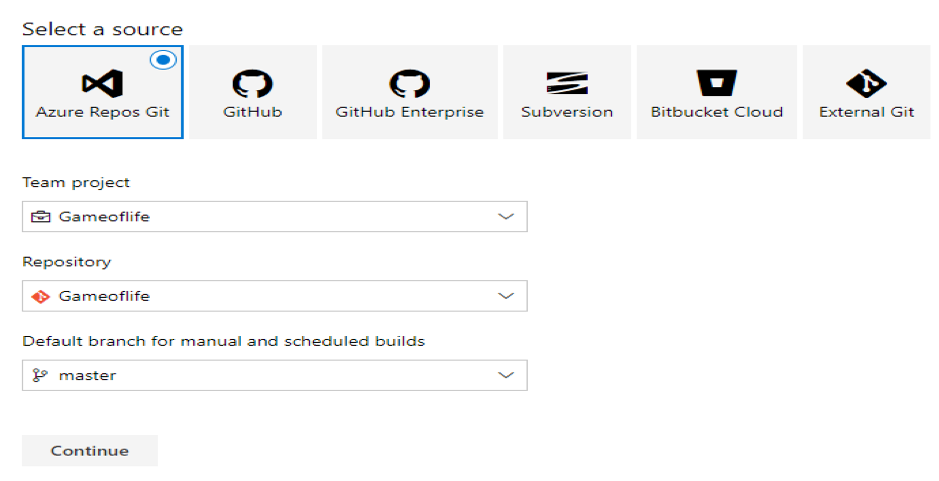

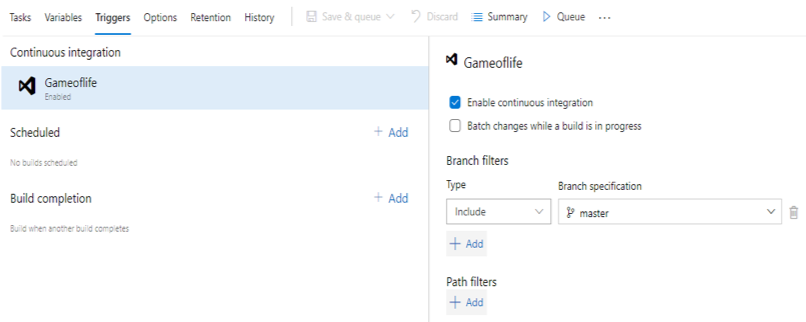 Next, select a template Maven, type in the pipeline name and select Hosted VS2017 for the Agent pool, and click on pom.xml in the Maven POM file. There you can list the goal(s) as Clean Package and select Copy Files. At the contents section please enter **/*.war then go to Publish Artifact: drop, list the artifact name as Gameoflife and keep all remaining options as default values. Then, under Triggers, select Enable continuous integration and give branch filters listed at right, which enables the continuous integration feature. Once a developer commits their changes into master, the CI build will trigger automatically.
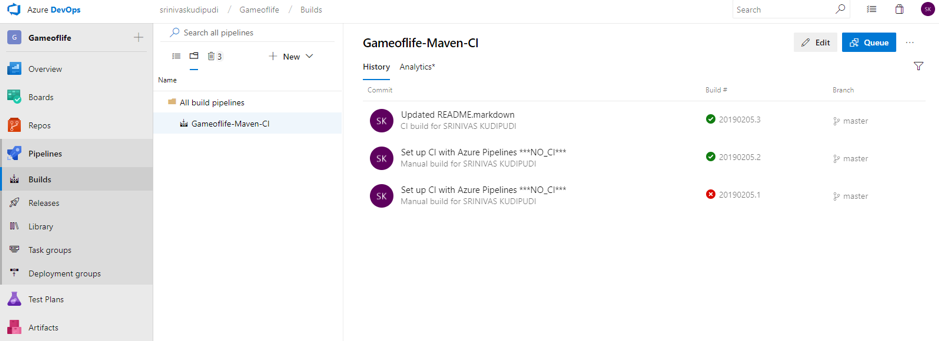 Once the configuration is complete, click on Save and Queue from top of pipeline to trigger a CI build. (Every commit into master will trigger a new build.)
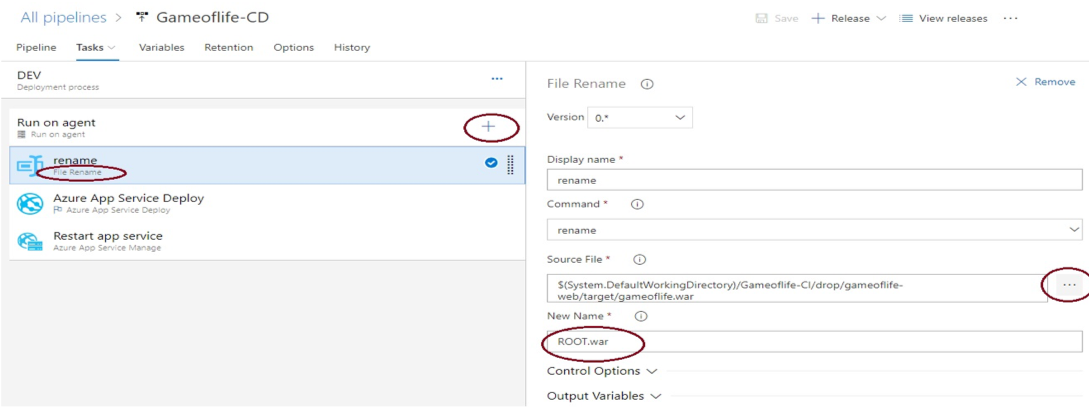
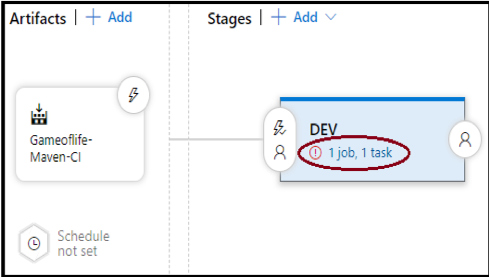 Go to Pipelines -> Releases -> New Release Pipeline, then select the template Azure App Service deployment, list the stage name as DEV and click on Add an artifact. Select project and source (build pipeline), then select default version as Latest, click on Add. Cick on Task (below the DEV), select Run on agent and select agent pool as Hosted VS2017, then click on the plus(+) symbol, search for template File Rename and select the .war file from source file and give it the new name ROOT.war.
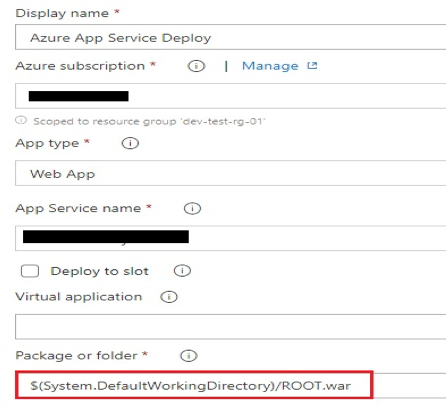
 In the Display name box, list Azure App Service Deploy. In the Azure subscription field, you need to select a service principal name to authorize the resources. Then choose the App type and App Service name. In the Package or folder selection, select war file and rename it ROOT.war, because for java-based applications we need to deploy our app into a proper directory structure.
 Finally, select the template Azure App service manager and select the Restart option, making sure to select the same subscription and app service name you selected in the Azure app service deploy window. Click on Save, then click on Release -> Create a release -> select artifact build number -> create. Build will then trigger and deploy into the app service.