Author: Sudhi Seshachala

  • Best Practices for User Management Models in AWS

    Best Practices for User Management Models in AWS

    Amazon Web Services (AWS) gives organizations the flexibility of using several different methods for managing user accounts. In this article, we will take a look at some of the best user account management practices and their potential pros and cons.

    The Ins and Outs of AWS Accounts

    AWS accounts provide comprehensive access to resources created during the account creation process. The first account is created when the user provides his payment details. from then on, the user is considered a root user. Additional users and accounts can be set up through an AWS service called Identity Access Management (IAM). We can use this service to create users with granular-level roles and permissions.

    Two unique identifiers are assigned to each account during its creation:

    • AWS Account ID
    • Canonical user ID

    AWS Account ID is a unique 12-digit number meant as a reference point for each and every user. It also helps to differentiate between users and resources.

    Canonical User ID is a long string used for enabling cross-account access on S3 buckets. It is achieved by using any other AWS account’s canonical user ID while writing an S3 bucket policy.

    AWS Account Detailing

    AWS account has a versatile set of features and functions. The resources and features help define the boundaries between the application and the service running in AWS account is set. There are six different types of the properties and behaviors:

    • Security and Access Controls
    • Communication
    • AWS Service Limits
    • Cost and Billing
    • Resource sharing
    • Account Linkage and Consolidated Billing

    Security and Access Controls

    IAM

    Identity Access Management and AWS identity exist for every account made on AWS. It offers control over access and permissions within an AWS account. It allows users and roles to be created as well as permission sets, which control access to resources within the account.

    The default IAM configuration prevents any unauthorized access to users not associated with the AWS account. Cross-account access is possible, too. An AWS account is best in when organizations are divided into business units: Within each business unit, the users, roles and permissions are created specific to the unit.

    Security Groups

    The security groups in EC2 are used to control ingress and egress requests from Elastic Compute Cloud (EC2) instances. In other words, security groups can be configured to control the open ports used for inbound and outbound requests to the EC2 instance. They allow access to the use of Instance ID, CIDR range or by referencing existing security groups. Unlike CIDR, other security groups just work within the AWS account.

    Advantages:

    • Accidental configurations allowing access across accounts can be avoided easily.
    • The responsibilities of departments within the organization/business unit are clearly defined.

    Communication

    AWS virtual private clouds (VPCs) are logically isolated sections of the system within the EC2 environment, which facilitate the construction of discrete networks for workload or organization. They empower users to gain not only control over the subnets but also access to the routing tables, internet connectivity, etc. IAM controls the access to VPCs. Security groups control ingress and egress at the EC2 instance level and access control lists (ACL) control the access to subnets at the VPC layer.

    By default, it is impossible for instances within different VPCs to communicate privately with each other. But using the unique feature of VPC Peering, it is possible to connect routing traffic between IP spaces for two different VPCs. Communication between subnets within two or more VPCs is possible as well. To initiate a VPC Peering connection, the requester has to send the request to the target or Peer VPC and then the request must be accepted by the administrator associated with the target or Peer VPC. Once the connection is established, all the routing tables can be modified, enabling the flow of traffic between the connected VPCs. If there are no particular IAM configurations, the person initiating the VPC Peering request might possess permissions to accept the request from the target VPC, allowing inter-VPC access.

    Cross-account peering is possible using VPC peering, but the administrative control of AWS accounts is usually segregated.

    AWS Service Limits

    A lot of AWS service limits exist by default. They are region-specific and provide the control over the number of different types of resources that could be created.

    Examples of AWS Service limits include:

    screen-shot-2016-10-05-at-1-48-32-am

    Although most of the limits that are specified are soft and can be increased or decreased easily on request, changes are not instantaneous. AWS support needs 24 hours to remove service limits after receiving business need-based requests. If an organization is using separate AWS accounts, it will end up with multiple sets of these AWS service limits. Putting a logical boundary in place is a good practice whenever there are multiple, independently functioning business units within any organization.

    Cost and Billing

    The AWS account can be seen as a billing entity that functions as a boundary for the allocation of the cost associated with the resources within the account. There may be different payment modes for different AWS accounts, and can produce detailed billing statements. Tagging is used for identification of the individual resources within an AWS account, making accurate cost allocation models possible.

    Note: There might be some resources that do not use tagging and will not be represented in detailed reports. If, for example, an organization is sharing an AWS account for several different entities that need their cost to be apportioned, then the best way to deal with this will be to use separate AWS accounts.

    The following list of resources that cannot be tagged:

    • Ingress or Egress Bandwidth from EC2
    • VPC endpoints
    • VPC flow logs
    • Elastic IPs
    • Ingress or Egress Bandwidth from S3

    When it comes to the cost optimization, reserved instances (RIs) play a vital role. RIs allow customers to access the significant amount of discounts over on-demand EC2 instances by committing to an instance type, region availability, period and level of utilization. RIs are not allowed to be moved between accounts, but it is possible to sell an unwanted RI on Reserved Instance Marketplace.

    Sharing Resources

    While there are several methods to prevent cross-account sharing, there are some that facilitate sharing it. Cross-account interaction with appropriate security controls is provided through VPC Peering.

    Some methods that facilitate sharing of resources between accounts are:

    • EC2 Amazon Machine Images (AMIs)
    • EBS volume snapshots
    • RDS Backup
    • Amazon S3 Buckets

    These mechanisms are used for sharing data from critical services. Even without relying on these tools, transfer of the data can be done manually, which is often prone to errors and security risks. This is not recommended.

    Linking Accounts and Consolidated Billing

    In AWS, linking multiple accounts in parent-child model is an efficient way to organize accounts for organizations. This method, called Linked Accounts, provides customers a holistic view of billing from multiple child AWS accounts into the single master AWS account. Through a single billing report that also includes separate reports per child account, Linked Accounts gives the user an integrated view on the resource charges for a cluster of AWS accounts. It provides more visibility into an organization’s spend throughout all AWS, still utilizing the AWS account as a boundary.

    When a linked account model is set up, a best practice is to make an empty master AWS account strictly for consolidated billing. When AWS resources are created within the master account, it adds complexity to the consolidated billing configuration/data and accounts holding payment.

    Consolidated billing is also beneficial at the time of purchasing RIs for an optimizing cost. RIs bought at the master account level could be linked at instance startup time to any child accounts  linked to the master account.

    Account Usage Patterns

    Training accounts can be used for different purposes:

    • Single Account Model
    • Autonomous Model
    • Single Master Hierarchy Account Model
    • Multiple Master Hierarchy Account Model

    Single Account Model

    In this model, all AWS resources are contained within a single AWS account employed by an organization. It’s a preferred model for smaller organizations that require simplistic workloads or fewer workloads within their AWS account. It also can be leveraged by an organization that centrally manages the IT and business functions. Using this model, a customer for a single payment method would receive a single billing report—the client is not required to handle numerous accounts for access management or communications.

    Pros:

    • Less complicated.
    • Cross-account configuration is not required.
    • Sharing of resources is held within an account.
    • Financial governance is easier and can be easily centralized.
    • Customer is provided with a single payment method and billing report.

    Cons:

    • With the increase in the usage, the account limits are required to be frequently raised.
    • Configuration and resource issue in one environment will adversely affect other settings (including production).
    • There is no way to isolate the access controls independent of IAM policies.
    • Erroneous changes to Security Group or IAM policies can have adverse effects.
    • Production and non-production workloads are not independent of each other.

    Autonomous Model

    This model leverages multiple AWS unlinked accounts to provide the advantages of the single account model. This permits independent IT or business functions to operate independently. It also allows each division or department to have a decentralized model to administer their functioning.

    Pros:

    • Decreased complexity for all accounts in the model.
    • Sharing of resources is held within the account.
    • Cross-account configuration is not required.
    • Individual billing reports for each AWS account.
    • Payment modes for every AWS account and business unit.
    • Decentralized governance across AWS resources.
    • Impact of erroneous changes to items such as IAM policies or Security Group changes reduced to a lone organizational unit

    Cons:

    • Assigning as a single account to manage a business unit reduces the impact of erroneous change outside the business unit. But this also has the drawback of single account model.
    • With no centralization available, the construction of multiple accounts becomes a challenge to manage.
    • Managing IAM policies with the different independent account may result in a drift of standards and access control, for instance, the user management.
    • Duplication of efforts because the organization manages several different billing and payment reports.

    Single Master Hierarchical Model

    In this one-to-many connected account model, a single master account helps the organization integrate the control and governance of AWS spending while allowing some autonomy for the business units. The Single Master Hierarchical Model is preferred by big organizations with centralized finance having several workloads throughout functional groups or projects. This model uses distinct subordinate AWS accounts for isolating the application environments within the organization.

    Pros:

    • Provides for a central managing system.
    • A single payment mechanism and integrated billing report across several accounts.
    • One single billing statement that covers subordinate accounts.
    • Provides the ability for attributing the costs, taggable or not, to an individual business unit.
    • Less prone to incorrect changes in the IAM policies, as the impact is contained within limited accounts.
    • Business units can be empowered to carry out administrative and IT duties.
    • RIs can be purchased at the master account level and used for the child accounts.

    Cons:

    • Managing IAM users and other policies can be tricky, as each account requires duplicate configuration.
    • Manual linking is required for setting up the new subordinate AWS account.
    • Consolidated billing that includes child accounts may produce multiple reports, making it difficult for efficient data analysis.

    Multiple Master Hierarchical Model

    This model also knows as, multi-master account structure, is preferred by large organizations or enterprises with numerous business units or governing bodies. These groups usually want their business units to function independent of each other, for legislative, political or financial reasons. In this model, several master payer accounts are set up, followed by dependent child accounts. This model retains benefits of the single-master model while allowing cost-allocation on a master-by-master account basis to payers and payment methods.

    Pros:

    • A centralized governing body yet separation between the child accounts.
    • Separate payment methods for each account as dictated by the needs of business divisions and units.
    • Reduced collateral damage from mistakes, such as security breach or IAM changes (constrained to individual accounts).
    • Business units and project groups can be empowered to carry out administrative and IT duties.
    • RI buyouts can be done at every master account level, enabling RI improvement inside every business unit.

    Cons:

    • IAM clients, policies and roles can be more tricky and intricate to manage because of the presence of AWS master and sub-accounts.
    • Consolidated billing over several master AWS accounts with numerous child accounts results in complex billing documents.
    • Multi-master arrangement will typically lose some of the cost efficiencies by limiting RI buys to every master account.
    • No nesting approach for setting multiple master records into a n+ various leveled structure

    Using a single account for all AWS resources will reduce complexity but increases risk, as issues with one account can impair several business applications. A single-report model should be used only for simple or singular use cases.

    Eventually, there’s no definite answer to what is the best account model. The choice of model is a subjective decision based on the requirements. However, some aspects of the Linked Accounts model can be a good fit for most real-world scenarios. It’s tricky to set up, but the behaviors and efficiencies of Linked Accounts model would overshadow the cash outlay for its setup. A structure should be chosen with an eye toward the future. Can this structure support rapid growth? Can it help growing communication in near future? These are the questions that should be addressed before choosing a model.

    Simplifying Your AWS Account Strategy

    Leveraging a single AWS account pattern may result in operational challenges. Managing and setting up IAM users, roles and groups consume a lot of time and could cause trouble and unexpected behaviors. While Identity Provider federation or cross-account IAM can be used to reduce the overhead, their configuration settings may be complex.

    AWS has a lot of human specialists who can assist with configuration, organization and administration of AWS assets. They can also help simplify operations of AWS infrastructure.

    AWS IAM Configuration Setup And Management

    With IAM, users can be allowed cross-account IAM role. One should remove the root account access to console and API. Also, a parent account could be created with access to specific AWS resources as an administrator or in read-only/read-write mode. As a best practice, roles and policies should be defined on the role. Then when the users are created, they can be allowed to be part of a particular role as needed.

    Consolidated Billing

    Consolidated Billing could be used for consolidating payments for several AWS accounts or AISPL (Amazon International Services Pvt. Ltd) accounts within a company by defining any of those accounts as the payer account. Consolidated Billing is a free service and offers a collective view of all the account changes, along with cost report for accounts associated with the payer account at the individual level. Usually, AISPL and AWS cannot be consolidated together; however, service providers could tie these two accounts and offer Consolidated Billing.

    Consolidated Billing offers the simplicty of one bill for multiple accounts. Account charges and cost data tracking is available in CSV format. And, in the case of multiple accounts, AWS integrates the use of all accounts, making the user eligible for a volume pricing discount.

    Summary

    By following the usage patterns discussed in this white paper, operational issues can be addressed through proper planning, automation and additional tooling.
    — Sudhi Seshachala

  • Useful Big Data Terminologies, Part 1

    Useful Big Data Terminologies, Part 1

    As data continues to increase at an evermore rapid pace, organizations struggle to deal with this data torrent, let alone use it to analyze and capture value. The ways used to understand this big data also is increasingly rapidly, which introduces myriad terms used to define these methods.

    The follow is an attempt to provide natural explanations to some of the significant terms and technologies you will come across when you’re getting into big data.

    Algorithms: Mathematical and analytical formulas that also include statistical processes used to analyze data. Algorithms are implemented in software to analyze, process the input data and produce output or results.

    Analytics: The course of depicting conclusions based on the raw data. With the help of analysis, otherwise-meaningless numbers and data can be converted into something useful. The emphasis here is on interpretation and not on big software systems. That may be why data analysts are very experienced in the art of storytelling.

    Biometrics: Using analytics and technology to identify people by one or many of physical characteristics, such as fingerprint recognition, face recognition or iris recognition.

    Cassandra: A very well-known open-source database management system managed by the Apache Software Foundation, which has been constructed to handle high volumes of data throughout distributed servers.

    Cloud: A term used to describe data or software running on remote servers rather than locally. Data stored in the cloud is usually reachable over the internet, wherever the owner of that data in the world might be.

    Database: A systematized collection of data, such as schemas, charts or tables. A database management system (DBMS) is software that helps in data analysis and exploration.

    Data Mining: This term can mean different things for different context. To the layman, it means the automatic examining of large databases. To an analyst, it refers to the pool of statistical and machine learning methods used in the databases.

    Dark Data: The information collected and managed by a business that is never put to use, yet sits waiting to be studied. Most companies don’t realize they have a lot of this kind of data lying around.

    Data Scientist: A skilled expert in extracting value and insights from data. A data scientist typically is someone with skills in computer science, analytics, mathematics, creativity, statistics, communication and data visualization, as well as strategy and business.

    Gamification: The process of creating a game-like environment in areas that typically would not have games, such as websites, to attract users and increase engagement. In the terms of big data, a gamification is a powerful tool for incentivizing the data collection.

    Hadoop: An open-source software structure that works mainly by processing and storing files and data. Hadoop is known for its big processing power, which makes it easy to run a host of tasks alongside. It helps companies access, save and analyze enormous amounts of data.

    IoT: An acronym that stands for internet of things. Principally, it defines an ecosystem of things, from diapers to self-driving cars, that can communicate with each other via the internet. Their sensors generate a large amount of data that can be analyzed.

    Machine Learning: A highly casual way performing data analysis. Machine learning mechanizes logical model building and trusts on the ability of the device to adapt. With the use of algorithms, models dynamically learn and improve themselves every time they process any new data. Machine learning is not new; however, it is receiving massive attraction as a modern tool for data analysis. It allows devices to grow and acclimatize without demanding numerous hours of extra work by the scientists.

    MapReduce: A model for programming, generating and processing massive data sets. It does two different things: the Map, which includes rotating one dataset to the other, more valuable and fragmented dataset made of bits known as tuples; and the Reduce, which takes all of these fragmented tuples and breaks them even further. It results in a useful breakdown of information.

    NoSQL: Database management systems that do not use relational tables used in most old-style database systems. The data retrieval and storage system is designed for managing massive volumes of data without tabular categorization.

    SaaS: An acronym for software as a service, a method of application delivery in which vendors host applications and make them available through the internet. SaaS providers deliver their services via the cloud.

    Spark: An open-source computing structure developed at the University of California, Berkeley, and donated to the Apache Foundation. It is used for interactive analytics and machine learning.

  • Financial Drivers for Cloud Migration in Enterprise

    Financial Drivers for Cloud Migration in Enterprise

    Clouds are a vast pool of usable and manageable virtualized means such as development platforms, hardware and services. These assets can be animatedly reconfigured to adjust to a flexible load, which helps in the optimal utilization of resources. Your enterprise breathes through IT—to keep your business moving forward, you must modernize and be more flexible to break the shackles of the orthodox technologies that are holding you back.

    The cloud’s pay-as-you-go business model enables enterprises to cut capital spending by leveraging the cloud service. It also offers several benefits required by the enterprise, including lower operating cost, no upfront investment, great scalability and much more.

    To gain the benefit of cloud computing and guard the current investment to the legacy system, companies are keen in migrating their legacy systems to the cloud. The cloud provides a cost-effective corridor to transforming legacy systems to more modern technologies. It offers modern efficient development structures, improved supervision of IT resource supply and demand and enhanced scalability, and it provides access to these assets from almost any part of the world. With this upgraded dexterity, you are able to respond more swiftly to the changes in the market, exploit newer business prospects, surge financial growth and drive innovation.

    However, to benefit from what the cloud could offer, you are required to spend money and time on launching your cloud and migrating data and applications to the newer environment.

    Migrating databases from on-premise machines to the cloud has a few crucial advantages: Cloud elasticity delivers instant flexibility in scaling up or down. And, the cloud model saves money by shifting companies from early heavy capital expenses (CapEx) of on-premise hardware to constant, known operational expenses (OpEx) on cloud facilities and more.

    Migration Ahoy

    But migrating live applications to the cloud is not an easy task. Listed below are few methods to migrate to the cloud.

    Rehost: This term refers to redistributing applications to a diverse hardware setting and changing the application’s structure configuration. Rehosting the application while making no changes to its construction can offer a faster migration to the cloud. The key benefit of infrastructure as a service (IaaS) is that the systems can be migrated by the teams quickly, with no modification to their architecture.

    Refactor: This term refers to applications run over the cloud provider’s infrastructure. The main benefit is combining innovation with awareness, as “backward-compatible” platform as a service (PaaS) means developers can reuse frameworks, languages and containers in which they have invested. Its biggest drawbacks include transitive risk, missing capabilities and lock-in framework.

    Revise: This method requires extending or modifying the present code base to assist the legacy transformation requirements, and then using the refactor or rehost options to position the cloud. This method enables enterprises to enhance the application to influence the cloud features of providers’ infrastructure. However, this method requires upfront development work, which needs upfront outlays to assemble a development team.

    Rebuild: This term refers to rebuilding the solution on PaaS, discarding code for the current application and restructuring the application. Though rebuilding involves dropping the familiarity of present code and frameworks, the benefit of rebuilding the application is admission to advanced and innovative features in the platform of the provider. They increase the productivity of the developer. Still, lock-in is a major drawback: Should the provider make a pricing or technical change, breaches the service level agreements or goes out of business, the customer is required to switch, possibly deserting some or almost all its application resources.

    Replace: This method requires discarding the present application and using the commercial software offered as a service. This method reduces or eliminates any investment in assembling a development team when there is a change in the business function. Issues may include issues in accessing the data, unpredictable data semantics and vendor lock-in.

    The Bottom Line

    Projects relating the migration be of any size entails careful planning. Evaluating its existing applications portfolio could help an organization understand the complexity, challenges and amount of effort required in migrating its databases to the cloud. Many tools assist application and database migrations, and each method differs in the amount of automation they provide and in the accurateness of the migrated system. Carrying out proofs of concept using these tools to understand their abilities will be constructive in the longer run for larger projects related to migration.

  • Bigdata – Understanding Hadoop and Its Ecosystem

    Bigdata – Understanding Hadoop and Its Ecosystem

    It is quite interesting to envision how we could adopt the Hadoop eco system within the realms of DevOps. I will try to cover it in upcoming series.  Hadoop managed by the Apache Foundation is a powerful open-source platform written in java that is capable of processing large amounts of heterogeneous data-sets at scale in a distributive fashion on cluster of computers using simple programming models. It is designed to scale up from single server to thousands of machines, each offering local computation and storage and has become an in-demand technical skill. Hadoop is an Apache top-level project being built and used by a global community of contributors and users.

    Hadoop Architecture:

    The Apache Hadoop framework includes following four modules:

    • Hadoop Common: Contains Java libraries and utilities needed by other Hadoop modules. These libraries give filesystem and OS level abstraction and comprise of the essential Java files and scripts that are required to start Hadoop.
    • Hadoop Distributed File System (HDFS): A distributed file-system that provides high-throughput access to application data on the community machines thus providing very high aggregate bandwidth across the cluster.
    • Hadoop YARN: A resource-management framework responsible for job scheduling and cluster resource management.
    • Hadoop MapReduce: This is a YARN- based programming model for parallel processing of large data sets.

    Below diagram portray four components that are available in Hadoop framework.

    Hadoop

    All the modules in Hadoop are designed with a fundamental assumption i.e., hardware failure, so should be automatically controlled in software by the framework. Beyond HDFS, YARN and MapReduce, the entire Apache Hadoop “platform” is now commonly considered to consist of a number of related projects as well: Apache Pig, Apache Hive, Apache HBase, and others.

    Hadoop Ecosystem:

    Hadoop has gained its popularity due to its ability of storing, analyzing and accessing large amount of data, quickly and cost effectively through clusters of commodity hardware. It wont be wrong if we say that Apache Hadoop is actually a collection of several components and not just a single product.

    With Hadoop Ecosystem there are several commercial along with an open source products which are broadly used to make Hadoop laymen accessible and more usable.

    The following sections provide additional information on the individual components:

    MapReduce

    Hadoop MapReduce is a software framework for easily writing applications which process big amounts of data in-parallel on large clusters of commodity hardware in a reliable, fault-tolerant manner. In terms of programming, there are two functions which are most common in MapReduce.

    • The Map Task: Master computer or node takes input and convert it into divide it into smaller parts and distribute it on other worker nodes. All worker nodes solve their own small problem and give answer to the master node.
    • The Reduce Task: Master node combines all answers coming from worker node and forms it in some form of output which is answer of our big distributed problem.

    Generally both the input and the output are reserved in a file-system. The framework is responsible for scheduling tasks, monitoring them and even re-executes the failed tasks.

    Hadoop Distributed File System (HDFS)

    HDFS is a distributed file-system that provides high throughput access to data. When data is pushed to HDFS, it automatically splits up into multiple blocks and stores/replicates the data thus ensuring high availability and fault tolerance.

    Note: A file consists of many blocks (large blocks of 64MB and above).

    Here are the main components of HDFS:

    • NameNode: It acts as the master of the system. It maintains the name system i.e., directories and files and manages the blocks which are present on the DataNodes.
    • DataNodes: They are the slaves which are deployed on each machine and provide the actual stor­age. They are responsible for serving read and write requests for the clients.
    • Secondary NameNode: It is responsible for performing periodic checkpoints. In the event of NameNode failure, you can restart the NameNode using the checkpoint.

    Hive

    Hive is part of the Hadoop ecosystem and provides an SQL like interface to Hadoop. It is a data warehouse system for Hadoop that facilitates easy data summarization, ad-hoc queries, and the analysis of large datasets stored in Hadoop compatible file systems.

    It provides a mechanism to project structure onto this data and query the data using a SQL-like language called HiveQL. Hive also allows traditional map/reduce programmers to plug in their custom map­pers and reducers when it is inconvenient or inefficient to express this logic in HiveQL.

    The main building blocks of Hive are –

    1. Metastore – To store metadata about columns, partition and system catalogue.
    2. Driver – To manage the lifecycle of a HiveQL statement
    3. Query Compiler – To compiles HiveQL into a directed acyclic graph.
    4. Execution Engine – To execute the tasks in proper order which are produced by the compiler.
    5. HiveServer – To provide a Thrift interface and a JDBC / ODBC server.

    HBase (Hadoop DataBase)

    HBase is a distributed, column oriented database and uses HDFS for the underlying storage. As said earlier, HDFS works on write once and read many times pattern, but this isn’t a case always. We may require real time read/write random access for huge dataset; this is where HBase comes into the picture. HBase is built on top of HDFS and distributed on column-oriented database.

    Here are the main components of HBase:

    • HBase Master: It is responsible for negotiating load balancing across all RegionServers and maintains the state of the cluster. It is not part of the actual data storage or retrieval path.
    • RegionServer: It is deployed on each machine and hosts data and processes I/O requests.

    Zookeeper

    ZooKeeper is a centralized service for maintaining configuration information, naming, providing distributed synchronization and providing group services which are very useful for a variety of distributed systems. HBase is not operational without ZooKeeper.

    Mahout

    Mahout is a scalable machine learning library that implements various different approaches machine learning. At present Mahout contains four main groups of algorithms:

    • Recommendations, also known as collective filtering
    • Classifications, also known as categorization
    • Clustering
    • Frequent itemset mining, also known as parallel frequent pattern mining

    Algorithms in the Mahout library belong to the subset that can be executed in a distributed fashion and have been written to be executable in MapReduce. Mahout is scalable along three dimensions: It scales to reasonably large data sets by leveraging algorithm properties or implementing versions based on Apache Hadoop.

    Sqoop (SQL-to-Hadoop)

    Sqoop is a tool designed for efficiently transferring structured data from SQL Server and SQL Azure to HDFS and then uses it in MapReduce and Hive jobs. One can even use Sqoop to move data from HDFS to SQL Server.

    Apache Spark:

    Apache Spark is a general compute engine that offers fast data analysis on a large scale. Spark is built on HDFS but bypasses MapReduce and instead uses its own data processing framework. Common uses cases for Apache Spark include real-time queries, event stream processing, iterative algorithms, complex operations and machine learning.

    Pig

    Pig is a platform for analyzing and querying huge data sets that consist of a high-level language for expressing data analysis programs, coupled with infrastructure for evaluating these programs. Pig’s built-in operations can make sense of semi-structured data, such as log files, and the language is extensible using Java to add support for custom data types and transformations.

    Pig has three main key properties:

    • Extensibility
    • Optimization opportunities
    • Ease of programming

    The salient property of Pig programs is that their structure is amenable to substantial parallelization, which in turns enables them to handle very large data sets. At the present time, Pig’s infrastructure layer consists of a compiler that produces sequences of MapReduce programs.

    Oozie

    Apache Oozie is a workflow/coordination system to manage Hadoop jobs.

    Flume

    Flume is a framework for harvesting, aggregating and moving huge amounts of log data or text files in and out of Hadoop. Agents are populated throughout ones IT infrastructure inside web servers, application servers and mobile devices. Flume itself has a query processing engine, so it’s easy to transform each new batch of data before it is shuttled to the intended sink.

    Ambari:

    Ambari was created to help manage Hadoop. It offers support for many of the tools in the Hadoop ecosystem including Hive, HBase, Pig, Sqoop and Zookeeper. The tool features a management dashboard that keeps track of cluster health and can help diagnose performance issues.

    Conclusion

    Hadoop is powerful because it is extensible and it is easy to integrate with any component. Its popularity is due in part to its ability to store, analyze and access large amounts of data, quickly and cost effectively across clusters of commodity hardware. Apache Hadoop is not actually a single product but instead a collection of several components. When all these components are merged, it makes the Hadoop very user friendly.

  • Ansible Best Practices : Automation, Provisioning and Configuration Management

    Ansible Best Practices : Automation, Provisioning and Configuration Management

    What is Ansible?

    Ansible is an IT automation engine, and a trouble-free model-driven configuration management and command execution framework. Made for multi-tier deployments, it designs your IT infrastructure by describing how all of your systems are interrelated instead of just managing one system at a time. Written in Python, Ansible does not use any agent. It makes uses the SSH server on the target, and no additional custom security infrastructure is required, making it easy to deploy.

    Ansible comes up with following uses:

    1). Normal configuration management

    • Creates system files through the medium of templates
    • Manages software installation with the help of yum, apt, gem, or the like
    • Manages services or daemons such as start, stop, enable, disable

    2). Orchestration tasks

    • Removing server from load balancers
    • Disabling monitoring or altering
    • Perform deployment of your code by git

    3). Continuous integration

    • Deploy code to QA servers
    • Run tests and promote software to production if tests pass

    How is it different?

    Ansible is a configuration management, deployment and an ad-hoc task execution tool, all in one. It does not require daemons or any other software to start the remote machines’ management. Since it uses the SSH, it easily passes a security audit, and can be used in places resistant to run a root-level daemon with a custom PKI infrastructure.

    The Ansible modules can be written not only in Ruby or Python, but in any language efficient enough of returning JSON or key. In this way, Ansible manages to sidestep the popular Python vs Ruby language war, and is of interest to people who like both or neither of them.

    Ansible Architecture:

    ansiblenew

    Coming with a simple framework, Ansible connects with your nodes and pushes out small program termed as Ansible Modules, which are considered to be the workhorse of the system and are responsible for performing all heavy liftings. These programs are written to be resource models of the anticipated position of the system. Thereafter, Ansible carries out these modules upon the SSH by default and eliminate them when finished.

    Without using servers, daemons and databases, your library related to modules can be inherited in any machine, thus giving the advantage of working with your favorite terminal program, a text editor, and most likely a version control system to keep a track of alteration to your content.


    SSH keys your biggest companion

    Though passwords are supported, the finest method to practice it is by using the SSH keys along with SSH-agent. The root logins are not required; you can login as any user. Ansible ‘authorised-key’ module helps in controlling which machines can access or which hosts. You can also use other available options like Kerberos or identity management systems.

    Management of your inventory in simple text files

    Ansible by default uses an INI file to represent the machines being managed. These files help in placing all of your managed machines in groups of your own choosing. In order to add up new machines, you do not require any additional SSL signing server. So by no means, there will be a problem in deciding about why a particular machine didn’t get linked up due to obscure NTP or DNS issues.

    Ansible can also be plugged into another source of truth, if available in your infrastructure like drawing inventory, group, and sources suchlike EC2, Rackspace, OpenStack, etc,. As soon as the inventory hosts are listed, variables can be assigned to them in simple text files in a subdirectory called ‘group_vars/’ or ‘host_vars/’ or directly in the inventory file or, as already mentioned, you can use the dynamic inventory to pull inventory from the data sources like EC2, Rackspace, and OpenStack.

    Playbooks, a simple and powerful automation language

    Playbooks are Ansible’s configuration, deployment and orchestration language. They can explain a course of action you want the remote system to apply, or a set of steps in a general IT process.

    At a fundamental stage, playbooks can be used to manage configurations and for deployments of the remote machines. At a more advanced level, they can sequence multi-tier rollouts involving rolling updates, and can delegate actions to other hosts, interacting with monitoring servers and load balancers along the way. Most importantly, the language remains readable, transparent and is developed in a basic text language. You don’t need to declare explicit ordering relationships or write code in a programming language. There are ample of ways to organise playbooks and the files they include.

    Widen up Ansible: Modules, Plugins and API

    Ansible modules can be written in any language that can return JSON, such as Ruby, Python, Bash, etc,. The inventory can also plug into any data source by writing a programme that speaks to that data source and returns JSON. There are multiple Python APIs for spreading Ansible’s connection types callbacks — SSH is not the only transport possible — and even for adding new server side behaviours.

    AnsibleWorks (AWX)

    AnsibleWorks, which also sponsors the Ansible community, also produces the AWX. It is a web-based solution to make Ansible simpler, and to provide a trouble-free usage for the IT companies. It is also designed to be complete all kinds of automation tasks.

    AWX permits you to regulate the access and even allows sharing of SSH credentials, without someone being able to transfer those credentials. Inventory can either be graphically managed or synced with a wide variety of cloud sources. It keeps log of all your jobs and integrate them with LDAP. It also has an amazing browsable REST API. If required, the command line tools are also available for easy integration with Jenkins.

    Conclusion

    Ansible’s simplicity and ability to decrease the complexity of other tools has made it a reliable applicant for your environment. Its foremost concern is on security and reliability. It uses OpenSSH for transportation, and the language is designed around auditability by even those who are not familiar with the program. Ansible is suitable enough for managing both small setups with a handful of instances as well as the enterprise environments.

  • Puppet: Best Practices

    Puppet: Best Practices

    This is 4th part of the multi-part series covering Automation, provisioning and Configuration Management. In this article best practices for Puppet shall be covered.

    Puppet, one of the most well-liked configuration management tools, can also turn out to be complicated at times. In this post I’m going to briefly go through a few practices that have emerged as good, recommendable and high-level best practices. I would like to share some of them with the world so that the beginners get an advanced start.

    1). Use Modules when possible:

    Puppet modules are something everyone should use. If you have an application you are managing, add a module for it, so that you can keep the manifests, plugins (if any), source files, and templates altogether.

    2). Keep your Puppet content in Version Control:

    There is NO reason, not to use a version control system while developing puppet manifest/modules. You can pick your favorite systems — popular choices being Git, Mercurial or Bazaar which prove to be particularly useful due to the ease that they provide in managing multiple branches of code.

    Version control is well-supported by the Puppet ecosystem. It is possible to use a mature Software Development Lifecycle to manage the development and maintenance of your Puppet manifests, tightly integrated with a branch-based workflow that truly realizes the ideals of “infrastructure-as-code.”

    Using version control helps in opening up of lot of additional possibilities with puppet, like better tracking of changes, testing your Puppet manifests in an isolated environment, promoting your configuration from environment to environment, etc. Version control even provides a free backup for your configuration code.

    By making a use of a collaboration tool like Github or Bitbucket, you and your team can easily revise each of the changes separately before they are applied. This results in much better, more sustainable Puppet code. Placing all your Puppet files under version control is counted as one of the best Puppet practice and whenever you are ready to “deploy” any kind of changes to your Puppetmaster, you just have to sync the working copy on the server with the code in the version control repository.

    3). Make use of Environments:

    Environments are isolated groups of Puppet agent’s nodes. A Puppet master server can serve each environment with completely different main manifests and module paths. Puppet has this concept of Environment that helps in applying your configuration changes on less critical servers first and after the changes has been tested and ready, then promoting those changes to production. This frees you to use different versions of the same modules for different populations of nodes, which is useful for testing changes to your Puppet code before implementing them on production machines.

    Staging and production are two Puppet environments that are used where Staging environment is used at an initial provisioning of a server to all pre-production boxes and production servers make use of the Production environment. Both environments are tied to a specific branch in Git repository i.e., “master” branch in Git is production and “staging” branch is staging.

    4). Use dry-runs:

    Even with the best precautions taken, sometimes your Puppet manifest doesn’t do exactly what you expected. Things can get messy at times whenever you actually get to run the Puppet agent to apply your configuration updates on your servers. For example, if it would update a config file and restart a production service this could result in unplanned downtime. Also, sometimes manual configuration changes are made on a server which Puppet would overwrite.

    To reduce the risk of problems, you can use Puppet’s agent in “dry run” mode (also called noop mode, for no operation) using the following options:

    puppet agent […] –verbose –noop –test

    By making use of this practice you will be able to see the difference for all files that would modify as well as validate things according to your expectation. It will help Puppet agent to only show what it would do, not what it did.

    5). Managing Puppet modules with librarian-puppet:

    Handling module dependencies can sometimes become a source of worries, especially when several numbers of people are working on Puppet code and each one demand to test it on their own computer. Librarian-puppet is a bundler for your puppet infrastructure that helps in providing sanity to the process by automatically managing your module dependencies.

    Librarian-puppet manages your modules/ directory based on your “Puppetfile”. The tool will install, update or remove modules automatically when you run it, always matching what’s specified in the Puppetfile. Your Puppetfile becomes the authoritative source for what modules you require and at what version, tag or branch.

    Once using Librarian-puppet you should not modify the contents of your modules directory. The individual modules’ repos should be updated, tagged with a new release and the version bumped in your Puppetfile. It will help resolving and installing modules’ dependencies and become aware of compatibility issues.

    Librarian-puppet simplify deployment of your Puppet infrastructure by automatically pulling in modules from the forge and git repositories with a single command thus saving you from installation and managing your modules manually. Deployment normally comes up with following two simple steps:

    • Sync your main sources with your code repository (ex: git pull)
    • Run librarian-puppet to synchronize your installed Puppet modules

    Don’t use Git dependencies with any version specifier

    6). Keep sensitive data safe:

    Today Data security is the key concern for any organization. Some data always needs to be kept safe. For example, for maintaining the data security it may be required to put in your Puppet code in passwords, private keys, SSL certificates and so on.

    Don’t put Puppet code in version control unless you’re absolutely aware of the risks you’re taking while doing so.

    If you’re already a bit familiar with Hiera which is a Puppet tool, you know why it’s a good idea to separate your data from your Puppet manifests. In case you aren’t familiar, though, using Hiera leases you write and use reusable manifests and modules. After you store your organization-specific data in Hiera, Puppet classes can request the data they need from your Hiera data store.

    Hiera allows you to store data about your servers and infrastructure in YAML or JSON files. From usage, you’ll see that most data in Hiera files is not confidential in nature… so should we refrain from using version control for Hiera files just because of a few elements that are unsafe? CERTAINLY NOT!!!!!!!!!!!!

    The trick is to use Hiera’s ability to combine multiple data sources or backend

    or

    What you can do is split Hieradata files into 2 types: YAML files for your “main” Hieradata files and JSON files to store your “secured” data. Those JSON files are not to be put under version control and are stored securely on a single location i.e., “the Puppetmaster”. This way, very few people can actually see the contents of the sensitive files.

    7). Producing abstractions for you high-level classes:

    Wrapping up all the uses of modules into a covering or let’s say into a wrapper classes provides higher-up maintainability of the Puppet code in time. For example, Assume you want to setup a reverse proxy server using an existing Nginx module. Instead of directly assigning the ‘nginx’ class on your nodes and setting all of the required stuff up, create instead a new class called, say, ‘proxy_server’ with the attributes you want to consider for your proxy server as class parameters. Assigning the ‘proxy_server’ class on your node not only better states your intent, but it also creates a nice little abstraction over what you consider as a “proxy server”. Later on, if you decide to go away from Nginx (highly improbable) or use another Nginx module (more probable!), then you’ll probably just need to change the content of your “proxy_server” class, instead of a bunch of tangled node definitions.

    In the End:

    Puppet isn’t the only Configuration management (CM) tool available, but it is the most mature, with a large community of active module developers. Implementing these practices will help you in getting the most out of the Puppet.

  • Automation, Provisioning and Configuration Management with PUPPET

    Automation, Provisioning and Configuration Management with PUPPET

    This is 3rd part of the multi-part series covering Automation, provisioning and Configuration Management. In this follow up article best practices for Puppet shall be covered.

    Why Puppet?

    While every system administrator comes up with more progressive systems to be managed, the automation of every mundane task is increasingly significant.

    Instead of achieving in-house developed scripts, it is necessary to share a system that can be used by everyone, irrespective of one’s employer. But undoubtedly, this is not possible manually.

    So, Puppet has been developed to benefit the sysadmin community in building up and sharing of all mature tools, which prevent the replication of a problem which is being resolved by many.

    Following are the key methods followed by Puppet:

    1). It supports a powerful framework, and is responsible for simplifying most of the technical tasks required to be done by the sysadmin.

    2). The sysadmin’s work is written in form of code, easily sharable as the other pieces of code, in the puppet’s custom language.

    The Puppet usage accelerates your work as a sysadmin, as it supervises and handles all the details. You can download the code from other sysadmins to help you get your work done even faster. Most of the Puppet implementations make use of one or more modules already developed by others. One can find hundreds of modules developed and shared by the community.

    What is Puppet?

    Puppet is an open-source IT automation tool developed by Puppet Labs. Its written in Ruby; composed of a declarative language for expressing system configuration; a client and a server for distributing it; and a library for realizing the configuration. Puppet helps in automation, deployment and scaling of applications in the cloud or on site.

    The basic design objective of Puppet is to come up with a powerful and expressive language backed by an influential library that makes you write your own server automation applications in just a few lines of code. Its intense adaptability and open source license lets you add up the required functionality. And, you can also share your innovations with others.

    System Components:

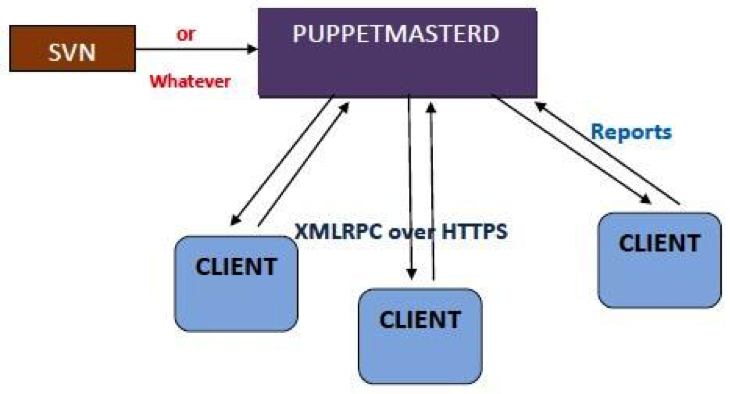
    Puppet in general is used in a client/server formation, with all your clients talking to one or more central servers. Every single client contacts the server at regular intervals i.e. every half hour, by default. It even downloads the latest configuration and makes it sure that it is in sync with the configuration. The moment it’s complete, the client is able to send a report back to the server and can also refer to the changes required.

    Following diagram displays the data flow in a usual puppet operation:

    Puppet1

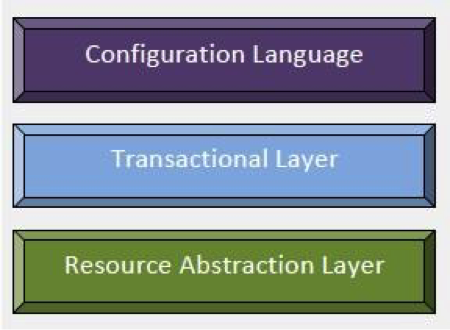
    Puppet’s functionality is framed as a heap of individual layers. Each layer is duty-bound to a fixed aspect of the system with a tight control on how information transfers between these layers.

    puppet2


    Fig2

    How Does Puppet Work?

    The Puppet agent acts as a daemon that runs on all the client servers where configurations are required, and the servers to be managed by Puppet in the future. Now all the clients to be controlled will have puppet agent installed in their systems. This puppet agent also known as a node in Puppet will have a server designated as the Puppet master.

    Puppet Master: This machine restrains the entire configuration for different hosts, and runs as a daemon on this master server.

    Puppet Agent: This is the daemon that will run on the entire server that is to be managed with the help of Puppet. At a specific time interval, the Puppet agent will go and inquire the configuration from the puppet master server.

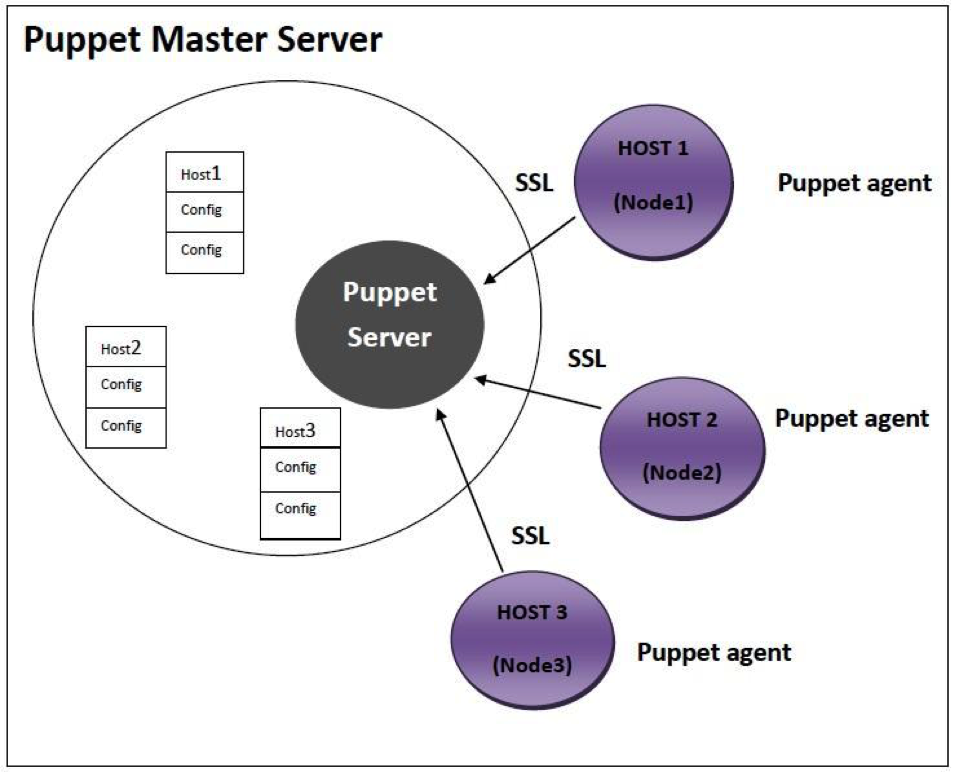
    Now the connection network between the puppet agent and master is built in a secure encrypted channel with the support of SSL. For example, if the Puppet agent has already applied for a necessary configuration and there are no new changes, it will do nothing. By default, the puppet agent will go and fetch the required config data from the puppet master in every 30 minutes.

    From the above diagram it is clear that puppet master server has all the configuration options available for Host 1 or Node1, Host 2 or Node 2 and Host 3 or Node 3.

     puppet3

    Following are the steps that are always followed whenever a puppet agent of any node makes up a connection between a node and a puppet master server to fetch the data.

    Step 1: Every time a client node makes a connection to the master, the master server examines the configuration to be applied to the node.

    Step 2: The Puppet master server takes and assembles all resources and configurations be applied on the node, and brings it together to make a catalog. Now, this puppet is given to the puppet agent of the node.

    Step 3: According to the catalog, the Puppet agent will apply configuration on the node and then reply. It will also submit the report of the configuration applied to the puppet master server.

    Who would find Puppet useful?

    An organization that would like to decrease the cost of maintaining its computers could benefits from using Puppet. Since the return on investment is related to several factors such as the current administrative overhead, diversity among existing computers, and cost of downtime. It might be complex for an organization to determine if it should invest in any configuration management tools, much less Puppet.

    In general, any organization should make use of server automation if any of the following are true:

    1. It comes up with a higher server administration costs
    2. Either because of contracts or opportunity cost, it pays a high price for downtime.
    3. It contains loads of servers that are fundamentally identical or nearly identical.
    4. Flexibility as well as agility is required in server configuration.

    Conclusion:

    Puppet refers to the two different things

    • The language in which code is written
    • The platform that manages infrastructure.

    Puppet is both a simple and a complex system. It is composed of several moving sections wired all together quite loosely. It is a structure that can be used for all configuration problems. Our future success rests on the structure becoming more powerful and simple, for it should be   approachable while gaining capability.

  • Chef  best practices

    Chef best practices

    Chef Best practices 

    This article is the II part covering Chef. Please refer to Automation, Provisioning & Configuration Management (CHEF) for an introduction.

    As a matter of fact, Chef is truly an astounding tool. It keeps the cooking metaphor actively going.

    Following is the list of best practices that I would like to cover in the article:

    • Project creation and “readme driven development”
    • A sane build system with Rake
    • Continuous integration with Travis
    • TDD with Chefspec
    • Workflow with Spork
    • Verification with Minitest

    Getting Started:

    1). First and prime important step is to create a new Project. In this section everything should be source controlled. Here in the example a Github repo has been created for all the codes and for the verification or to see step to step process of the development as well as mistakes, they can be easily viewed from the commit history. Follow all the steps and do same for your project:

    git init
    

    Second objective is to perform a Source Code Management. By running the following command you can make use of git flow to manage your features by selecting all the default settings and if you aren’t using it, then its time you should start working on it.

    git flow init

    Using Readme Driven Development is top best practice that can be started by README.md file. This practice is really important as it helps you to focus your mind and cause you think like a user.

    Here Rake is being used for an already build system. Following is the list of tasks that are to be considered:

    • Rake check: This is responsible for checking all other dependencies.
    • Rake build: The main aim of rake build is to manage and run the test suites.
    • Rake start: It acts as an envelope for vagrant up.

    2). Another best practice is to Set up a Ruby version for the project. This is done by creating two version files: .rvmrc and .rbenv.

    After Ruby files have been created, next step is to create a Gemfile. The main aim of creating this file is to set up all the project dependencies.

    Below is the example with the commands that will help you in creating a Gemfile:

    source "http://rubygems.org"

    ruby ‘1.9.3’

    gem ‘rake’, ‘10.0.4’

    After creation, installation of these dependencies is the essential key step which is possible with below mentioned instruction:

    bundle install

    Creating a new Rakefile is also necessary. It contains a placeholder task per those that have already been defined in our Readme file.

    By making use of Rake for setting up a build system helps in automating some common tasks.

    3). Continuous Integration with Travis is another elite practice.

    But before we proceed further, it’s important to create a link between the repository and the Travis. It is an essential step in the cases where users have already created a repository for the code as part of the series.

    After link is made, you can configure Travis by creating a new Travis file i.e; .travis.yml in the root of the project directory.

    Configuring Travis helps in eliminating development gem dependencies so as to pace things up and tests on the CI server. Furthermore, it also tests the master as well as the development branches.

    Updating your Gemfile is also important in order to ensure that any future development related Gems are correctly excluded. Add this to your Gemfile:

    group :development do

    end

    After Travis is configured, you can update your README.md by adding the Travis notifications to indicate the status of the build.

    4). Another best practice is to perform TDD using Chefspec to “spec” out the cookbook.

    First step is to add chefspec to your Gemfile by updating the file and by all means also do bundle update.

    After updating is done you can Automate Chefspec Cookbook Creation. As per the Chefspec documentation, you are capable of creating a cookbook and on the other hand use another command to create the spec directory.

    According to user or your varying needs you may even wish to create a new_cookbook.

    For example: To build up a new rake task: new_cookbook below are the instructions to be followed

    desc "Creates a new cookbook."
     task :new_cookbook, :name do |t, args|
     sh "bundle exec knife cookbook create #{args.name}"
     sh "bundle exec knife cookbook create_specs #{args.name}"
     end

    As soon as you generate new cookbook you can also create your sample Cookbook

    rake new_cookbook motd

    At this point you have a new blank cookbook and can run the basic tests with rspec cookbooks. You can even add a rake task and upgrade the build tasks for the usage. At last you can add the spec for the motd cookbook in the motd/spec/default_spec.rb file by creating a Failing Spec. By executing the rake, build should be able to show “this now fails”. Thereafter you are required to implement the cookbook.

    Make your Spec Pass and the templates/default/motd.tail.erb file:

    Finally test driven cookbook is made and as Travis file is already referencing the build tasks, when we push this code up, CI will run this test and verify your work.

    5).Working with Spork is another practice in Chef. This tool helps in collaborative cookbook development. It also helps single developer to control and place things in order when it comes to bumping versions.

    So to test this out, initially we will install knife-spork and will do a small edit to your motd cookbook to use its features. First step is to always update your Gemfile by adding the spork gem to the Gemfile. This is not required by the CI server and is put under the development block:

    Following example exemplify the instruction:

    group :development do
     gem "knife-spork", "~> 1.0.17"
     end

    After updating, next step is to configure your Spork by creating a config/spork-config.yml file to put in the default configuration. Though there is a little issue of having lots of configurations in various places and is consolidated over a period of time.

    Configure your Spork using following instructions:

    mkdir config
     touch spork-config.yml

    Running the rake build task shows that our test has failed and can be set right just by updating the template. The moment you complete your updates and the test pass, we should bump the version number of the cookbook by bundle exec knife spork bump motd patch. And finally you will make use of the upload feature so as to upload it to the chef server “freezing” it at the same time.

    Another great feature of spork is the spork promote command that allows you to constrain a specific version of a cookbook to a specific environment. A use case could be:

    • Cookbook 2.0 is being verified on your development environment.
    • Cookbook 1.9 is in production environment.
    • When things looks good can be rolled out to production.

    6). Last but not the least is to set up the mini test suite to verify your cookbooks on a real server. This is done by placing your files in the right place and adding default to your existing cookbook:

    mkdir -p cookbooks/motd/files/default/tests/minitest
     touch cookbooks/motd/files/default/tests/minitest/default_test.rb

    There is also another option available with you in order to avoid the above mentioned action. You can simply modify the new_cookbook rake task to make this part of the cookbook buildout. Last stage comes with deploying the Cookbook and testing it. This helps you in building up a cookbooks that actually works when used on the servers. They also act as a safety net as they run whenever the server is provisioned.

    Conclusion:

    Above mentioned are the best practices of Chef that will help you in building cookbooks in a true, test-driven way. Implementing all these will help in saving you from all key headaches by keeping your custom cookbook changes in new cookbooks and without problems be able to create targeted pull requests to share back with the community.

    I expect you’ll be smart enough to take away some good practices here.

    Happy Chefing!

  • Automation, Provisioning & Configuration Management (CHEF)

    Automation, Provisioning & Configuration Management (CHEF)

    Introduction

    Chef is an influential configuration management and automation platform that transmutes the complex infrastructure and helps you in describing your infrastructure with code, by bringing your servers and services to life. Since your infrastructure is controlled and managed with code, it can be automated, tested and reproduced with efficiency and ease.

    Chef automates the applications configuration, deployment and management throughout your network regardless of its size, even if you’re operating in the cloud, on-premises or on hybrid.

    Chef is constructed around easy concepts: achieving the desired state, centralized modeling of IT infrastructure and resources primitives that serve as the building blocks. Chef’s biggest asset is that it saves the time in setting up virtual servers and other tasks. Through a multi part series I will be covering best practices in Automation, Provisioning & Configuration Management with CHEF.

    Why Chef?

    Being a system administrator is alternately inspiring as well as tedious, on the other hand is the thought to bring the best to your organization goes hand-in-hand with the idea that you require help to keep it all running. It is exceptional that a single individual is familiar about each and every complex problem and its essential solutions. Same goes with the tools also. Chef provides you with a framework which helps in evading these worn-tools problems. It even improves infrastructure management that can help you to solve every complicated problem.

    There are numerous reasons to use Chef:

    1). Chef immensely decreases the amount of documentation you ought to write.

    2). Chef doesn’t change the scalability of the Bash.

    3). Chef comes up with terrific technical approaches.

    4). Chef is a tool that grows with you.

    5). Chef can help you in holding back and stop you from reinventing the wheel.

    What are the fundamental principles?

    The main principle of Chef is to make users know best about their environment, what should be done and how it should be maintained. Chef-client does not come up with any assumptions. Only the individuals i.e. you and your team members on the ground is capable of understanding the technical as well the human problems which includes audit trails, skill levels and other internal issues that are unique to your organization and what are the required solutions to solve these problem plus whether any single technical solution is feasible.

    Main components of Chef

    Chef environment is typically made up of three components:

    1. Chef Server
    2. Workstation
    3. Chef Nodes

    Chef Server:

    The Chef server is the brains of the operation which acts as a hub to store configuration data that is available to every node and also administer access rights. It preserves all the information regarding your infrastructure. All the client nodes are registered within the server.

    The Chef Server stores and holds all the cookbooks, recipes and metadata that illustrates each and every registered node which is being managed by the chef-client and the policies that are applied to nodes. Clients communicates with the server in order to get the correct configuration details from the server such as recipes, templates, file distributions and apply it to the nodes. This type of flexible and scalable approach distributes the configuration effort throughout the organization.

    Workstation:

    Workstation is the development machine from where users run all configuration related tasks which includes creation of cookbooks and recipes, updating chef-repo, interacting with the single Chef server and many more. Workstation is the place where user will spend most of their time with Chef and will do most of their work that includes:

    • Development of the cookbooks and the recipes
    • Retaining the chef-repo synchronization with version source control
    • Making the use of knife to upload items from the chef-repo to the Chef server
    • Configuring organizational policies i.e. defining roles as well as environments and ensuring that critical data is stored in data bags
    • Communicating with the nodes whenever needed, such as carrying out a bootstrap operation

    Chef Nodes:

    A node can be a physical, virtual or cloud machine that contain the chef-client which performs all the infrastructure automation. Nodes are the computers that we manage using chef and it act as server in our infrastructure.

    chef-fig1 Fig:1

    How Chef Works?

    As already mentioned above, Chef converts infrastructure into code and make your infrastructure easily versionable, testable and repeatable as the application code.

    Chef is totally dependent and certain about the reusable definitions named recipes to automate infrastructure tasks. Recipes make use of the building blocks called resources. These resources explain a certain pieces of infrastructure like a file, a template or a package to be installed. You can make use of these resources whenever required or even built up your own so as to manage and accomplish unique configurations and legacy systems. Together, Recipes are fully responsible for describing what your infrastructure comprises of and how each portion of your infrastructure should be deployed, configured and managed.

    The Chef server holds up all the recipes as well as other configuration data. Now the Chef client is installed on all the nodes in your network. As explained before these nodes can be a physical server, a virtual server or a container instance. The Chef client at regular intervals polls the Chef server for the most recent recipes and examines whether the nodes is in compliance with the policy defined by these recipes. If a situation arises where a node is outdated then the Chef client runs them on the node so as to bring it up to date.

    chef-fig2

    Fig 2

    Conclusion:

    Through Chef you will be able to:

    • Manage servers by writing recipes.
    • Integrate tightly with applications, databases and more.
    • Configure applications that require knowledge about your entire infrastructure
    • Create perfect clones of QA environments, pre-production environments, partner preview environments and more.

    Chef is evolving fast and taking your first steps with Chef can be a little bit daunting. Chef comes up with new concepts to learn and best practices to understand. Chef provides you help with the infrastructure management and solves complicated problems.

  • Amazon Simple Notification Service (SNS)

    Amazon Simple Notification Service (SNS)

    Amazon has packed a box full of services and covered nearly every aspect in making cloud a smooth experience for developers to put up exceedingly operational and structurally complex applications on AWS. Large numbers of cloud-based systems feel the dire need of or dependency on sending out emails on a subscription basis to end users. But it is unfortunate that the internet today is brimming with spammers who refuse to stop sending requests and retarded emails from servers with objectionable SPF configuration.

    Taking care of the above mentioned issues, AWS publicized an exceptionally great service known as Simple Notification Service (SNS), designed to the needs of genuine notification delivery.

    What is Amazon Simple Notification Service (SNS)?

    The Amazon Simple Notification Service (SNS) has made it straightforward and trouble-free for you to construct and put together an application in its own way.

    Amazon SNS is a speedy, adaptable, flexible, entirely commanded and managed push messaging service that allows you without any difficulty to set up, operate and send notifications to all your subscribers. It brings in the simple and cost-effective push notification service to Apple, Google, Fire OS, and Windows devices even, including all the Android devices in China with Baidu Cloud Push. It can also be used to push notifications to internet connected with all distributed services and smart devices.

    It is capable of creating topics, subscribe to topics and even publish topics in an exceedingly scalable, flexible and beneficial manner. By means of Amazon SNS, you can direct event driven messages from your applications to your users. In order to bar and avoid any sort of message loss, all the messages broadcasted across the multiple availability zones to Amazon SNS are stored constantly.

    Screen Shot 2015-03-01 at 9.01.07 PM


    Let’s deep dive into the block displayed in the figure:

    1. Topics: These are the access points or named groups of events for each identifying a specific subject, content or event type. Every single topic carries along a Unique Identifier (UI) that helps in identifying the SNS endpoint for publishing and subscribing.
    2. Owners: Owners are those who create topics and have a complete admittance and access to the topic.
    3. Subscribers: These are the clients usually the end-users, servers, applications or other devices that desire to receive notifications on particular topics of their interest.
    4. Publishers: They are responsible for sending messages to topics. Now SNS matches up the topic with the list of subscribers interested in the topic and distributes the message to each one of them.

    Features and Benefits:

    Amazon SNS has come up with sufficiently great benefits over the complications of developing custom messaging resolutions in support of a system that demands to be supervised, managed and maintained on site. Following are some of the key benefits and features of Amazon SNS.

    1. Reliable: Whenever Amazon SNS streams inside Amazon’s verified network infrastructure and data centers, all topics will be available each time applications calls for them. All messages broadcasted to Amazon SNS are stocked redundantly throughout numerous servers and data centers in order to prevent message loss.
    2. Scalable: Amazon SNS is modeled to encounter the demand of most needy and demanding applications which permit event driven limitless amount of messages at any time.
    3. Simple: For the majority number of cases the developer just by using only three API’S, can get started with the Amazon SNS which are: Create Topic, Subscriber and Publish. To provide you with intuitive functionality additional APIs are also made accessible.
    4. Flexible: With Amazon SNS, applications as well as end-users on different devices are able to receive notifications with the help of Mobile Push notification (Apple, Google and Kindle Fire Devices), Email/Email-JSON, HTTP/HTTPS, SMS or Amazon Simple Queue Service (SQS) queues.
    5. Secure: Amazon SNS is a secure service and makes sure that topics and messages are secure from any unauthorized access. All the Topic holders have a full authority of setting policies for each topic to put limit on who can publish or subscribe to a topic and can even make sure of the encryption via marking that the delivery procedure ought to be in HTTPS.
    6. Inexpensive: Pay-as-you-go method helps in saving a lot of money of Amazon SNS customers. There are no beforehand fees or commitments. It only charges you per-request for the messages, notification delivery and transfer fees that are sent through Amazon SNS.

    Amazon Simple Notification Service also supports SMS (Simple Messaging Service)

    Amazon SNS leaves no means of notification untouched and comes with SMS feature to subscribe a phone number via an SNS topic. Notifications can directly be addressed as text messages to cell phones, Smartphone as well as on any other SMS-enabled device. Amazon CloudWatch users who are actually responsible for monitoring and controlling their applications that are running on AWS are capable of receiving the timely updates for actions of interest or alarms as they set. Content delivery is also possible to the mobile device through email to the existing Amazon SNS users. Developers can combine mobile applications in conjunction with Amazon SNS to not only send messages but even take delivery of notifications over SMS.

    Here’s a figure to better explain how Amazon SNS supports SMS

    Screen Shot 2015-03-01 at 9.03.35 PM


    Pricing:

    For Amazon SNS usage you can pay-as-you-go and have no upfront costs. You pay money according to the number of notifications that you are publishing and delivering. You even have to pay if you use additional APIs for managing topics and subscriptions. Price of delivering these notifications varies according to the endpoint type.

    Below are the tables that will provide you with full details:

    Publishers:

    Currently, Amazon SNS only permits maximum limit of 256 KB for published messages. Each 64KB block of published data is billed as 1 request.

    Screen Shot 2015-03-01 at 10.10.28 PM

    Fig: 3

    Notification Deliveries:

    Screen Shot 2015-03-01 at 10.11.38 PM

    Fig: 4

    Data Transfer: Data transfer ‘IN’ is for $0.000 per GB.

    Below is the pricing table for Data transfer ‘OUT’:

    Screen Shot 2015-03-01 at 10.13.05 PM

    Fig: 5

    Conclusion:

    Amazon SNS is designed to use with other Amazon Web Services such as Amazon SQS and EC2. For example, applications which are running in EC2 have the capability of publishing event/information updates to Amazon SNS and transfer them immediately to all other end-users. In addition to this the subscriber can also choose and select Amazon SQS as a delivery protocol that delivers notifications to multiple SQS queues in parallel format keeping in mind the perseverance of messages and a formal assurance that the messages would be delivered. If you are an Amazon SNS user then use must enable this service to your mobile devices and experience its benefits.