Author: Sudhi Seshachala

  • Optimize your spend on AWS through Reserved Instances

    Optimize your spend on AWS through Reserved Instances

    Over the last few years Amazon has gradually raised its compute capacity and provided the user with a set of advanced analytical and structural services. For each service, you can expand precisely for the amount of resources you actually need and shall pay for each resource usage at the end of each month.

    In the spotlight, Amazon EC2 instances which carry along an entire surplus of attributes to help you in deploying, managing and scaling up your applications, Reserved Instances(RI) are another feature making itself really useful in resource management. In this blog we will see what actually are these Reserved Instances also known as RI and why are they named so and how are they cost effective.

    Reserved Instances:

    Reserved Instances are the best money saving technique considering cloud costs. Here’s the catch ” they  require  no methodological optimization effort, no Devops wizardry and no auto scaling structure”.

    RI gives you the power to escalate the roof of your savings by encountering all your business’s call.

    1). Term: 1 or 3 years is time period proposed by AWS for Reserved Instances usage.

    2). Region: Reserved Instances are accessible in all AWS regions. They are also obtainable in Amazon VPC and Dedicated Instances.

    3). Operating System: Platforms for which Reserved Instances can be purchased are Microsoft SQL Server, Amazon EC2 running Linux/UNIX, Microsoft Windows Server, SUSE Linux and Red Hat Enterprise Linux.

    4). Payment Option: There are three payment alternatives provided by RI which are as follows:

    a). Upfront Option: With upfront payment you pay in once for whole RI and you get an extensive discount over On-Demand Instance pricing.

    b). Partial Upfront Option: In this payment option, you are charged a discounted hourly rate as a low upfront payment for the Instance for time span of the RI term.

    c). No Upfront Option: This option provides a discounted hourly rate for the time span of the term and does not require any upfront payment.

    Why Is It called “Reserved”?

    These Instances are named as “Reserved Instances” as they reserve the server capacity. They provide you with a formal assurance that you will be able to launch these RI fully whenever you need them without a popup of insufficient capacity, any time you attempt to start an EC2 instance.

    HOW RESERVED INSTANCES WORK:

    I assume the information above makes you well acquainted with what Reserved Instances are and why they are named so. Now lets consider their functioning.

    To work with your reserved capacity, directly launch an EC2 instance with the same configuration as the reserved capacity that you are capable of purchasing. Instance comprises of varying combinations of platform type, memory, storage, availability zone and instance type. As long as you have an active Reserved Instance, AWS will automatically apply the discounted hourly rate for your EC2 instances. If at any point your purchased Reserved Instance gets expired, then at this situation you will be charged on the basis of On-Demand pricing until and unless you purchase new Reserved Instance of the same capacity.

    All these reservations are applied at the infrastructure level. Once you have a single account, your reservation will be shared amongst the different instances based on run-time. Incase you are a multiple account holder under the same parent account, your reservation gets shared across all accounts.

    There’s also an option available to purchase as well as sell these Reserved Instances through the EC2 Reserved Instance Marketplace thus providing you with the flexibility to sell unused Reserved Instances to any other businesses and organizations.

    Benefits:

    1). Cost Effective: RI equips you with a sufficient discount which is nearly around 75% when compared to On-Demand Instance pricing.

    2). Modifiable: If there arises a situation where you are required to change the zone of your RI then it can be easily done by moving your RI to another available Zone within the same region, by changing its Network Platform as well as instance size of your reservation to another size of the same instance type at no extra cost.

    3). Reliable: To build up your confidence, RI supplies you with a capacity reservation to launch the number of instances you have stockpiled when you need them.

    4). Easy to use: RI usage is similar to that of EC2. While evaluating the bill , system will undoubtedly apply RI rates to reduce your costs.

    5). Marketplace Available:If you want to impose any sudden or planned changes than RI marketplace gives you the opportunity to sell these Reserved Instances.

    Reserved Instance Pricing:

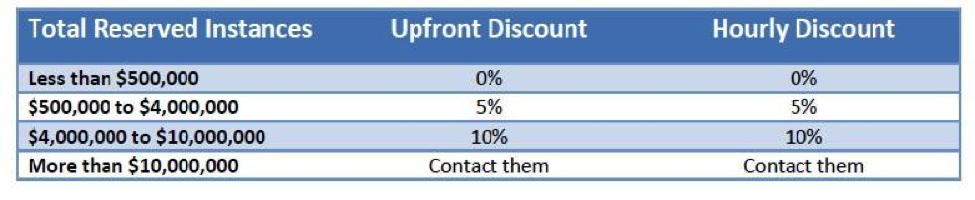
    It’s pretty undoubted that if used with a fair setup, RI helps you to save dollars on AWS in many ways. But if you purchase a massive number of RI in an AWS region, you will automatically be receiving discounts on your upfront fees and hourly fees for future purchase of RI in that AWS region.

    The figure below represents the RI Tiers pricing list:
     

    RI

           Fig: 1

    So far Amazon Web Services has created exceptionally compelling and powerful features with the Reserved Instances. They not only provide cost benefits but even warranty on the capacity. Though, to be flexible it requires cautious guardianship of your cloud substructure and reservation inventory. So go ahead with reserved instances if you’re looking to deploy a wide scope of apps and websites with a long term no hassle approach.

  • Copying Data From One Docker Container to Another

    Copying Data From One Docker Container to Another

    Docker containers can easily be compared to a directory. A Docker container holds everything that is required for an application to run including its dependencies and can be started, stopped, moved and deleted at will. When containers are activated they use Linux kernel namespaces. Each container operates in isolation from the server apart from networking and storage. Each container is created from a Docker image and one can have multiple containers running, depending upon the server hardware capacity. Docker containers are the run component of Docker.

    What are Docker images?

    Each Docker container is created from a Docker image, which can be built either by executing commands manually or automatically through Dockerfiles. Images can be basic either consisting of the operating-system fundamentals or a pre-built stack ready for launch. They are read only templates and consist of series of layers, so any new action or update leads to the addition of new layer on top of the previous one rather than replacing whole image entirely. This is how a new container is made.

    Copying data from one Docker Container to another:

    Copying of data from one container to another is essential and most important feature of Docker containers. Copying data to another container means having a backup that could be used if any kind of disaster occurs out of any situation in real time scenario.

    Using Data Volume Containers:

    Data volume is a directory available to a container but it is located outside of its root file system. Sharing data between the containers allows volume to bypass image layering. Any changes in the data are made directly, containers have dedicated directories in the /var/lib/docker directory and volumes are stored separately in/var/lib/docker/volumes/ by default. –v option of docker run can be used to copy volume data between the two containers.

    How to copy content from one container to another -An Illustration

    In this example we assume that Docker is running two instances of data volume container image mymod/dvc: v1. Following are the commands that are used to start the container

    # docker run –d –name dvc1 mymod/dvc:v1

    # docker run –d –name dvc2 mymod/dvc:v1

    Now to copy data to the host and to even mount the volume from another container, use cp command to copy data

    [root@host ~]# docker run –rm –v /var/tmp:/host:rw  \ –volumes- from dvc1 cp –r/var/www/html/host/dvc1_files

    The container mounts the host directory /var/tmp read-writable as /host, mounts all the volumes, including/var/www/html, that dvc1 exports, and copies the file hierarchy under /var/www/html to /host/dvc1_files, which corresponds to /var/tmp/dvc1_files on the host.

    Now to copy data from dvc1 host to another data volume container we use following command

    [root@host ~]# docker run –rm –v /var/tmp:/host:ro –volumes-from dvc2 \ cp –a –T /host/dvc1_files /var/www/html

    The container mounts the host directory /var/tmp read-only as /host, mounts the volumes exported by dvc2, and copies the file hierarchy under /host/dvc1_files (/var/tmp/dvc1_files on the host) to /var/www/html, which corresponds to a volume that dvc2 exports.

    Another method with which one can copy data is ADD command, a Dockerfile command. Source and destination form the two arguments for ADD command to run successfully. It copies the files or data from the source container into the destination container with its own filesystem.

    Conclusion:-

    Docker will certainly expose nicer ways to grow container service to support wider deployment platforms and the community is surely expected to build service layers around. Development of core capabilities, cross service management and messaging between the containers are the paths set by Docker. We’ve tried to demonstrate via this article that data can be copied and replicated in another Docker container thus can be used in any case of disaster as well as recovery. Docker provides the ability to easily differ containers. It improves debugging, fast sharing of the environment and quick deployment. Docker has an ability to put the containers directly from Dev or QA onto AWS. User can share data through volume containers, mount host directories to containers or even can export data from containers to archive files thus very flexible.

  • AWS Key Management Service

    AWS Key Management Service

    Security of data and applications whether stored on-premises or in the cloud has always been a supreme issue of influence. To date AWS has provided it’s customers with services that help in securing and encrypting the data e.g., Amazon S3, Amazon Elastic Block Store(EBS) which is a server-side encryption service, Amazon Redshift, Amazon RDS for SQL and many more. All these services make use of the “master keys” that are created, stored and managed within the AWS.

    Recently AWS launched a new and even more secure option for Key Management which will help in managing the keys for the applications and services running both in the cloud and on-premises.

    Introduction to AWS Key Management

    AWS Key Management Service is a fully managed service that helps you in providing a uniform, centralized control over your encryption keys. It makes use of the Hardware Security Modules (HSMs) to protect the security of your keys and empowers you to easily encrypt your data across your AWS infrastructure plus within your own applications by providing a highly available key storage facility, management where you can create, rotate, disable, define the usage and perform auditing solution to examine carefully the use of encryption keys used to encrypt your data.

    AWS Key Management service provides:

    1. One click encryption
    2. Full control over your encryption keys
    3. A centralized place to manage keys
    4. Forced-key rotation policies

    AWS KEy Management

    Key Management Service components:

    There are three major components of AWS Key Management Service and they are:-

    1. Create and Manage keys:

    All the encrypted keys of your organization are stored and viewed in a single place thus easy to implement creation, rotation, usage policies and auditing.

    2. Use Keys to encrypt your data:

    AWS Key Management Service works with SDK for simple integration of encryption into your application. It integrates with AWS services like Amazon S3, Amazon EBS and Amazon Redshift.

    3. Audit Key usage:

    It provides all the audit trail information to CloudTrail that helps in meeting the regulatory and compliance requirement by providing logs that examines and verifies who used which keys, on which resource and when.

    Key Benefits:

    AWS Key Management Service provides high accessibility, low latency and a high level of persistence for your keys. Following are some benefits provided by AWS Key Management Service:

    1. Centralized Key Management

    It provides you with a uniform, centralized control over your encryption keys. You can easily create, rotate, disable, define the usage and enable logging either from AWS Management Console or by using API. The entire keys that are being used in the organization KMS provides a single view of them.

    2. Integrated with AWS services

    AWS Key Management Service (KMS) is unified with Amazon S3, Amazon EBS and Amazon Redshift so to simplify encryption of your data within those services. With these integration encryption and decryption are done automatically. You just have to choose the KMS master key with which you want to do the encryption or decryption.

    3. Encryption for all your applications

    AWS Key Management Service integrates with the SDK and the Command Line Interface. It provides a programmatic integration of your encryption and key management into your applications. Regardless of the storage of the data, KMS makes it easy to organize the encryption key used to encrypt data.

    4. Built-in Auditing

    AWS Key Management Service operates with AWS CloudTrail that supply you with logs of API calls made by or made to KMS which even helps developers in auditing. These logs helps you in examining and verifying who used which keys, on which resource and when.

    5. Fully Managed

    Accessibility, physical security and hardware maintenance of the infrastructure is managed by the AWS. Whereas AWS key management prime attention is on the encryption needs of your applications.

    6. Low-cost

    You just have to pay for the supplementary master key that you have created and for your key usage. Storage of the default keys in your account is charge free.

    7. Secure

    AWS Key Management provides you a secure location so that no one access to your master keys. It makes use of the hardened systems where your unencrypted keys are only used in the memory. Any update on the service is managed by a multi-level approval process that is examined, verified and evaluated by an independent group within Amazon.

    AWS Key Management Use with the example:

    In this example and usage we will

    1. Create a key in AWS KMS
    2. Use this key to encrypt a file in S3 bucket
    3. Modify access permission of this key
    4. Audit all activity related to this key

    Example:
    Here three IAM users are called which are named as

    1. Admin1- An Administration
    2. User1- A user of Financial Report
    3. User2- A compliance officer

    Creating Keys Using AWS Key Management Service

    Sign in to an AWS management console and click on IAM.
    On the IAM dashboard you will see the encryption key at the bottom of the detail section

    clicking on this option you will reach to AWS KMS console.
    AWS KMS keys are region specific and can only be used in the region they are created. For this example we click on US West (Oregon).

    Next click on create key to start the three step process of creating a master key

    1. First step is to give a name to a master key called Allias. Allias is display name of the master key and is required field. Here we define

    Allias name – “Financial_Report”

    Description key option is also displayed with the name option. This key is used to give a meaningful description and what master key will be protecting. We define it as

    Description key -Protected_Corporate_Financial_Data

    We Click on Next Step.

    2. Here in this step we define Key Administrators for the Financial_Reports master key we are creating.

    After you click on next step a screen appears where you can define which IAM users are allowed to administer the new key by choosing one or more IAM users and/or roles. Users added here can edit, enable, disable and rotate the master key. They can also encrypt and decrypt data with the help of this master key. From this screen we select Admin1 and make him/her enable and click on next step option.

    3. In this step we decide which users, roles and other AWS accounts are allowed to use the key to encrypt and decrypt data. Users, roles we select can use the Financial_Report key within their applications or within AWS KMS.

    Here we select the option of User1.
    If you want to allow another AWS account to be able to use this key then you can enter the account or Amazon resource name in the external accounts option.

    To complete key creation process we click on Finish button. Once this master key is created we will use this Financial_Report key to protect the file that we have uploaded to Amazon S3.

    Using Key with Amazon S3

    1. Now once we are in Amazon S3 console our foremost step is to create a bucket and upload a Financial_Report document in the bucket and encrypt this document using Financial_Report key that you have created.

    We will click on create bucket to get started and enter

    Name – Finance.Reports.US.2014

    Region – Oregon

    Make sure that region you select should match the region you have created for master key. Now click on create bucket option.

    2. Once bucket is created we have to upload this document. To do so we click on Action button and then click on upload.

    Click on set details button to select the encryption option we want for this file. Two options will appear on the screen out of which first is default key option so we choose second key option.

    When we choose second option a drop down list appears which will ask for your master key name. Once you write your master key name Financial_Report, all the other details like description, account, key ID will automatically get filled. After filling and checking all details click on Start Upload Button.

    Modify and Audit all activity related to this key

    Now let’s assume that compliance officer who is User2 also needs to use encrypted file to Audit and he needs access to the Financial_Report key to decrypt the file in that bucket. We can grant bucket access to him by using Amazon S3 console. This can be done by making few simple changes.

    For this first go back to AWS KMS console. When screen appears click on Financial_Report key on this page under the key usage section click on ADD button and a list of users and roles appears click on User2 and then click on attach.

    User2 will now have access to encrypt and decrypt files using the Financial_Report master key. When User2 no longer want access of the key you can come back to the same page and click on User2 and click on Remove.

    AWS KMS master key can be disabled and enabled according to your own need. All the data that is protected with that key becomes inaccessible as long as the key is disabled thus removing your charge from the key. To do this we first go to the encryption page and select Financial_Reports option and then go to Key Action option and select disable and same way you can make it enable.

  • AWS Best Practices – Enterprise Perspective

    AWS Best Practices – Enterprise Perspective

    Amazon AWS has changed the IaaS game for startups and growth companies. There are several practices we must acknowledge the importance of during the adoption and implementation of AWS services. Readers are more than welcome to comment, suggest modifications and even add their own little practices they follow during roll outs and implementations. As clients start piloting cloud initiatives it is best to avoid common pitfalls. The below best practices are a good first step in that effort. Below we have compiled a top ten list to be expanded in the future of best practices we have learned during our aws deployments. We look forward to expanding this list in the future.

    1.   Choose your VPC infrastructure carefully

    a. As you move into the AWS environment often the first thing firms want to do is create a VPC, the question is what type of architecture is appropriate for you?  The answer to this question is driven by the intended use case.  Often internet based organizations will opt to go with a VPC containing Public and Private Subnets. Opting for this type of VPC ensures the services that don’t require direct access to the internet are in a segregated subnet while locating public services access to the public subnet.

    b.   Existing enterprise firms intending to burst into the cloud often don’t intend to utilize public facing services and may opt instead for private only subnet and create a secure tunnel between their enterprise and the public cloud.

    c.   The architecture with the greatest flexibility tends to be a public/private subnet ensuring the public subnet is available if necessary and can remain unpopulated if not needed.

    2.   CIDR Block Selection is driven by two realities: VPC address space is fixed and can’t be changed after it is created.

    a.Ensure your VPC address space doesn’t overlap with your corporate space, for internet based firms this is less of an issue, however for enterprise firms this can prevent the need to rebuild the environment after a significant investment in time and resources

    b. While AWS allows CIDR blocks to be as large as /16 don’t waste space, having several very large subnets reduces one flexibility as needs arise to support multi-AZ services, or other eventual requirements.  On the other hand don’t overly constrain your environment.

    3.   Environment Isolation is an important consideration, the same isolation that’s present in the physical environment should be present in the cloud environment.  The cloud give firms more flexibility in implementation of this isolation, in an effort to control cost, development, integration/test and production environments can be registered under separate accounts ensuring accurate billing and cost controls.

    4.   Security: Use security groups to isolate services and management rules

    a. Separate public traffic from private using subnets

    b. Create a SSH gateway as an entry point for SSH communication

    c. Create a VPN tunnel for management access

    5.   VPC/Enterprise Integration

    When integrating AWS into an existing enterprise environment planning will ensure minimal rework.  Often the key consideration is assigning IP ranges to AWS that do not overlap with the corporate space.  In this way routing between the corporate LAN and AWS will be seamless.

    6. IAM: The primary AWS account should be treated like the traditional root user in Linux systems.

    a. Create a separate account specifically for administration, with the minimum permissions necessary to perform the task at hand.

    b. Create separate accounts for each user, or service to ensure audit traceablity

    c. Permissions should be assigned to groups and users to the group, this will minimize duplication of effort

    d. All users should utilize strong passwords, in this case refer to your corporate password policy.  Cloud passwords should be as secure as the corporate infrastructure.

    e. Don’t share credentials this will wreck audit traceability, and corporate policy, use roles to assign permissions.

    f.  Rotate credentials on a regular basis, the same way corporate credentials are rotated.

    7.   Disaster Recovery :Remember Disaster Recovery is designed to get backup after a failure.  Traditional enterprise environments are often limited by the question do we need to building a duplicate system for recovery or can we through vendor SLAs perform a data recovery.  In terms of the cloud enterprise customers are able to (at a lower cost) duplicate their environments across availability zones, regions and vendors to create an exceptionally resilient service offering.

    a. Do create multiple availability zones.

    b. Do use an automated CM tool to maintain your configurations

    c. Do create snapshot of your volumes.

    d. Do run drills to ensure everything operates as it was architected.

    e. Do run drill more than once.

    f. Do ensure everyone relevant is aware of the procedure

    g. Do architect you environment with sufficient redundancy, to minimize the need recovery efforts.

    8.   Security Groups: Security Groups like traditional firewalls should be set with the least permission necessary to accomplish the mission.

    a. Decide on a security group methodology; by creating groups to manage access to services ie allow access to ports 80 and 443 for nodes that will be a web server.

    b. Create a ssh gateway/ Bastion node and group:

    i. Only allow external SSH access to the SSH Gateway

    ii.Only allow local SSH access from within a security group, or from the gateway node, this minimized an attackers ability to traverse the networks between zones.

    c. Define an enterprise naming convention and stick to it.

    d.Utilize the ability to assign multiple security groups to a single asset (up to 5 groups per asset).

    9.   Naming Conventions: AWS assets should be named in such a way they can be readily identified, a suggested standardization around the purpose of the Instance, its environment, its region, and its sequence number.  An example of this might be haddop_dn_prod_usw1_001, this represents a production Hadoop data node, in the US-West 1 region.

    a. When naming an AMI its a good practice to include the creation date as part of its name, and a complete description. This will minimize confusion when selecting ami for new instances.

    b. When naming security groups and key pairs, continue to use the convention purpose, environment, region, function.  For example db_prod_usw1_key or ws_prod_usw1_sg

    10. Elastic Load Balancing: Use multiple availability zones to balance traffic in the event of an environment failure (this can still happen within the cloud)

    a. Use Route53 to balance traffic between regions, this is not supported by ELB

    b. Use ELBs for more than just web traffic, most any protocol can be supported by the ELB, ensure your service can support it

    c. ELB timeout after 40 seconds, ensure your application touches the socket before then to prevent the session from timing out.

    These are my top 10.  Let me know what you think I missed.

  • Docker vs VMs

    Docker vs VMs

    All applications have their own dependencies, which include both software and hardware resources. Docker containers bring numerous unknown tags to the chart as compared to existing technologies in use. In terms of technology, it’s quite interesting in scenarios where it helps in promoting cloud portability by running the same applications in different virtual environments. Docker is an open platform for developers, it’s a mechanism that helps in isolating the dependencies per each application by packing them into containers. Containers are scalable and safer to use and deploy as compared to previous approaches.

    Virtual machines are used extensively in cloud computing. Isolation and resource control have continually been achieved through the use of virtual machines. Virtual machine loads a full OS with its own memory management and enable applications to be more efficient and secure while ensuring their high availability.

    How are Docker Containers different from a Virtual Machine?

    Virtual machines have a full OS with its own memory management installed with the associated overhead of virtual device drivers. In a virtual machine, valuable resources are emulated for the guest OS and hypervisor, which makes it possible to run many instances of one or more operating systems in parallel on a single machine (or host). Every guest OS runs as an individual entity from the host system.

    On the other hand Docker containers are executed with the Docker engine rather than the hypervisor. Containers are therefore smaller than Virtual Machines and enable faster start up with better performance, less isolation and greater compatibility possible due to sharing of the host’s kernel.

    Docker Containers versus Virtual Machines:

    When it comes to comparing the two, it could be said that Docker Containers have much more potential than Virtual Machines. It’s evident as Docker Containers are able to share a single kernel and share application libraries. Containers present a lower system overhead than Virtual Machines and performance of the application inside a container is generally same or better as compared to the same application running within a Virtual Machine.

    There is one key metric where Docker Containers are weaker than Virtual Machines, and that’s “Isolation”. Intel’s VT-d and VT- x technologies have provided Virtual Machines with ring-1 hardware isolation of which, it takes full advantage. It helps Virtual Machines from breaking down and interfering with each other. Docker Containers yet don’t have any hardware isolation, thus making them receptive to exploits.

    As compared to virtual machines, containers can be faster and less resource heavy as long as the user is willing to stick to a single platform to provide the shared OS. A virtual machine could take up several minutes to create and launch whereas a container can be created and launched just in a few seconds. Applications contained in containers offer superior performance, compared to running the application within a virtual machine.

    There is an estimation being done by Docker that application running in a container can go twice as fast as one in a virtual machine. Also, a single server can pack more than one containers as OS is not duplicated for each application.

    Virtual Machines and Containers: better together

    You can sometimes use a hybrid approach which uses both VM and Docker. There are also workloads which are best suited for physical hardware. If both are placed in a hybrid approach, it might lead to a better and efficient scenario. With this Hybrid setup, users can benefit from the advantages if they have workloads that fit the model. 

    Following are a few of them, that explain how they work together as a Hybrid:

    1). Docker Containers and Virtual Machines by themselves are not sufficient to operate an application in production. So one should be considering how are the Docker Containers going to run in an enterprise data center.

    2). Application probability and enabling the accordant provisioning of the application across infrastructure is provided by containers. But other operational requirements such as security, performance and capacity management and various management tool integrations are still a challenge in front of Docker Containers, thus leaving everyone in a big puzzle.

    3). Security isolation can be equally achieved by both Docker Containers and Virtual Machines.

    4). Docker Containers can run inside Virtual Machines though they are positioned as two separate technologies and provide them with pros like proven isolation, security properties, mobility, dynamic virtual networking, software-defined storage and massive ecosystem.

    Apples to apples comparison: On a physical host with a certain configuration and Virtual Machines with the same configuration running an identical running same number of docker Containers with the same performance on both?

    Who wins amongst the two?

    Answer to this question so far cannot be ascertained but depending upon their configurations and constraints one could say that containers are overcoming virtual machines. Application design is the one standpoint suggesting which one of the two should be chosen. If application is designed to provide scalability and high availability then containers are the best choice else application can be placed in a virtual machine, though Docker containers have surely challenged  virtualization market with containers. Well, keeping the debate aside, it is easy to say that containers in Virtual Machines are twice as robust as one without the other.

    Conclusion:-

    Docker Containers are transforming the DevOps (developer operations) landscape as an important tool in DevOps arsenal. The use cases for Docker Containers within the realm of DevOps are plenty. Running apps over Docker Containers and then deploying anywhere (Cloud or on-premise or any flavor of linux) is a reality now.

    Working in heterogeneous environment, Virtual Machines provide high flexibility whereas Docker containers’ prime focus is on applications and their dependencies. The prime goal of the article is to compare the both on the basis of performance. Docker Containers promise to port application stacks across cloud easily by using each cloud’s Virtual Machine environment to deal with the cloud. This represents a useful capability that has to be implemented in a more complex and tedious way today without Docker Containers. Its not about abandoning Virtual Machines but to advocate in favor and design for the use of Docker Containers in addition to Virtual Machines when necessary. We don’t think Docker Containers could completely wipe out Virtual Machines.