Tag: JSON

  • Best of 2021 – How to Revoke JSON Web Tokens (JWTs)

    Best of 2021 – How to Revoke JSON Web Tokens (JWTs)

    As we close out 2021, we at devopsy.kinsta.cloud wanted to highlight the most popular articles of the year. Following is the seventeenth in our series of the Best of 2021.

    One of the most common questions about JSON Web Tokens (JWTs): Once they’re issued, how can they be revoked?

    What Are JWTs?

    JSON Web Tokens are portable, industry-standard identity tokens. They are issued after a login request by a central identity server and used to identify and credential a user and grant access to resources. They can be presented by clients such as browsers and external programs. Applications and APIs can examine them to ensure the caller is properly authenticated and authorized.

    The Challenges Involved

    One of the most common questions is how to revoke them. The problem is that once they are issued, no further communication is needed with the identity server. That’s one major benefit of JWTs decentralization.

    Let’s say you use RSA public/private key signing for secure data transmission. After the IdP signs a JWT using the private key, any service that has the public key can verify the integrity of the token.

    Let’s use the Todo-Backend API as an example. The architecture might look something like this:

    Todo API

    Now, Todo-Backend can use JWT and the public key to verify the user’s ID and other attributes, and then use that ID to perform operations on that user’s data. Once the JWT has been issued, Todo-Backend doesn’t communicate with the identity provider at all. As a result, if an administrator has locked or deleted that user’s account in the identity provider, Todo-Backend won’t know about it.

    Managing Revocations Using a Distributed Event System

    The most common way to revoke access to resources protected by a JWT involves setting its duration to a short period of time and revoking the refresh token so that the user can’t generate a new token. This does not revoke the JWT per se; it does solve the root issue, which is to limit access.

    In other words, you can set the JWT’s expiration duration to a short period (e.g., anywhere from a few seconds to, say, ten minutes) and set the refresh token’s expiration duration to a longer period (e.g., a two-week or two-month window).

    During the normal flow, the Todo API would accept the JWT until it expires, at which time access would be denied. At that time the client could present the refresh token to the identity provider, which would send a new JWT to the client. That new JWT would be valid for another ten minutes.

    An administrator can, at the identity provider, revoke the refresh token at any time. Any subsequent request for a new JWT by a client holding that refresh token would fail and access to the Todo API would be lost.

    However, while ten minutes isn’t long, this timeframe still comes with risks.

    One strategic way to handle this challenge is to set up a distributed event system that notifies services when refresh tokens have been revoked. Upon receiving this event broadcast, backends/services would update a local cache that lists users with revoked refresh tokens. After a JWT is verified, this cache would then be checked to determine whether or not access should be revoked.

    This distributed event method truly revokes the JWT, rather than simply waiting for it to expire, as mentioned above.

    An Example of Revoking JWTs

    Here’s a sample solution that provides support for events and webhooks that can be used to implement this revocation strategy. In this example, when a user logs out or has their refresh token otherwise revoked, a jwt.refresh-token.revoke event is emitted. This includes the user ID and the application for which the revocation occurred. It also includes the JWT lifespan for this application (in the below case, 600 seconds). Any JWT for this user that was issued before 600 seconds from the point in time when this event was received is thus revoked.

    For example:

    • User logs in, and JWT ‘abc’ is issued at 1:11pm. JWT is good until 1:21
    • User logs out at 1:15. Entry is added stating that any JWT for this application and user expiring before 1:25 is revoked.
    • Application tries to use JWT ‘abc’ at 1:16. Todo-Backend does not deliver data because this JWT is on the denylist.
    • User logs in, and a new JWT ‘def’ is issued at 1:18. JWT is good until 1:28.
    • Application tries to use JWT ‘def’ at 1:19. Todo-Backend delivers data because this JWT is good until 1:28 and is therefore not on the denylist.

    JWT Revoke

    What you need to do is write a simple webhook that will receive this event and inform JWTManager that the refresh token for applicationId for this user has been revoked.

    JWT webhook

    JWTManager maintains a list of user IDs whose JWTs are revoked. You could also use JWT IDs (the `jti` claim), which, in some cases, might be simpler. JWTManager also launches a thread to clean up the cache to remove expired users and avoid running out of memory.

    Is valid

    For each API call, in addition to all the other checks that should be performed against a JWT (verifying the signature, expiration, issuer and so on), the backend needs to check validity with JWTManager.

    configure webhook

    As a final step, configure the webhook:

    JWT webhook

    The Revocation Process, Simplified

    Using the process described above, you can revoke a user’s refresh token and broadcast the event using a webhook. The webhook receivers then update JWTManager, which will render JWTs for that user unusable.

    The good news is that you can use a webhook and event system to build this feature into your application quickly. You can also write JWTManager implementations into Java, Node and other client libraries for future use. Other languages, such as Ruby, have denylist implementations already written.

    Ultimately, all that’s required are the use of refresh tokens, an API that enables revocation of refresh tokens and a system for distributing the revocation event. This solution should work well with most systems, even large systems with numerous backends.

  • Cloud Orchestration Language Roundup: A Comparison

    Cloud Orchestration Language Roundup: A Comparison

    What cloud providers do you work with? Google Cloud Platform (GCP)? Amazon AWS? Microsoft Azure? Which services? Are you using a managed Kubernetes such as GKE, AKS, Openshift or EKS? How do you manage your cloud resources? How do you manage the release cycle of the infrastructure and applications that you deploy?

    If the above questions are the basic introduction to describe your work, then you are probably also familiar with the console, API or both of a major cloud provider. You probably know how to use a configuration management tool such as Ansible or Chef, Terraform or CloudFormation, or some other similar tool. Additionally, you are familiar with the languages of one of these tools. You probably have opinions on those languages, which inform your attraction to the tools you choose.

    Kubernetes and Ansible use YAML. CloudFormation and Azure ARM can be JSON or YAML. Chef and Terraform have their own languages. (To be precise, Terraform can also be expressed in JSON.)

    cloudify orchestration language comparison
    A comparison of cloud orchestration languages

    Whenever you start learning a new tool, it is helpful to already know the tool’s language. The strength of using a standard language is that new users will feel more at home learning to use a language if they already understand the basics of its syntax. In the same way that many English speakers will relate to cognates in French, German or Latin than in Greek or Sanskrit without using transliteration, developers that know YAML will find it easier to learn Ansible than a tool that relies on XML. However, just because you know the language doesn’t mean you know the DSL. A DSL might use a language in a novel or even strange way that contradicts what you believe is proper.

    A number of variables may come into play when a user develops an opinion of a tool. The most important is, “How simple is it for me to create something that does what I want and minimizes frustration later on?” The next often are, “Which I venture is dependent on the first, are apparent scientific and analytical reflections? Does it lend itself to convoluted data structures? Do efforts to remain readable flounder because of inefficient use of space or punctuation?”

    Some projects, such as HashiCorp’s (Terraform), abandon a standard language to avoid such issues and instead create their own languages. The main drawback here is that it is more difficult to integrate the tool with existing projects and software libraries (although, providing for input and output in standard languages such as JSON can alleviate such problems).

    Cloudify has a DSL, which is based on YAML. Cloudify uses YAML, because it is easier to read than JSON, but powerful enough to define new types when necessary.

    Whether using a general language such as YAML or a proprietary one, certain designations are necessary: the type of resource, the name of the resource and often even whether the line refers to a resource, a parameter or a dependency.

    To illustrate the differences between the languages, and associated products that have been mentioned, let’s take a look at a few examples. Let’s use a relatively simple example, an AWS VPC, named “myVPC.” This is a simple resource to define in any language because it has relatively few parameters and no dependencies aside from an AWS account.

    Terraform:


      resource “aws_vpc” “myVPC” {

        cidr_block       = “10.0.0.0/16”

        instance_tenancy = “dedicated”

        tags = {

          foo = “bar”

        }

      }


    Terraform, or HCL, is notable for two reasons. First, the HCL “block” syntax recalls method definition syntax in a number of familiar programming languages. This is a nod to how Terraform, among all of these tools, relates to packaging infrastructure definition as code. Second, Terraform is the most concise. It only takes seven lines.

    Also, Terraform syntax infers significance from string position through the use of identifiers, such as “resource,” “aws_vpc” and “main.” HCL knows that block type comes first, followed by type and then name. For readability, this may be an ideal and certainly elegant method for defining components. Inside of the block definition is the API payload accepted by AWS EC2 Service for the creation of a VPC.

    One drawback of HCL is the punctuation requirements. Braces are required to enclose blocks as well as dictionaries. Arrays require square brackets.

    Let’s compare HCL/Terraform to CloudFormation:


      myVPC:

        Type: AWS::EC2::VPC

        Properties:

          CidrBlock: 10.0.0.0/16

          InstanceTenancy: dedicated

          Tags:

           – Key: foo

             Value: bar


    CloudFormation utilitizes YAML as well as JSON. These are data serialization languages. So, we are looking at our resource definition, less as code and more as information. This results in greater verbosity and decreased readability. Less concise, CloudFormation is eight lines.

    Whereas HCL uses “blocks” for resources. CloudFormation templates just call them “resources.” Instead of positional arguments, we have keys and values. “Type” defines the type. Properties introduce the resource API payload accepted by AWS EC2 service. However, YAML reduces the need for punctuation. Dictionaries are introduced by indentation and lists with hyphens. This can result in improved readability, and if someone really likes to use braces and brackets, no one is forcing them not to. However, it increases the number of lines and characters needed, because even abstract sections of the DSL require keys for introduction. This is because YAML accepts JSON.

    Ansible also has a module for creating a VPC in AWS.


      – name: create VPC.

        ec2_vpc_net:

          name: myVPC

          cidr_block: 10.10.0.0/16

          region: us-east-1

          tags:

            foo: bar

          tenancy: dedicated


    Ansible also uses YAML; however, there is no separation between API payload and other parameters. For example, authentication parameters are on the same level as payload parameters. Ansible uses modules for infrastructure management the way it uses modules for managing applications, which, while novel, is implemented in a clunky and relatively useless way. For example, you need a playbook for creation and a playbook for deletion.

    Cloudify:


      myVPC:

        type: cloudify.nodes.aws.ec2.Vpc

        properties:

          resource_config:

            CidrBlock: 10.10.0.0/16

            InstanceTenancy: dedicated

            Tags:

              – Key: foo

              – Value: bar


    Cloudify also uses YAML. It also works with key-value pairs. Cloudify is even more verbose than CloudFormation.

    A node template can be a resource or a group of resources. In Cloudify, there are three types of properties. The resource_config, which contains the API Payload; the client_config, which contains the API Authentication; and orchestration properties,which are additional properties that enable you to describe how Cloudify will interact with the resource. For example, all resources have the use_external_resource, which means that Cloudify can use resources that Cloudify did not create.

    Whereas Terraform/HCL uses “resource blocks” and CloudFormation uses “resources,” Cloudify uses “node templates.” Node templates can be a VPC or other cloud resource, or even a CloudFormation Template or a Terraform template.

    Azure also sports an orchestrator, Azure ARM, and has its own DSL to describe Azure resources. This is how a virtual network is defined in Azure ARM:


      type: Microsoft.Network/virtualNetworks

      apiVersion: ‘2019-11-01’

      name: myVPC

      location: “[parameters(‘location’)]”

      properties:

        addressSpace:

          addressPrefixes:

          – 10.0.0.0/24

        subnets:

        – name: “[parameters(‘subnet_name’)]”

          properties:

            addressPrefix: 10.0.0.0/24


    One notable difference in Azure ARM is that the resource entry in the YAML does not have a key name with the definition being the value of the name key; instead, the entire dictionary is a list item. This is perhaps more concise, but it may forfeit a modest amount of readability. Also, Azure is similar to Cloudify in that the resource definition “properties” is not on the same level as other more general details, such as “apiVersion” or “location.”

    The syntax for accessing a parameter is also a tad obtuse. Accessing a key in a dictionary via square brackets and parentheses is probably one of the most unreadable methods in the DSLs we are looking at.

    Like Cloud Formation, ARM can be written in JSON or YAML.

    Terraform can define the same Azure resource using fewer lines.


      resource “myVPC” “example” {

        name                = “virtualNetwork1”

        location            = azurerm_resource_group.example.location

        resource_group_name = azurerm_resource_group.example.name

        address_space       = [“10.0.0.0/16”]

        subnet {

          name           = “subnet1”

          address_prefix = “10.0.1.0/24”

        }

      }


    Cloudify will define the same resource in 14 lines. However, this could be shortened using default values.


      network:

        type: cloudify.azure.nodes.network.VirtualNetwork

        properties:

          resource_group_name: { get_input: resource_group_name }

          name: { get_input: network_name }

          location: { get_input: location }

          resource_config:

            addressSpace:

              addressPrefixes:

                – 10.10.0.0/16

            subnets:

              – name: subnet1

                address_prefix: 10.0.1.0/24


    Azure and Amazon expose ARM and CloudFormation as API objects respectively. This enables orchestrators to manage those resource stacks as single resources.

    You can define an ARM deployment in Terraform like this:


      resource “azurerm_template_deployment” “deployment” {

        name                = “myArmDeployment”

        resource_group_name = azurerm_resource_group.example.name

        template_body = file(“${path.module}/environment.json”)

      }


    The type requires deployment name, resource group name and template body. The latter can be supplied inline or using Terraform’s file function.

    Ansible can also define ARM templates:


      – name: Create Azure Deploy

        azure_rm_deployment:

          resource_group: myResourceGroup

          name: myDeployment

          template_link: ‘https://…/azuredeploy.json’

          parameters_link: ‘https://…/azuredeploy.parameters.json’


    Cloudify can also orchestrate ARM deployments. Here is a simple infrastructure stack in ARM using Cloudify:


      deployment:

        type: cloudify.azure.Deployment

        properties:

          location: { get_input: location }

          name: { get_input: resource_group_name }

          template_file: ‘resources/arm/environment.json’


    Cloudify can also accept a file or inline JSON (or YAML).

    Having defined the source code for our infrastructure components, we can now connect other resources and processes to this infrastructure dependency. We can use the Terraform template to a CICD workflow or a networking application.

    Using the same approach, Cloudify can also call Terraform stacks:


      infrastructure:

        type: cloudify.nodes.terraform.Module

        properties:

          resource_config:

            source: resources/terraform/template.zip

            variables:

              access_key: { get_secret: aws_access_key_id }

              secret_key: { get_secret: aws_secret_access_key }

              aws_region: { get_input: aws_region_name }

              aws_zone: { get_input: aws_zone_name }

              admin_user: { get_input: agent_user }

              admin_key_public: { get_input: public_key }


    Cloudify also utilizes other Cloudify deployment stacks as service components:


      infrastructure:

        type: cloudify.nodes.Component

        properties:

          resource_config:

            blueprint:

              id: my_deployment

              blueprint_archive: { get_input: infra_archive }

              main_file_name: infra.yaml

            deployment:

              id: my_deployment


    To summarize, there are many DSLs for orchestrating cloud resources. Each has its own focus: Terraform on simplicity and repeatability, CloudFormation on Amazon, ARM on Azure, Ansible on setting up applications and Cloudify on enabling users to automate any task, including automating Cloudify. We call this “orchestrating the orchestrator.”

  • Jobs-as-Code: The Business Processing DevOps Forgot

    Jobs-as-Code: The Business Processing DevOps Forgot

    Developing web and mobile apps is cool. But in the words of a longtime ballad: “Don’t forget who’s taking you home and in whose arms you’re gonna be …” It’s the back-end services that underpin a lot of those cool apps and make them possible. So yes, servers and relational databases and enterprise applications and sometimes even mainframes are definitely a thing. And in those environments, scripting, batch processing, application integration and operational visibility are a very big thing that, more often than not, is managed by workflow and job scheduling tools.

    I argue that the “something—application, code, other” elements used to deliver all those capabilities are logically part of the application and should be treated as such. The fact that “process X” needs to start only after certain data has arrived, been cleansed and inserted into some database is just as much a part of the application as calculating an invoice amount or determining that inventory needs to be replenished.

    And if you are still reading, then I submit that you need jobs-as-code.

    Simply stated, jobs-as-code means that the jobs—automation rules for business applications—you need to manage and execute systems of record, back-end application components and data pipelines in production are built and managed in the same way as Java, Python, C++ or any other business logic code. In other words, everything that is part of the application should be included in the software development life cycle (SDLC).

    Of course, that statement is pretty simple to say but not that easy to accomplish, because traditional workflow, job and batch processing solutions have lived (and most continue to) in the operations world. The practitioners of enterprise scheduling tend to prefer graphical interfaces with a strong emphasis on ease of use and rigid control over access. Traditionally, capabilities such as developer self-service, automated build and test and deploy have not been high on most enterprise job scheduling new feature requirements wish lists. Most commercial solutions, if they do anything, add an API or two and consider the job done. Open-source authors build tools that cater to developers with little to no regard for the multitude of other user types that rely on batch workload.

    The resulting state in the industry is that developers spend lots of time building “snowflake” operational plumbing which may be difficult to test, difficult to embed in an automated delivery pipeline and either has to be reworked to make it ready for production or becomes an albatross around the necks of operations teams trying to keep it running. It’s time for the DevOps community and the industry to recognize there is a better way and we all instinctively know what it is.

    Jobs-as-Code

    To understand jobs-as-code, let’s examine the traditional dev-to-ops handoff from a developer and DevOps perspective.

    I write some code and now I want to test. The execution is simple; I want to pull some data from a relational back end, run my code to manipulate the data and push the result set to some other location to serve as a data source for a different application. I need a SQL query, run my Java code and ftp or sftp the result.

    I’ve used some interactive tool to extract my test data, debugged my code in Eclipse and just browsed the output with Notepad++. Now I want to construct a flow that either I or any of my teammates can run whenever they want.

    Today, I probably brush off my scripting skills, bash or perl or whatever, and write a quick script to run a SQL query, run my java code and then run the file transfer. Easy, right?

    Maybe not.

    Connecting to the database interactively was so trivial I didn’t even think about it, but doing it in the script is a whole different exercise. I’ve got to get my quotes and escape characters right; I have to make sure I connect without compromising the credentials needed to log in to the database; I even have to figure out what return codes I’m getting and what to do with them. Of course, I need to add some notification so that I’m informed if there was a problem.

    OK, got all that done. Now running my Java code is a piece of cake right? Well, it is when running on my machine with my credentials but maybe my teammate has a different environment. Or he’s a .net guy and doesn’t have Java configured the same way as me. Or worse, maybe doesn’t even have it installed. Better add the code to check for all these problems and notification for that, too. And when I get that failure notification, what do I look at to figure out what went wrong? I’d better pipe everything to a log and make sure others can view the log, too, so I make sure I put it on a shared filesystem that others can access.

    Let’s not event start on the file transfer! Or, when you have to add additional steps or when you have to run this a 3 a.m. as part of some testing that another group is doing or making sure that database you rely on is up and running, etc., etc., etc.

    Eventually, after way more time than I ever thought it would take, that massive script is done. I run it through some test cases and I’m done.

    On to the rest of the delivery phases with more testing and probably some more extensions that make the script truly epic.

    In those last few stages of getting to production, someone may raise the issue that this new application interacts with some other application that’s managed by some production automation tool. OK, let the rework—or, really, brand new unplanned work—begin. The developers aren’t familiar with the tool and the tool administrators aren’t familiar with the application so you can imagine how well those conversations go. However, they are all professionals and eventually manage to get the job done and the application proceeds to production.

    If this long, drawn-out story didn’t already make you uneasy, you may have caught the huge fail that is now just waiting to blow up in our proverbial faces. Most, if not all, the testing was already completed. The new work done at the eleventh hour gets minimal, if any testing, is deployed and—surprise!—has a high failure rate in production.

    To add insult to injury, somewhere down the road after all the heroics of getting the application deployed are long forgotten, a failure occurs, as is only natural and to be expected. The poor on-call folks must negotiate through that production tool they aren’t familiar with and isn’t part of their world. And then they encounter that massive, epic script. What’s going on inside of that thing and where did the failure occur? Where are the logs and do we even have all the ones we need? And saving the best for last, after the problem has been identified, how do we restart this process in the middle when half of the processing was already completed?

    So What Would Nirvana Look Like?

    What if you could create a database query by just coding the SQL statement(s), picking the database you wanted from a list of logical names and requesting notification in case of error and you could express those requirements in a few simple statements? If you want to run it at 3 a.m., you just add that requirement too and then say “run.” The availability of the database is checked, the credentials are secure, there is no scripting, log and output are captured automatically (not just from this run but as many runs as you want, and you can compare one run with another, etc.) and you get whatever notifications you requested. The logic would be solid because it’s been in use for years by organizations like yours, rather than being written under pressure while trying to meet a deadline.

    You could write your automation rules (jobs) in some simple notation you were already familiar with such as JSON, store it together with your Java code in git or whatever SCM you use. The jobs could be packaged with the rest of your application and your build, config management and testing tools and could push your entire application including your jobs through the entire delivery pipeline so there are no surprises or additional work required before deploying to production. The facilities to deliver operational visibility, support problem analysis and log and output management would be second to none because they have been evolving with input from community and IT professionals.

    Imagine if this magical-sounding solution that implemented Jobs-as-Code was available from github and other public sources? You could download, install and have access to Jobs-as-Code in minutes. You wouldn’t have to submit access requests to IT folks, no purchase requisitions, no messy and complex installations.

    You don’t have to imagine. Jobs-as-code solutions already exist. If the tool(s) you’re using doesn’t give you these capabilities, switch! At least start talking to your peers and let them know the better way has arrived. With sufficient demand from the community, the vendors and authors implementing the myriad job management tools may just accommodate you.

    — Joe Goldberg

  • 4 Top Tips for Developing a New Feature

    4 Top Tips for Developing a New Feature

    As a backend developer at CA BlazeMeter, I recently had the chance to work on a big feature for our web app. The feature required a massive change on our backend code, a big change on our frontend and multiple migrations. You know what I’m talking about—it was one of those projects that developers fear.

    But, I gained a lot of valuable experience from the project. Not only did we deliver a kick-ass feature, I also learned the importance of teamwork and patience when developing something new. Armed with those two values, and the right tools and technologies, you can deliver a new feature quickly and efficiently.

    Here are a few more things that I learned that should prove helpful whether you’re developing a major feature or one that only requires a minor code change.

    Tip 1: Plan to understand the development requirements

    The process of development starts way before you start coding, with planning. After the product manager decides what needs to be developed, R&D needs to understand the cost: how many days (or weeks) of development the feature will take, how many people will be needed and which APIs are required.

    To do that, the product manager needs to conduct at least three “grooming” sessions with backend, frontend and QA leaders. The grooming sessions start with the product manager presenting the product flow and requirements.

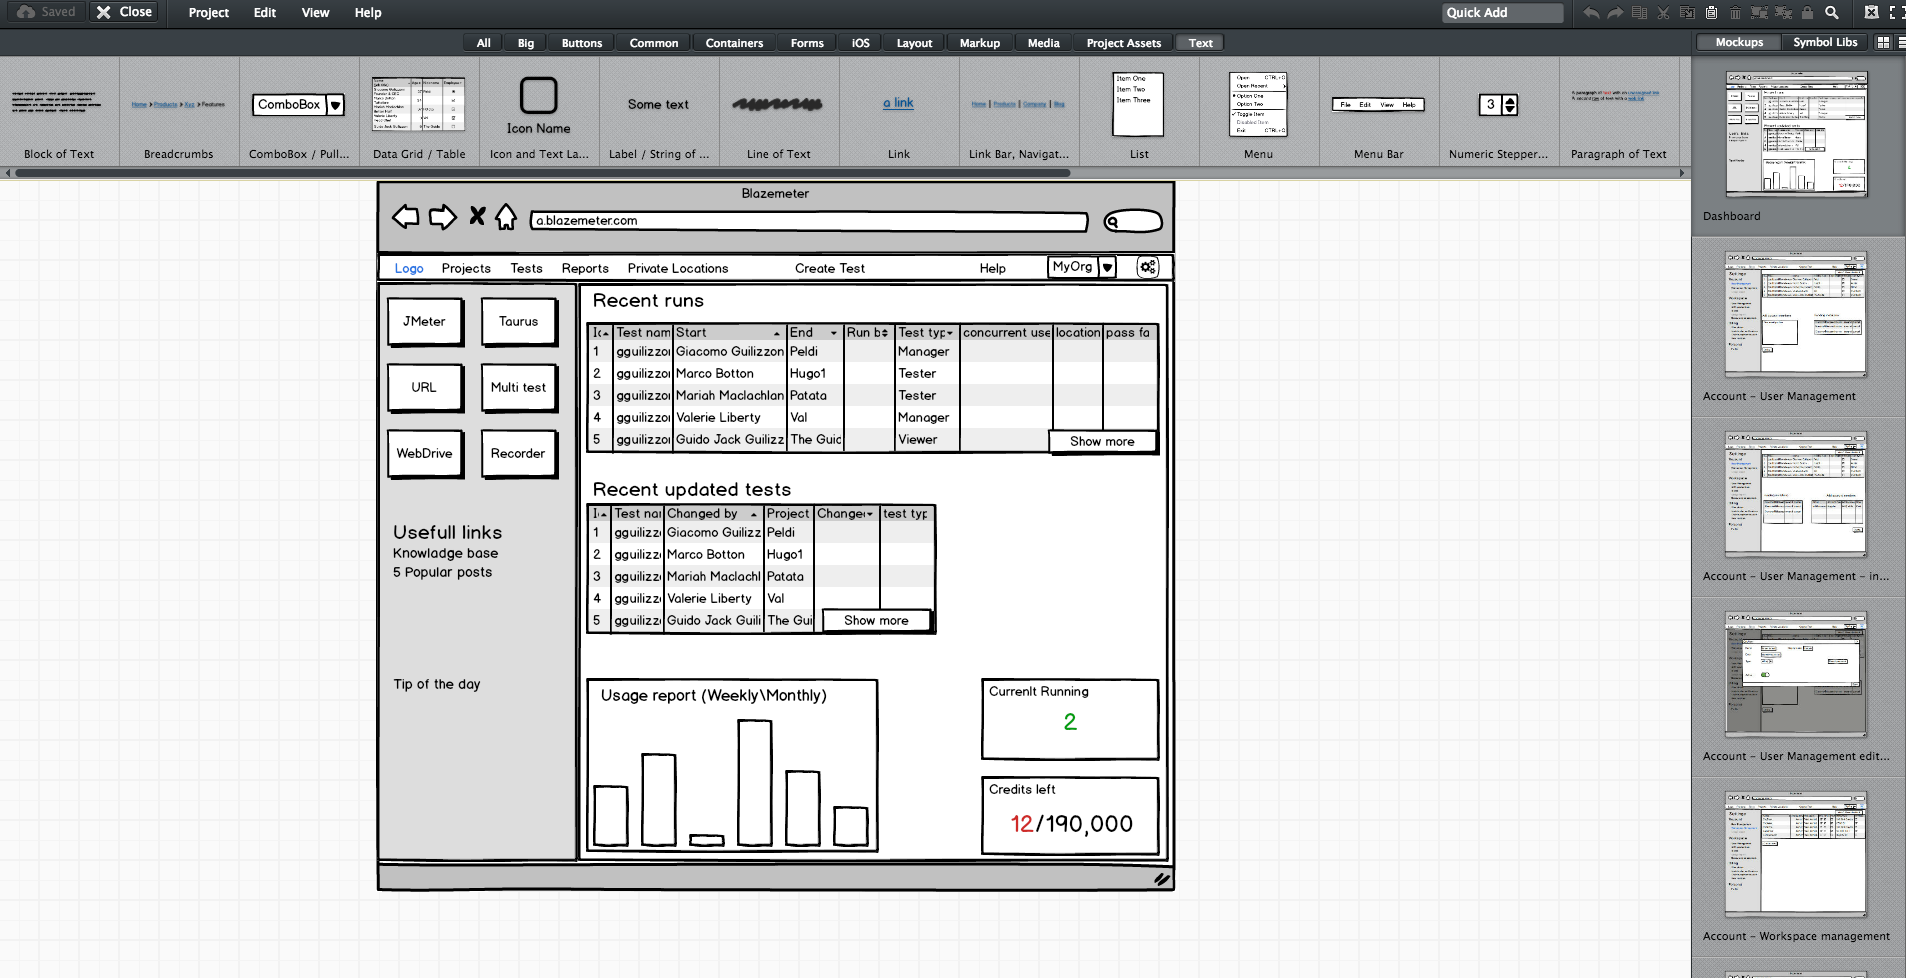
    Since no one wants to read a lot of text (except perhaps the awesome readers of this article), the product manager should prepare mockups. They don’t have to be designed or colorful, but they do need to show the team what the feature looks like in his or her vision. During our grooming sessions, we used Balsamiq, which lets you create screen sketches for how the product is supposed to look, feel and work.

    Editing screen sketches using Balsamiq

    After the initial presentation, the sessions should include a lot of open discussion—asking questions, checking for answers and examining compliance, etc. —until everyone is satisfied and understands what the feature requires from them and from others.

    This is the time and place for frontend, backend and QA to give their opinion about the schedule and to alert and flag any potential problems in development or extreme use cases. It’s the role of the product team to answer questions and change the flow and requirements until there are no R&D rejections.

    Afterward, the frontend and backend leaders need to create a feature development plan, sitting down to determine what data they need to transform the product vision into a real thing. Or in other words, which APIs are required for each flow or button, how long each step is supposed to take, including buffers, and the order of development. APIs are the agreed “contract” between the development teams. After determining the contract terms, each team can proceed individually.

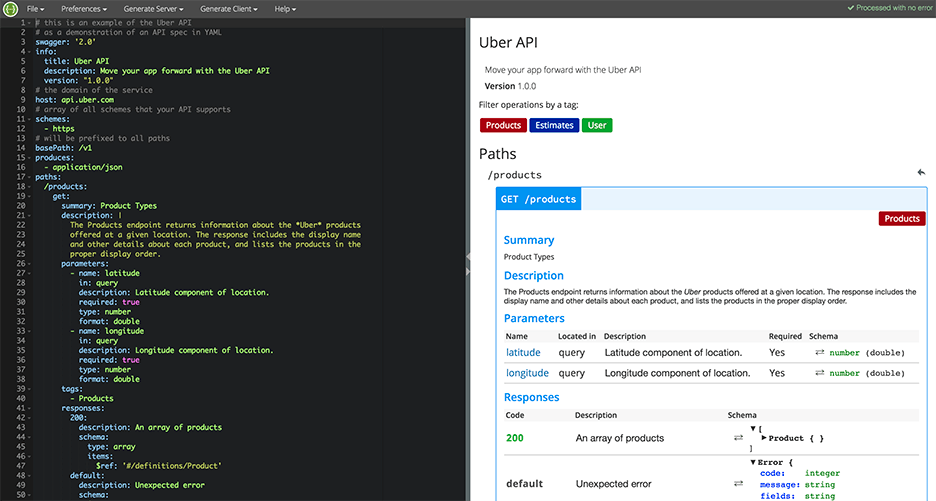
    I recommend you write your APIs in Swagger, which turns YAML files into detailed HTML pages with all the APIs.

    Swagger Editor

    This plan needs to be transparent to everyone working on the project. In fact, it’s even better if each project participant can add and describe scenarios. Tools such as TestLink and Atlassian do just that. Then, when the code is ready, developers can go over the list and see everything is covered.

    We will need to stick to this schedule later on, especially when new demands unrelated to the feature come in, such as fixing bugs. Sticking to this plan is the best way to distinguish the wheat from the chaff of the development process.

    Start writing automation ASAP

    After planning, we want everyone to start working, and not only the backend. To do that, the backend can prepare mocks, either through outsourcing services such as JSON servers, which show inputs and outputs, or by writing dummy code.

    I mentioned earlier that we used Swagger to write APIs. We also used it to generate a server in NodeJS/Python, like this:

    Generating a JSON Server through Swagger

    From this moment on, frontend can begin writing and building screens and QA can start writing API automated testing, by using tools suh as JMeter. At this point, frontend and QA have the response codes and response bodies; they know which features to put where; and which APIs they need and how to use them.

    QA also know which data they’re missing, such as field names and field data. Sure, the backend code isn’t ready yet and all of the automated exams will return “red” instead of “green,” but the main issue is making sure everyone is as prepared as possible.

    This includes load and performance testing. You can use open-source tools such as JMeter, which is enhanced by CA BlazeMeter. By uploading our test script into, configuring the number of virtual users and ramp-up time, determining geo-locations to test from and analyzing KPIs to determine trends and the health of our system, we can ensure our product is delivered to our customers without crashing.

    This is also true about sending code to QA: Developers should test their code themselves and ensure that when they commit their code, it works 99.9 percent of the time.

    By starting automation as soon as possible, you can minimize future bottlenecks in the development process.

    Ensure the team communicates and works together

    Like I said before, teamwork is the most basic requirement when creating a new feature. This is because new questions arise during development and because requirements change. Therefore, everyone in the team needs to be in sync all the time, from the product manager and the designer to the developers and QA.

    Open communication lines are crucial because everyone is working on the same product at the same time, but each developer or QA should be working on a different part of the product and on different functionalities. Communication ensures each person’s work is compatible with the rest of the team’s work. This saves time, prevents frustration and redundancy and ensures maximum professionalism.

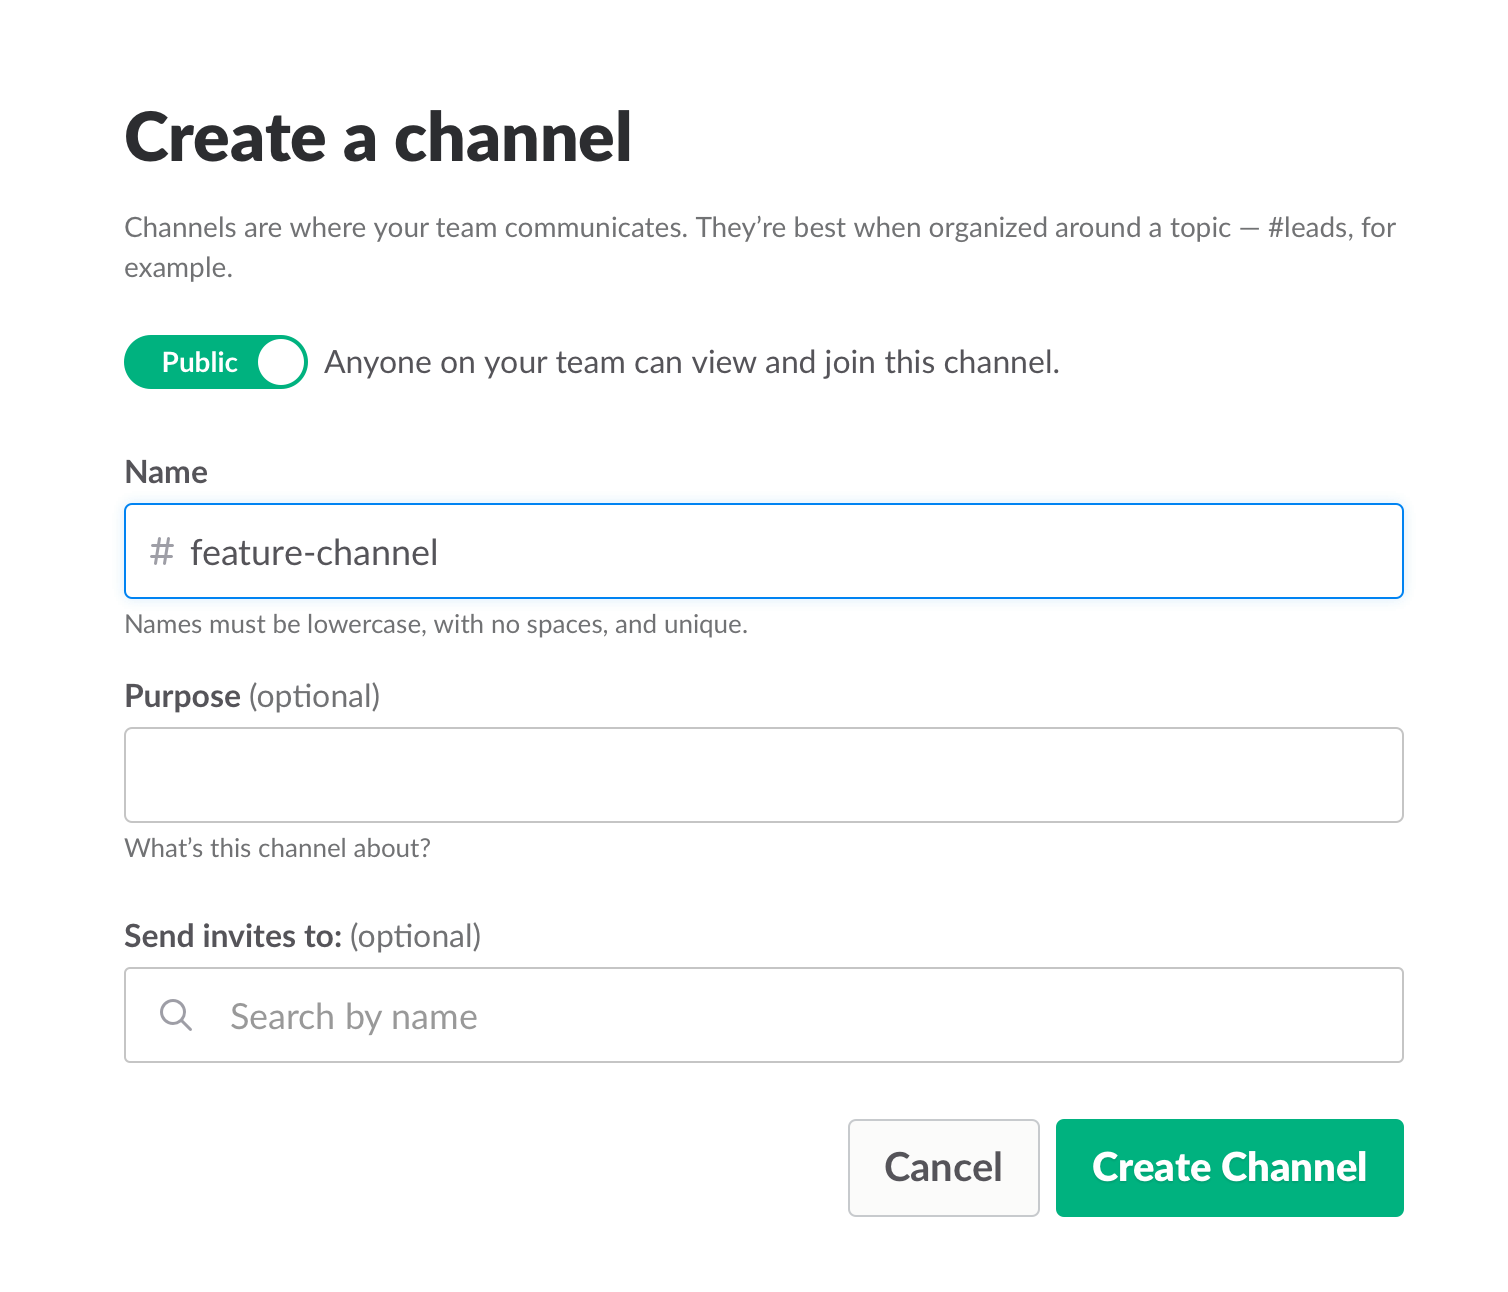
    To make sure everyone knew what was happening, we used Slack and opened a dedicated channel for the creation of this feature. We also had daily (short!) standups where we discussed what we have and what is missing.

    Opening a Slack channel

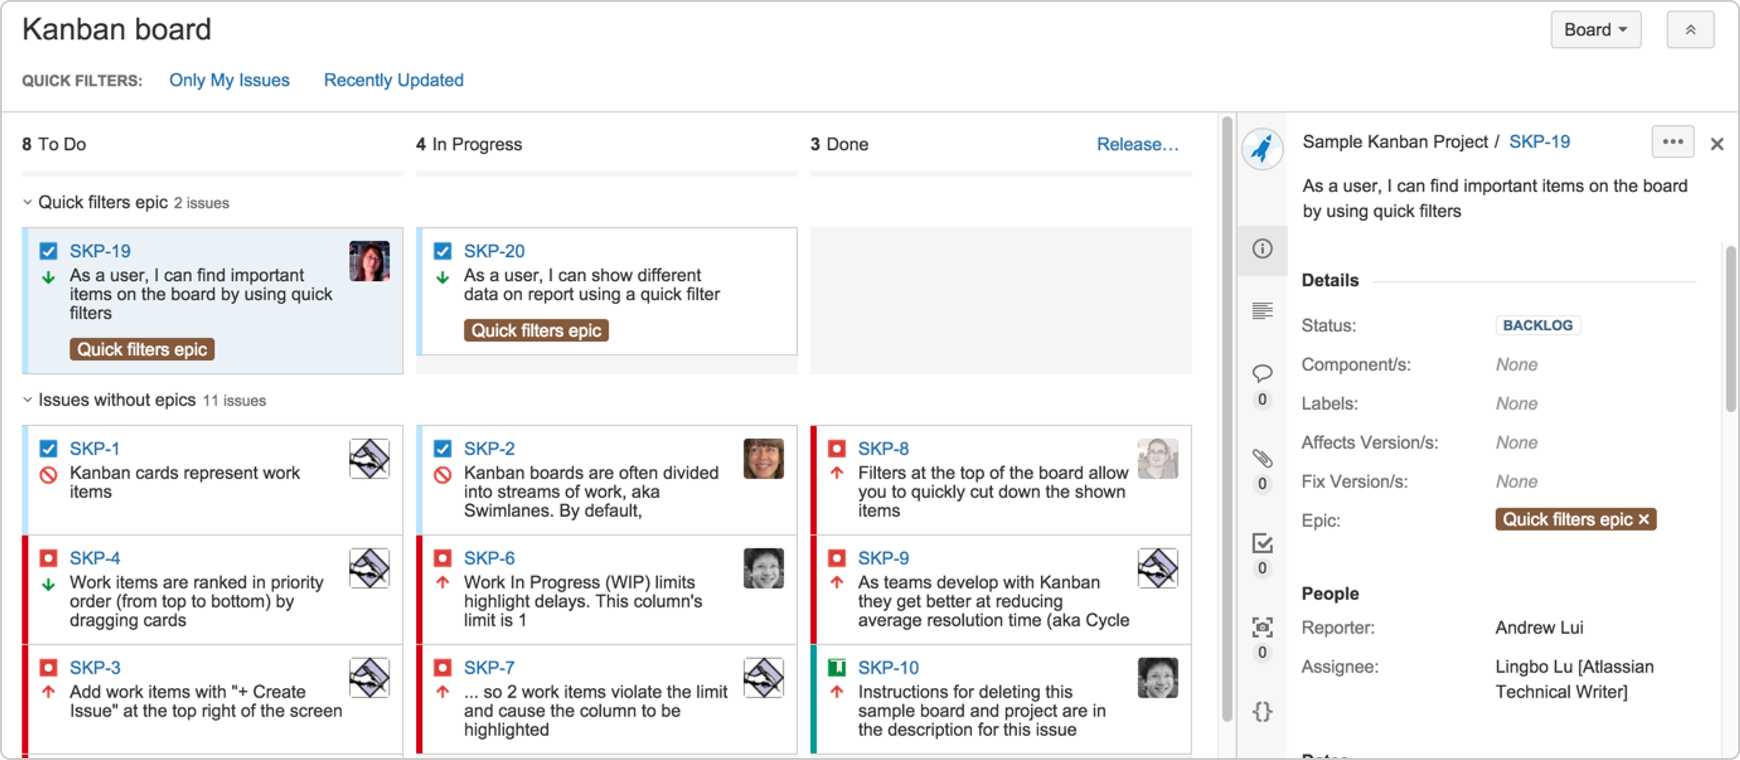
    Communication also includes team and assignment management. JIRA, our primary issue tracking tool, offers Kanban-style, Scrum and fully customizable boards, which show the progress of each development task, including the developer assigned to it, and his or her exact status or phase.

    This helps you understand what other people are working on, and just as importantly, where people are stuck. If you can, get everyone to work in an open space and put a large screen in the middle of it. This lets you stay in sync at all times.

    We used JIRA to open and manage bugs as well. This was helpful when multiple QAs found the same bug. It’s important to carefully choose which tickets are opened and put them under one epic, so everyone stays focused.


    JIRA Dashboard

    Another important aspect of communication is ensuring everyone uses the same terminology, as sometimes people might use the same term to describe different things or different terms to describe the same things. To prevent mixups that could waste your time, make sure everyone is on the same page. For example, do you say “system admin” or “<name (ex. BlazeMeter)> admin”?

    Work on the same development environments

    It’s important that everyone works on identical development environments and even on the same version of the tools and libraries. Otherwise, it could cause an (in)compatibility mess, including a lot of unnecessary back and forth and even might cause bugs to pop up. This environment needs to be as similar as possible to production, but only on a smaller scale.

    Conclusion

    Now look at the feature that came out of all that work here. I’m so grateful that I had the opportunity to work on it with an awesome team.

    I hope these best practices help you the next time you develop a new feature. Don’t forget to keep going agile after development and delivery by running tests in a continuous environment such as Jenkins for every commit.

    CA BlazeMeter works with Jenkins, ensuring you can load test in the cloud and analyze your data while shifting left. You can also use different APM tools, such as New Relic, AppDynamics and CA APM to alert you about errors before QA, which saves time.

    — Dor Atias

  • What is JSON? How Do I Use It? Does It Beat BSON?

    What is JSON? How Do I Use It? Does It Beat BSON?

    TL;DR: If you’ve ever wondered about JSON—what it is, how to use it or what it has to do with BSON—then you’ve come to the right place. In this article I’ll explore what these acronyms stand for and what these formats do in the world of programming and databases.

    What is JSON?

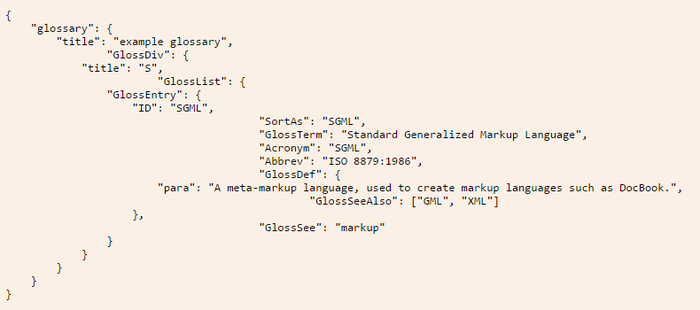
    JSON stands for JavaScript Object Notation. Basically, it uses syntax derived from JavaScript to represent data in a way that is readable to both humans and machines. For instance, an example used on the JSON website describes a glossary in JavaScript Object Notation, as shown in the figure below.

    JSON Example

    How to Use JSON

    As you can see, a hierarchy is created that encloses each level within a set of curly braces ({}). At each level, you have name/value pairs, such as “title”: “example glossary”. In the same way that JavaScript objects work, the value part of the pair can open yet another level by starting a new set of curly braces. This creates a well-structured layout of the data that can be scanned easily for information by machines, as well as be looked at by humans to find what is needed.

    This notation allows a number of data types to be represented—numbers, strings and Booleans, hashes (enclosed by {}) and arrays (enclosed by []) all can be used in this format.

    Once data is represented in this notation, a JSON parser can be used in most any programming language to turn this notation into the native data types for that language, thus allowing programmers to access the data using that language’s natural syntax. Since this notation is so prevalent, most programmers have a great deal of experience in storing and retrieving this type of data.

    Does It Get Used in Databases?

    Document databases typically store data in JSON format or something based upon that format. Rather than the tables and rows used by a relational database, a document database will store and query information through the use of the JSON format.

    These databases refer to each set of JSON data as a document. Since the structure is hierarchical, each document can have subdocuments on any of its keys. This setup makes it very easy for a programmer familiar with the language to both store and query the data within the database.

    What is BSON?

    BSON stands for Binary JSON. This format is specifically used by MongoDB for its document database. The idea behind it is to provide the utility of the JSON format, but also be able to use that format with the speed that comes with a binary format.

    JSON vs. BSON

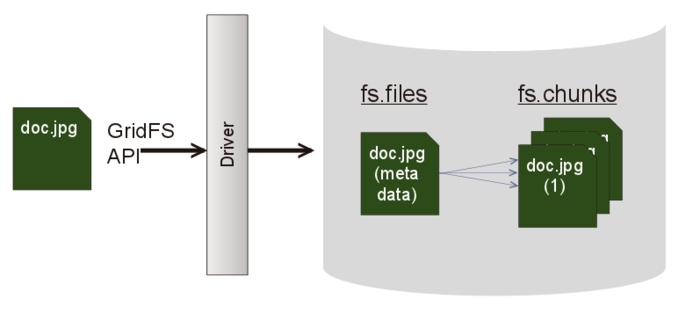
    While JSON simply represents a data structure, MongoDB can use BSON to build database indexes on keys at any level, thus helping improve speed in that area. MongoDB also provides a specification called GridFS that can be used in conjunction with BSON to store data over BSON’s 16MB document size limit. This can be useful to store large files, as it divides them into “chunks” to allow the storage to work properly in the database.
    BSON vs JSON
    For the  most part, JSON and BSON are very similar, but BSON is can provide an extra punch of speed as well. Both are certainly very handy ways of storing and retrieving data for applications.