
To watch, please fill out the form below:

To download, please fill out the form below:

Designing modern applications is a challenging task, and developing a robust data model for these apps is one of the most difficult yet crucial aspects of modern, cloud-native application architectures.
If you fail to create an appropriate data architecture, your application may encounter various problems, ranging from performance-related issues to data integrity, safety, sovereignty and scalability.
An incomplete, inappropriate or ill-considered data architecture can have serious consequences on your application and your company.
This problem isn’t reserved for traditional databases. Modern, cloud-native databases such as DynamoDB, CockroachDB and CosmosDB can be even more susceptible to problems related to poor data architecture and planning.
Establishing a sound data architecture is essential for the long-term prosperity of any modern application, especially cloud-native applications.
But many people, as they develop their cloud-native applications, do not spend the appropriate time required to create proper data architectures. Instead, they resort to old-fashioned concepts focused on how to join and merge disjointed data. Let’s take a closer look at this.
Modern cloud-native applications rely on service and microservices-based software architecture. These applications distribute the functionality of the application across multiple independent services. This helps formalize relationships between modules in a way that encourages distributed, scalable development of large applications.
This independence and isolation of individual services makes creating, designing, developing and supporting that service an easier task and allows independent development teams to work on their functionality without interference from each other. This enables larger development organizations to stay agile and develop features faster.
But unfortunately, many cloud experts suggest that even if you separate your application code into services, you should keep your application data centralized, as shown in Figure 1. Centralizing your data, their argument goes, makes it easier to apply machine learning and other advanced analytics to get more useful information out of your data.

But this is not a good strategy. Centralizing your data makes it harder for you to be able to scale your application, and it removes many of the benefits acquired from building independent services. If two distinct services share data with each other, they are no longer independent and cannot make the independent decisions necessary to remain agile. Further, an unanticipated decision by another team can have a negative impact on your team’s services.
Instead, each and every service in your application should own and manage its own data. This is shown in Figure 2.

Further, no two services should share data directly between themselves. If one service needs a piece of data owned by a second service, the first service should make an API call to the second service to get the data it requires. This keeps the boundaries and service contracts intact between the individual services and removes the issues involved with data sharing between services.

The distribution of data and data ownership to the individual service owners enables easier scaling of both your application and your development teams, enabling a full-service ownership module and allowing independent decision-making to occur among teams. Service ownership enables development teams to work more independently and encourages more robust contracts between services. This fosters higher-quality services and makes changes safer and more efficient.
But what if your business needs to perform analytics or machine learning on all of its data? Doesn’t that mean you need to centralize your data?
No, it doesn’t. I still recommend the distributed data model with data owned by individual service owners. However, to make your data useful for analytics and machine learning, each service owner can send a copy of the relevant data to a back-end data warehouse system. The data warehouse system then contains a copy of the application data, not the working product data itself, as shown in Figure 4.

The data warehouse copy of your data can be restructured and rearchitected using different rules. While the production data needs to be structured to encourage independent and scalable development across multiple teams, the data in the data warehouse can be structured to enable the data to be better utilized for analytics and more useful for machine learning algorithms to process. This data warehouse version is separate and distinct from your application data of record, which is still stored within the individual services.
This model can give you the best of both worlds: Microservice-owned data localization that encourages service ownership and organization scalability and efficiency and centralized data warehoused for analytics and machine learning.

Event-driven computing is a common pattern in modern application development with microservices, which is a great fit for building resilient and scalable software in AWS. Event-driven computing needs to be push-based with event-driven applications that are run on-demand when an event triggers the functional workflow. Tools that help you minimize resource usage and reduce costs are essential. Instead of running systems continuously while you wait for an event to occur, event-driven applications are more efficient because they start when the event occurs and terminate when processing completes. Additionally, event-driven architectures with Smart Endpoints and Dump Pipes patterns further decouple services, which makes it easier to develop, scale, and maintain complex systems.
This post demonstrates a proof-of-concept implementation that uses Kubernetes to execute code in response to an event. The workflow is powered by AWS Step Functions, which is a low-code, visual workflow service that helps you build distributed applications using AWS services. AWS Step Functions integrates with Amazon Elastic Kubernetes Service (Amazon EKS), making it easy to build event-driven workflows that orchestrate jobs running on Kubernetes with AWS services, such as AWS Lambda, Amazon Simple Notification Service (Amazon SNS), and Amazon Simple Queue Service (Amazon SQS), with minimal code.
AWS Step Functions integration with Amazon EKS creates a workflow that creates and deletes resources in your Amazon EKS cluster. You also benefit from built in error-handling that handles task failures or transient issues.
AWS Step Functions provide eks:runJob service integration that allows you to run a job on your Amazon EKS cluster. The eks:runJob.sync variant allows you to wait for the job to complete and retrieve logs.
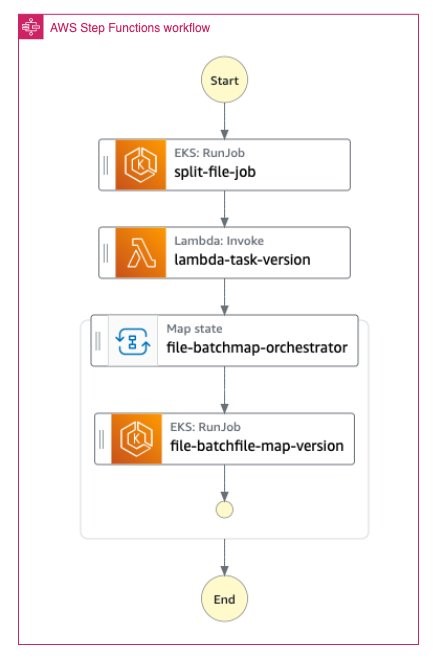
We use AWS Step Functions to orchestrate an AWS Lambda function and a Map state ("Type": "Map") that runs a set of steps for each element of an input array. A Map state executes the same steps for multiple entries of an array with the state input.
The following diagram demonstrates the solution to run a sample event-driven workflow using Amazon EKS and AWS Step Functions.
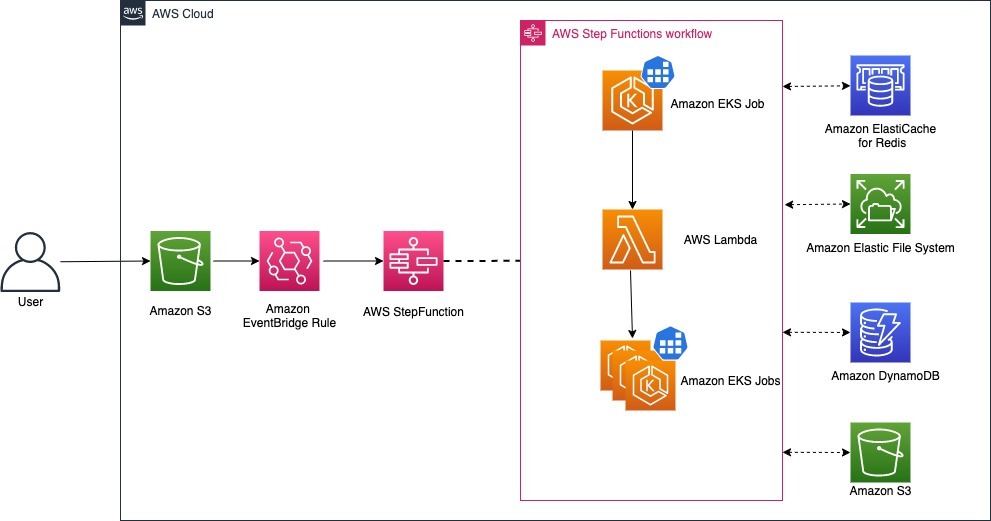
For this demonstration, we use AWS Cloud Development Kit (AWS CDK) and first deploy a set of AWS CDK stacks to create and deploy necessary infrastructure, as shown in the previous diagram. AWS Step Functions invoke when an input file appears in the configured Amazon Simple Storage Service (Amazon S3) bucket.
AWS Step Functions starts the following process when a new file appears in the Amazon S3 bucket:
File Splitter Kubernetes job that runs in an Amazon EKS cluster. The job reads the input file from the Amazon S3 bucket and splits the large input file into smaller files, saving them to an Amazon Elastic File System (Amazon EFS) persistent volume.File Splitter Kubernetes job uses the unix split command to chunk the large files into smaller ones, with each file containing a maximum of 30,000 lines (which is configured using MAX_LINES_PER_BATCH environment variable).File splitter Kubernetes job saves the path of the split files in Amazon ElastiCache (Redis) that are used for tracking the overall progress of this job. The data in the Redis cache gets stored in the following format:
Split-file-lambda AWS Lambda function that reads the Redis cache and returns an array of split file locations as the response.ConfirmationId for each OrderId field available for each row in the input file which inserts this information to orders Amazon DynamoDB table. All DynamoDB writes are batched to a maximum of 25 rows per request.ConfirmationId and OrderId written in batch.rdb.SRem command.MAX_LINES_PER_BATCH environment variable. Giving a smaller value will end up with too many split files creating many Kubernetes jobs, whereas setting a large value eaves too little scope for parallelism.You need the following to complete the steps in this post:
Let’s start by setting a few environment variables:
The first step to any AWS CDK deployment is bootstrapping the environment. cdk bootstrap is a tool in the AWS CDK command-line interface (CLI) responsible for preparing the environment (i.e., a combination of AWS account and Region) with resources required by AWS CDK to perform deployments into that environment. If you already use AWS CDK in a Region, then you don’t need to repeat the bootstrapping process.
Execute the following commands to bootstrap the AWS environment:
The AWS CDK code create one stack with the name file-batch-stack, which creates the following AWS Resources:
Orders table to store the output details of processed orderRun cdk list to see the list of the stacks to be created.
Run the following command to start the deployment:
Please allow a few minutes for the deployment to complete. Once the deployment is successful, you will see the following output:
To verify that the deployed solution is working, you can upload sample file test.csv under the payload folder to the input bucket. Run the following command from the root directory:
The following image shows a line from the input file:

When a new file is uploaded to the Amazon S3 bucket, the AWS Step Function state machine is triggered using an Amazon EventBridge Rule. Navigate to the AWS Managed Console and select the state machine created by the AWS CDK (the CDK output includes the name).
The AWS Step Function execution looks like the execution details, as described in the Solution overview section, and shown in the following diagram:
Once the workflow completes successfully, you can download the response file from the Amazon S3 bucket.
Run following command:

You continue to incur cost until you delete the infrastructure that you created for this post. Use the following command to clean up the resources created for this post:
AWS CDK asks you:
Are you sure you want to delete: file-batch-stack (y/n)?
Enter y to delete.
This post showed how to run event-driven workflows at scale using AWS Step Functions on Amazon EKS and AWS Lambda. We provided you with AWS CDK code to create the cloud infrastructure, Kubernetes resources, and the application within the same codebase. Whenever you upload a file to the Amazon S3 bucket, the event triggers a Kubernetes job.
You can follow the details in this post to build your own serverless event-driven workflows that run jobs in Amazon EKS clusters.

The architecture presented in this post authenticates users as they access the sample application. The application is exposed publicly using an Application Load Balancer. ALB securely authenticates each request when users visit the app and selectively forwards authenticated requests to the app.

ALB checks users’ request headers for an AWSELB authentication session cookie. For an unauthenticated session, the cookie is absent. Therefore, ALB redirects unauthenticated users to a login page, which is hosted by Amazon Cognito hosted UI. Amazon Cognito hosted UI authenticates or registers the user. When users successfully sign in, Amazon Cognito redirects them back to the ALB with an authorization grant code.
The ALB presents the authorization grant code back to Amazon Cognito’s token endpoint and receives ID and access tokens. Next, the ALB exchanges the access token with Amazon Cognito user info endpoint for user claims, which contain user details such as the user’s email, phone number, and so on. Then the ALB redirects the user back to the original URI, this time setting the AWSELB authentication session cookie.
When ALB receives a request with AWSELB cookie, it validates it and forwards the user info to backends with the X-AMZN-OIDC-* HTTP headers set. The application decodes these headers to get user information.
The application doesn’t handle user authentication, registration, or managing session timeout in this scenario. We don’t even create a login page. We offload that responsibility to Amazon Cognito hosted UI.
We will use a sample application called Yelb for this demo. Yelb’s user interface will be exposed to users on the internet using an ALB. For DNS, we will use Amazon Route 53, and we’ll get a TLS certificate from AWS Certificate Manager (ACM).
You will need a registered domain name to follow along. You can use any registered domain, even one that you may not have registered using Route 53.

You will need the following to complete the tutorial:
Note: We have tested the CLI steps in this post on Amazon Linux 2.
Let’s start by setting a few environment variables:
Create an EKS cluster using eksctl:
You can proceed to the next steps while you wait for cluster creation.
When users visit the sample app at https://sample.{your-domain}.com, Route 53 will route traffic to the ALB that exposes the user interface. Let’s create a Route 53 hosted zone and a record named sample.{your-domain}.com:
Users will access our application securely at https://sample.{your-domain}.com, so we also need a TLS certificate. AWS Certificate Manager can create a TLS certificate that we can use with ALB.
Request an ACM certificate:
Before the Amazon certificate authority (CA) can issue a certificate for your site, ACM must prove that you own or control the domain. We will use DNS validation.
Create a record in the Route53 hosted zone so ACM can validate domain ownership:
Wait for two minutes and verify that the certificate has been issued:
The output should be ISSUED. We recommend using watch to run the above command until the certificate is issued.
As users register to access our sample application, their information is securely stored in the Amazon Cognito user pool. A user pool is a user directory in Amazon Cognito. In addition to providing user directory management and user profiles, user pools also provide a built-in, customizable web UI called Amazon Cognito hosted UI to sign in and register users. We will use this web UI to sign in and register users.
Create an Amazon Cognito user pool:
Create a user pool app client:
Configure the app client:
You can find detailed information about app client settings terminology in Amazon Cognito documentation.
Amazon Cognito allows you to use your own domain for the web UI used to sign in and sign up users. Alternatively, you can use an Amazon Cognito domain (amazoncognito.com) and customize the domain prefix. When you use an Amazon Cognito domain, the domain for your app is https://<domain_prefix>.auth.<region>.amazoncognito.com.
We will use an Amazon Cognito domain for this demo. Create a domain using the hosted Amazon Cognito domain:
Let’s return to the EKS cluster. The first thing we need to install in the EKS cluster is the AWS Load Balancer Controller, which is a controller that manages AWS Elastic Load Balancers for a Kubernetes cluster.
Run the following commands to install the AWS Load Balancer Controller into your cluster:
Next, we’ll deploy ExternalDNS, which is an open-source Kubernetes controller that synchronizes exposed Kubernetes services and ingresses with DNS providers like Route 53.
ExternalDNS will automatically create an alias record in Route 53 that will route users to the application’s ALB. You also have the option of not using ExternalDNS and managing Route 53 or your DNS provider directly.
The steps in this post assume that you will use ExternalDNS along with Route 53 for DNS management.
Create an IAM policy that will allow the ExternalDNS controller pod to update the Route53 record:
In production environments, consider scoping the policy to only permit updates to explicitly mentioned hosted zone IDs.
Create a service account and associate it with the IAM policy we just created:
eksctl will also create a namespace called sample.
Install ExternalDNS:
You can verify that ExternalDNS deployed successfully by checking logs:
The output should look something like this:

Now that we have configured the EKS cluster, Amazon Cognito, and Route53, and we have a TLS certificate from ACM, it’s time to deploy the demo application.
Create an Amazon ECR repository where we will store the container image for the demo application:
Clone the sample code repository and then build, push, and deploy the application:
Create a Kubernetes ingress to expose the service:
Notice the annotations in the ingress manifest.
alb.ingress.kubernetes.io/listen-ports: configures the ALB with HTTP and HTTPS listener portsalb.ingress.kubernetes.io/certificate-arn: Configures the secure listener with an ACM provided certificatealb.ingress.kubernetes.io/auth*: enable authentication in ALB using Amazon Cognitoalb.ingress.kubernetes.io/auth-idp-cognito: provides the UserPool’s Arn, UserPoolClientId, and UserPoolDomainalb.ingress.kubernetes.io/auth-on-unauthenticated-request: configures ALB to authenticate unauthenticated requestsWith this step, we have completed the deployment. Let’s test the setup and verify that the sample application is only available to authenticated users.
Point your browsers to the URL of the sample app in your cluster. You can get the URL using the previously configured environment variable.
Your browser will be redirected to a sign-in page. This page is provided by Amazon Cognito hosted UI.
Since this is your first time accessing the application, sign up as a new user. The data you input here will be saved in the Amazon Cognito user pool you created earlier in the post. For security reasons, we recommend using a disposable email address.

Once you sign in, ALB will send you to the sample app’s UI:

The application gets the user’s identity by parsing request headers.
You may be asking, “How does the application identify the user?”
After ALB authenticates a user successfully, it sends the user claims received from Amazon Cognito to the application. The ALB signs the user claim so that applications can verify the signature and verify that the load balancer sent the claims.
The load balancer adds the following HTTP headers:
x-amzn-oidc-accesstoken: The access token from the token endpoint, in plain text.
x-amzn-oidc-identity: The subject field (sub) from the user info endpoint, in plain text.
x-amzn-oidc-data: The user claims, in JSON web tokens (JWT) format.
The target application gets the user identity by decoding x-amzn-oidc-data HTTP headers as shown in sample-ui-code/app.py:
Use the commands below to delete resources created during this post:
This post demonstrates how you can use ALB’s built-in authentication to authenticate users without writing authentication code in your application. Your Kubernetes web apps that use an ALB as Kubernetes Ingress can authenticate users by using Amazon Cognito user pool as an identity provider. Additionally, Amazon Cognito hosted UI provides you an OAuth2.0 compliant authorization server that provides default implementation of end user flows such as registration, authentication, and so on.
With this architecture, you don’t have to code authentication flows such as user sign-in or sign-up in your applications. ALB handles user registration and authentication and passes the user’s identity to your applications.

Internet-of-things (IoT) is a term used to describe the network of physical devices—from everyday household items to sophisticated industrial tools—connected to the internet, sharing and collecting data. With the advent of cheap computer chips and the ubiquity of wireless networks, it’s possible to make anything a part of the IoT. Add to that the exponential growth in artificial intelligence and machine learning, and the IoT is a truly significant part of our lives.
The IoT allows devices to communicate and interact over the internet, and they can be remotely monitored and controlled using technologies many of us have never heard of, such as MQTT, QUIC and AMQP. The proliferation of these devices has led to an exponential increase in the amount of data we can gather, analyze and use to make more informed decisions. We’ve already seen the transformative potential of IoT in our homes, workplaces and cities, and it’s only set to increase as more and more devices come online.
At the heart of this technology is the concept of seamless connectivity and communication. However, the rapid development and deployment of IoT devices pose significant challenges. This is where the DevOps approach comes in, offering a solution to these challenges by improving efficiency and effectiveness in the development and operation of IoT systems.
In the context of IoT, DevOps is crucial. IoT devices are often deployed in the field, in homes or in other environments where physical access is difficult or impossible. As such, the ability to update and manage these devices remotely is a critical necessity. DevOps methodologies enable this remote management, providing mechanisms for continuous integration and continuous delivery (CI/CD) that make it possible to push updates to devices regularly and reliably.
Moreover, given the pace at which IoT technology is advancing, it’s crucial to be able to adapt quickly to changes and new developments. In this regard, DevOps is invaluable. By bringing together development and operations, it allows for more agile response to changes, faster issue resolution and overall better performance.
One of the key benefits of using a DevOps approach in IoT development is the ability to speed up development cycles. With traditional development practices, the time between identifying a requirement or an issue and implementing a solution can be lengthy. In contrast, DevOps practices, such as continuous integration and continuous delivery, enable rapid prototyping, development, testing and deployment of new features and updates.
With the DevOps approach, developers and operations teams work together from the beginning of a project, collaborating closely to ensure that the software being developed is robust, reliable and meets the needs of the business. This cooperative approach, combined with automated testing and deployment processes, significantly reduces the time to market for new features and updates.
Another significant advantage of utilizing DevOps in IoT development is the increased quality and reliability of the applications being developed. With traditional software development methods, testing and quality assurance often occur after the development process. This can lead to issues being identified late in the cycle, which can be costly and time-consuming to fix.
On the other hand, DevOps practices emphasize continuous testing throughout the development process. This means that issues can be identified and addressed much earlier, leading to higher-quality, more reliable software. In the context of IoT, where devices may be deployed in critical applications such as health care or transportation, the importance of this cannot be overstated.
Finally, DevOps plays a crucial role in enabling the scalability and flexibility of IoT systems. As the number of IoT devices continues to grow exponentially, the ability to manage and monitor these devices efficiently is becoming increasingly important. DevOps practices, such as infrastructure as code (IaC) and the use of containers and microservices, provide the tools necessary to scale and adapt IoT systems as needed.
With IaC, the infrastructure required to run an IoT application is defined and managed as code, making it easy to replicate and scale. Containers and microservices, on the other hand, allow applications to be broken down into smaller, independent components that can be scaled individually, providing a high level of flexibility and efficiency.
Continuous integration/continuous delivery (CI/CD) is a fundamental DevOps practice that plays a vital role in IoT development. It involves automating the processes of software delivery and infrastructure changes. With CI, developers frequently merge their code changes into a central repository where automated builds and tests are run. CD takes this a step further by automating the release of these changes to the production environment.
For IoT, integrating CI/CD can help maintain the quality of software, increase efficiency, and speed up the process of delivering software updates or new features to devices. It also ensures that any changes made can be easily rolled back, reducing the impact of any potential issues.
Infrastructure-as-code (IaC) is another key DevOps practice that is highly relevant to IoT. IaC is the process of managing and provisioning computing infrastructure through machine-readable definition files rather than physical hardware configuration or interactive configuration tools.
In the context of IoT, IaC can simplify the process of setting up and managing the complex infrastructure required for IoT applications. With IaC, developers can quickly and reliably replicate infrastructure setups, making it easier to scale IoT applications as the number of connected devices grows.
Containers and microservices are two more DevOps practices that can significantly benefit IoT development. A container is a standalone executable package that includes everything needed to run an application, including the code, runtime, system tools, system libraries and settings. Microservices is an architectural style that structures an application as a collection of small, loosely coupled services.
In the context of IoT, using containers and microservices can greatly simplify the process of developing, testing and deploying IoT applications. Moreover, they can enhance the scalability and flexibility of IoT systems, making it easier to adapt to changing requirements and scale as the number of connected devices grows.
One of the main challenges in implementing DevOps for IoT is dealing with the diversity of devices and platforms. IoT devices can range from simple sensors to complex machines, each with its own capabilities, requirements and operating systems. Moreover, these devices may communicate using different protocols and have different connectivity requirements.
The key to addressing this diversity is to adopt a platform-agnostic approach. This involves developing software that can run on any device, regardless of its hardware or operating system. Containerization can help achieve this by providing a consistent and reproducible environment for running applications.
Security and privacy are significant concerns in IoT, and they can be particularly challenging in a DevOps context. The increased frequency of updates and changes that come with the DevOps approach can potentially introduce new vulnerabilities. Moreover, the interconnected nature of IoT devices means that a security breach can have far-reaching consequences.
To address these challenges, it’s essential to integrate security practices into the DevOps process. This is often referred to as DevSecOps. This approach involves continuously monitoring and testing for security vulnerabilities throughout the development process rather than treating security as an afterthought.
The sheer volume and complexity of data generated by IoT devices can also pose a challenge in a DevOps context. Traditional data management and analysis tools may not be able to handle this volume and complexity.
To tackle this, it’s important to utilize modern data management solutions that can handle large volumes of data. Additionally, employing advanced analytics and machine learning techniques can help make sense of complex data and extract valuable insights.
Finally, coordinating updates and maintenance for a large number of IoT devices can be a significant challenge. This is particularly true in a DevOps context, where updates and changes are frequent.
To address this, it’s crucial to have a robust system for managing and tracking updates. Automated deployment tools can be invaluable in this regard, allowing updates to be pushed out to devices in a controlled and coordinated manner.
In conclusion, implementing DevOps in IoT development can bring significant benefits, including faster development cycles, higher-quality, reliable applications and improved scalability and flexibility. However, it also presents unique challenges that need to be effectively addressed. By understanding and properly implementing the principles and practices of DevOps, we can harness the full potential of IoT technology and drive forward innovation.

To download, please fill out the form below:

Automated security testing tools enable us to identify web application vulnerabilities early and often, but what happens after a vulnerability has been identified? Does your security team have the coding skills to mitigate it themselves, or are your developers suddenly security experts once a vulnerability is discovered? Most likely not. So, how do we go from finding vulnerabilities to fixing them? Enter a key component of shifting left: Collaboration between security and developer teams. And a portion of that involves providing developers with the context they need to prioritize and remediate threats appropriately.
Useful context includes (but is not limited to):
– The vulnerability type
– How it works
– What malicious actors can accomplish by exploiting the vulnerability
– Ways to mitigate
The list below provides context around five common web application security threats to help you collaborate on resolutions with your developers. A shared understanding of these threats and how to mitigate them early in the development life cycle will significantly improve overall security posture without impacting software delivery.
A SQL injection attack is executed when an attacker injects malicious code into an application’s database through user-controlled data. While these types of attacks can accomplish many different things, there are several common outcomes. SQL injection attacks can enable attackers to gain unauthorized access to sensitive data stored in the database, and largely depending on what data is stored in a particular database, can result in access to authentication information, financial information and personal data. The second key outcome is the manipulation or removal of data. Malicious actors can then leverage this outcome to access the larger infrastructure and find even more sensitive information.
To help protect against SQL injection attacks, organizations should never implicitly trust and always validate user input and utilize input encoding, prepared statements, parameterized queries or stored procedures instead of dynamic SQL statements whenever possible. By combining frontend and backend standards to prevent SQL injection from happening, your application can increase its security against this type of threat.
Another common web application attack is cross-site scripting (XSS) which involves inserting malicious code or script into a website. The website will then execute on the given script, enabling attackers to steal sensitive user data, such as session tokens and cookies.
There are three main types of XSS attacks we regularly encounter: Reflective, stored and DOM. Reflective XSS attacks insert malicious code into a website that is immediately executed, whereas a stored XSS attack involves injecting malicious code into a website that is stored and executed later. DOM XSS is an attack pattern that is used more in single-page applications but acts similarly to reflective XSS. If successful, a cross-site scripting attack can lead to the theft of user session IDs and/or website defacement and lead to redirection to malicious sites, thus enabling phishing attacks.
Similar to SQL injection attacks, to protect against cross-site scripting, organizations must never implicitly trust and always validate user input and use output encoding techniques while also using auto-sanitization libraries such as OWASP AntiSamy and implementing a content security policy.
Cross-site request forgery (CSRF|XSRF) attacks trick users into performing an action on a website without their knowledge or consent. This is often achieved by inserting a malicious link or form into a website where a user is already authenticated. When the user clicks the link or submits the form, the action is performed on their behalf, leading to potential data loss or unauthorized access.
Mitigating these types of attacks requires leveraging CSRF protections which are built into the framework you are using, if applicable. Using CSRF tokens, which are unique, randomized values associated with a user’s session and can verify the authenticity of a request will also help migrate an attack. In addition, SameSite cookie settings can help prevent attackers from being able to send requests on behalf of a victim.
Insecure direct object references (IDOR) occur when an application exposes direct object references, like URLs or database keys, which allow attackers to gain access to restricted data by manipulating these references.
Safeguarding against IDOR requires the implementation of proper access controls and session management, ensuring that only authorized users have access to certain resources or data. Also, avoid using predictable references and instead utilize globally unique identifiers (GUIDs) to prevent attackers from guessing the direct object references they need to access restricted data.
It is important to remember that IDOR-based vulnerabilities don’t occur singularly and are coupled with other vulnerabilities to become an effective attack vector.
Remote code execution (RCE) gives an attacker the ability to execute arbitrary code on a server, which can lead to the compromise of entire systems and offer unauthorized access to highly sensitive data. RCE attacks can occur through an array of means, including exploiting vulnerabilities in code libraries or injecting malicious code through user input fields. As illustrated by the critical zero-day exploit discovered in the Java logging library Log4j in December 2021, RCE can be a determinantal vulnerability.
A successful RCE attack can cause denial-of-service (DoS) attacks, expose sensitive data, lead to illicit cryptocurrency mining and the execution of malware. In more severe instances, a successful RCE attack can allow an attacker to gain full control over the compromised machine.
The good news is organizations can implement the same tactics used for protection against SQL Injection and XSS—never implicitly trust user data and adhere to strong user input sanitization and validation.
Safeguarding applications and ensuring a sound security posture requires both security and developer teams to have a shared understanding of common threats and the associated risks.
The details provided in these examples only scratch the surface in terms of useful context for developers. When you can pinpoint when a vulnerability was introduced, which repository branch and code commit it’s associated with and whether it is exploitable from the outside, you create a powerful feedback loop that accelerates fixes.


To download, please fill out the form below:
