Author: Guillermo Vélez

  • What Is DevSecOps and How to Enable It on Your SDLC?

    What Is DevSecOps and How to Enable It on Your SDLC?

    For the past three to four years, all the companies around the IT world have adopted agile and different application development methodologies that leverage the work for different departments or areas and helps them to develop new products and release new features to improve their processes and infrastructure.

    In this new Agile and DevOps world where everybody on a team is involved in the rapid-changing and evolution of their application, we are promoting accountability for everybody in terms of security—this is when DevSecOps joins the party.

    What is DevSecOps?

    DevSecOps is a new model that provides accountability for the security implementation in the application; from the planning, design, development, QA/testing, to release and when operating on a production environment.

    When implementing DevSecOps on the Software Development Lifecycle (SDLC), an organization will experience the continuous integration and will notice that the costs for compliance are reduced, code is constantly being analyzed, tested, delivered and released properly.

    DevSecOps enables the process of implementing security to everybody and makes them accountable.

    Why Is It important?

    As I stated previously on this blog, on this rapid-changing era, everything is evolving at a very accelerated pace. We continue to discover vulnerabilities and breaches across platforms and operating systems, patches are released constantly but we—as part of the operating team of a company—cannot afford the risk of having a vulnerability on any side of our IT system/application.

    Main Benefits

    • Reduces vulnerabilities present on your code.
    • Reduces vulnerabilities present on your IaC technologies.
    • Reduces the number of ways to exploit your application
    • Reduces downtime.
    • Improves your application stability, availability and security.

    How Can I Enable DevSecOps on My Current DevOps Pipeline or SDLC?

    DevSecOps is a must-have methodology that needs to be integrated into your DevOps process/pipeline to help you improve your security on your SDLC.

    There are five important phases that need to be followed in order to enable DevSecOps on a current DevOps pipeline or in the SDLC. Here are the crucial phases to enable it:

    Phase 1: Secure Local Development. Start by implementing secure working-environments. When you are developing an application, in most cases you will use open source technologies. Docker is a great helper at this phase since it automates the infrastructure and services deployments on local machines. So when you are using this ready-to-go docker environment, make sure that you are using the most recent/updated versions of the Docker Images and scan them for vulnerabilities. Even the images from official providers have vulnerabilities that need to be patched.

    Phase 2: Version Control and Security Analysis. Enable Vulnerability while uploading your source code.  Having multiple hands or people working at a piece of code can lead to vulnerabilities, especially when they are remote. Git systems have been a great improvement for collaboration between team members and code. When a team member uploads a piece of code, I strongly suggest that you enable automated testing for security on your code dependencies and core. Some good alternatives to do it are Snyk or Sonatype’s Nexus.

    Phase 3: Continuous Integration and Build. When creating the development image/package, you’ll need to make sure that your build tool or system has the proper security in place. It uses https:// protocol, it’s properly hardened and secure, it’s available and protected for attack mitigation or even not accessible via the internet. The tools that you can use here are Jenkins, Circle CI, AWS CodeBuild, Google Cloud Functions, Azure DevOps.

    Phase 4: Promotion and Deployment. When deploying to an environment, insert the environment variables through your CI/CD tool and try to manage them as secrets. Proper encryption and management of these are recommended in order to enhance your security protocols.

    Phase 5: Infrastructure Security. When your app is deployed, make sure that you have an IDS (Intrusion Detection System). Tools such as OSSEC or Wazuh will help on this matter to protect all your hosts.

    Once your code gets to the production, it doesn’t mean that it will be 100% secure. New vulnerabilities are disclosed every day but this cycle will help you and your team to test your code against all the repository of known vulnerabilities, at the time of monitor, configure, reconfigure, adapt and deploy solutions to the environment.

    Tools and Processes

    These are the tools you will need to enable in your DevSecOps process:

    • CI/CD Tool.
    • Secrets Manager.
    • Version Control System.
    • Docker Orchestration tools.
    • Security Analysis tools.

    And these are the processes:

    • Automated regression testing.
    • Dynamic testing.
    • Automated Vulnerability Assessment.
    • Automated Integration.
    • Promotion.
    • Automated Deployment.

    What Is the Ideal Workflow for DevSecOps?

    1. A developer creates a new code and integrates it into the VCS.
    2. Members from the QA team retrieves the code to perform the static code analysis to identify security flaws or functional tasks.
    3. A test environment is created automatically using IaC such as Terraform, CloudFormation, Chef or Puppet and the security configurations are added to the system.
    4. The test automation suite is performed to the application with a tool usually Selenium or any other tool that performs backend, UI, integration, security and API tests.
    5. After the test suite is performed and successful the new changes are sent to the production environment.
    6. The new version of the code is now going to be monitored in the production environment using an APM or Cloud-native monitoring tool.

    Following these points you are ensuring that your application is following TDD practices improving the code quality, compliance, increasing the number of releases of code to production and reducing the time to market which is essential for any organization.

    What Are the Challenges When Enabling DevSecOps?

    • Enabling too Many Tools: Enabling too many tools can become a problem on your SDLC, especially when your team is not used to work and relate with DevOps/security tasks. The main recommendation here is to start slow. Start by enabling only the necessary tools to get your team familiar with the process and add more when you feel your team is prepared for it.
    • Getting Used to the Methodology: It will take some time for all the team to get used to the DevSecOps methodology/culture and also to keep following it in order to be compliant with the normative that your business demands. Try to always stay up-to-date and coaching your team for the newest technologies.
    • Chasing Perfection on the Process: Keep in mind that all the DevSecOps process won’t be perfect, but it will get mature over time. Teams always try to chase perfection and this only leads to more problems with even more integrations or dependencies.

    Conclusion

    In the end, I think every organization must make the effort to shift to a DevSecOps methodology or process and come up with a multidisciplinary team with a focus on security. That’s how an organization will transition from doing DevOps to DevSecOps. Allowing all their collaborators to have accountability on the part they are actively developing.

    — Guillermo Vélez

  • Hosting Scalable WordPress on AWS

    Hosting Scalable WordPress on AWS

    Do you own or manage a WordPress site? Is it complex, with a lot of traffic? I’m going to show you the ideal architecture to host a highly available and scalable WordPress site on AWS.

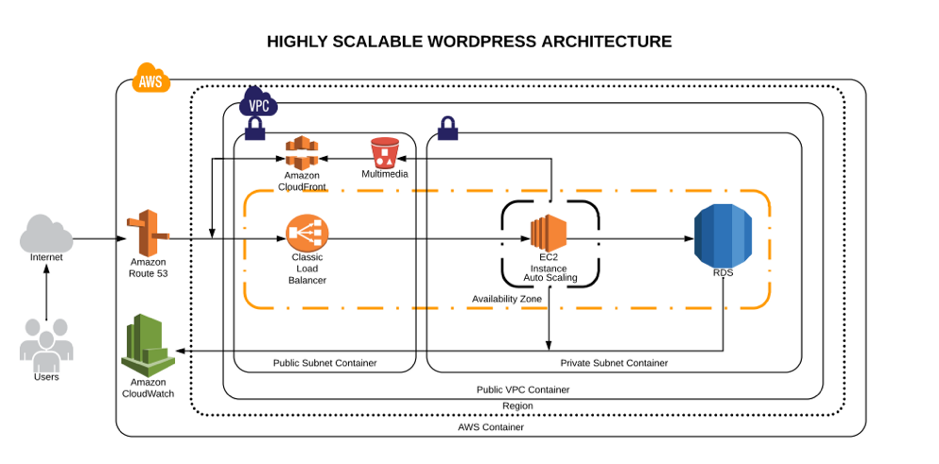
    This blog is intended to show a distributed architecture in AWS for WordPress CMS websites. You will be able to identify the different layers of services needed to run a high-traffic WordPress site.

    The Concepts of a Highly Scalable and Available Environment

    Let’s start by looking at what a highly scalable and available environment means—and what it includes:

    High Availability: On IT it means that a system can operate without any service disruption or interruption for a long time, as well as a system that has redundant components. (In our case, the redundant Infrastructure will be our high availability — thanks, AWS, for making this easier!)

    Distributed Services — Loose Coupling: The art of distributing different components of a system in the same network. We will be doing this to leverage the load of any resource and have dedicated hosts for a service.

    Scalability: A system’s ability to monitor the user demand and automatically increase or decrease resources. This scalability will be provided by the following AWS Resources: AWS ELB, AWS EC2, AWS S3, AWS RDS.

    One essential part of innovation is always to stay up to date and implement the best technology available.

    First Things First

    If you are planning to follow this blog, it is because you are looking to migrate to Amazon Web Services or you already have an environment or some resources allocated there.

    If you are already on AWS, we have also compiled a very concise checklist, which is available here.

    Architecture Diagram

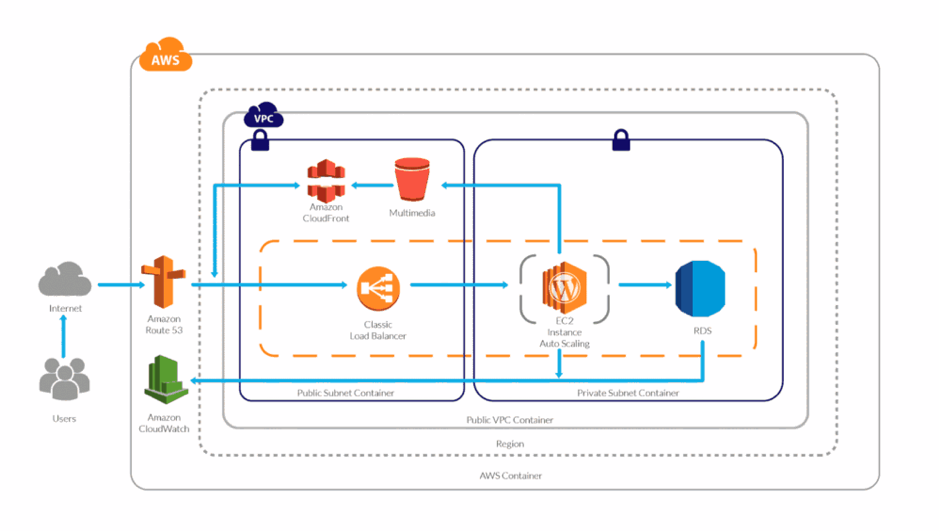
    High scalable and available WordPress environment on AWS Cloud

    AWS Services Explained

    1. Route53: This service will help us to manage all the upcoming requests (traffic) for our domain. AWS Route53 will also be the DNS manager, so here we will point our domain registrar to be the manager. Once it has been migrated here, we can add the A records, Cnames or TXT records and many other more.
    2. AWS VPC: The AWS VPC is a service that allows us to have a private network in which we will allocate our cloud computing resources. That means nobody has access to it—only ourselves.
    3. AWS Private Subnet: The private subnet is the subnet in which we are going to deploy the resources we don’t want outsiders to have access to. In this case, our database will be only accessible by the application.
    4. AWS Public Subnet: The public subnet is the subnet in which we are going to deploy the resources we want to make public — such as the server for our website.
    5. AWS S3: Amazon Simple Storage Service will be our content storage solution. Here, our WordPress installation(s) will have the content available whenever it scales up or off.
    6. AWS CloudFront: CloudFront combined with S3 will help us to spread the content faster to the end users. This way our WordPress multimedia content will be spread all over the AWS CDN network (edge locations), which will be used from our application to reduce the latency. Users will be served by the closest edge location available. So faster content = faster site.
    7. AWS Load Balancer: Here is the tricky part. The AWS ELB will allow us to distribute the traffic load between our instances available or in use depending on how the auto scaling is set.
    8. AWS EC2: Instances—also called “VMs”—the service on AWS for acquiring computing power. AWS EC2 will allow us to host our WordPress site and files we need.
    9. AWS Autoscaling: This will be the solution for our highly available and scalable WordPress site. AWS Autoscaling will take care of always having a minimum quantity of instances available for the public, and in case something goes wrong, it will replace the instance with a healthy one. This way our site will always be available. Autoscaling will also benefit our WordPress by creating instances based on the traffic demand and will help us to save costs while the traffic is low.
    10. AWS RDS and Multi A-Z: RDS will be the service in which we will host our WordPress database. The service is completely free and fully managed by AWS, which means we won’t need to worry about the database management anymore. Also useful is that RDS instances can have replication between them, which adds even more scalability. Also, enabling the Multi-Availability Zone (Multi A-Z) feature will provide us high availability. Keep an eye on this, however, since the price will is double for the RDS.
    11. AWS Cloudwatch: AWS Cloudwatch will be our trusted supervisor. Cloudwatch will be in charge of monitoring all the resources in our AWS account. It will keep an eye on the metrics that are predefined or as default by AWS resources, such as CPU usage, memory usage, disk IO and networking.

    Did I forget about EFS? Nope. In my experience, EFS has not been a huge help when it comes to sharing the WordPress files only. However, you can try using EFS; that way, the content will be replicated much faster and easier.

    If you want to learn more about the technologies and the approach that should be taken to create this kind of environments, take a look at this post.

    Millions of Page Views Served

    Here’s how this environment will be able to serve millions of page views/visitors:

    Traffic Flow

    Once visitors hit your domain on their browser their request is passed to the internet, then routed to your DNS manager. The DNS manager (Route53) will solve the request to the specified server and the web server then will serve the application.

    WordPress High Performance

    What will happen when your traffic increases? Here is an example:

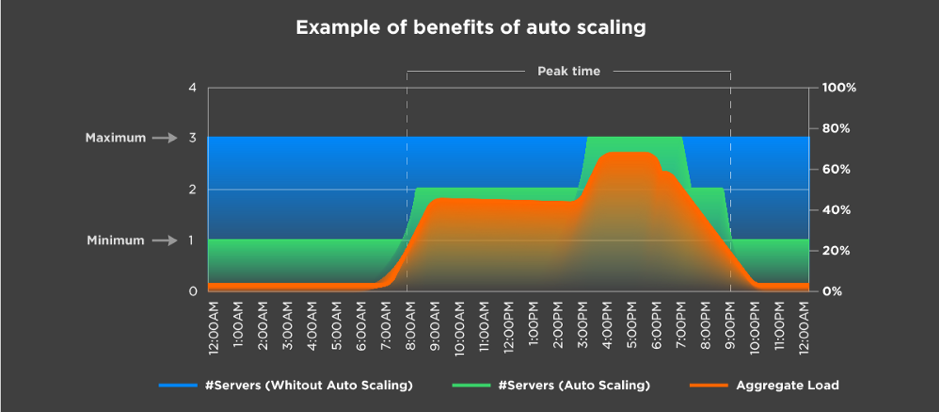
    Autoscaling example

    Let’s say you have set the autoscaling to one as the minimum number of instances and a maximum number of three instances. Based on different metrics, your environment will be able to scale out depending on the load it receives.

    In the image above, we can see that depending on the aggregate load, the environment continues to satisfy the demand by creating more instances as it grows. The same happens the other way.

    This means a lot when you are calculating the TCO of your cloud environment. It also means you won’t run out of memory or other resources; instead, you will have a more available system.

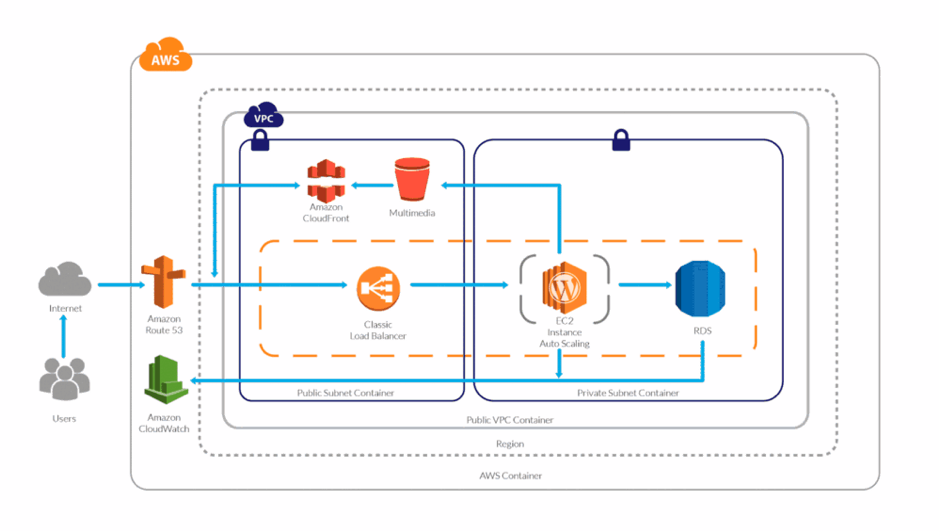
    And you might be wondering, What is going to happen to my AWS Resources? Here’s a visual:

    WordPress High Performance Scaling

    The answer is simple: More demand or traffic, more servers to meet it.

    Server Caching/WordPress Caching

    Server-side caching or WordPress-side caching happens with a plugin or is embedded in AH host. Whenever someone requests the homepage, for example, the request is passed to the database to retrieve the homepage information. Caching creates a temporary file (I say temporary, because you can specify the expiration) so when your request comes, it will check for the files it generates instead of processing the request to the database.

    This way, we can serve faster pages/content to our users and reduce the database consumption.

    If you yet don’t have a caching system implemented, make sure you do from now on, as it speeds up your website dramatically.

    Content Delivery Network

    In a few words,  the content delivery network (CDN) the network of servers or services in which your content will be hosted and this network will be used to transfer the content to all the visitors. Using a CDN will help you to spread your content around the world faster than having it hosted on your server.

    CPU/Memory Performance

    Based on the CPU and memory metrics, our stack will be able to scale up or scale in as desired. This way our response time will always be the same between all the servers and no instance will experience overload due to CPU or memory (these are the annoying 500’s errors).

    Instance Types

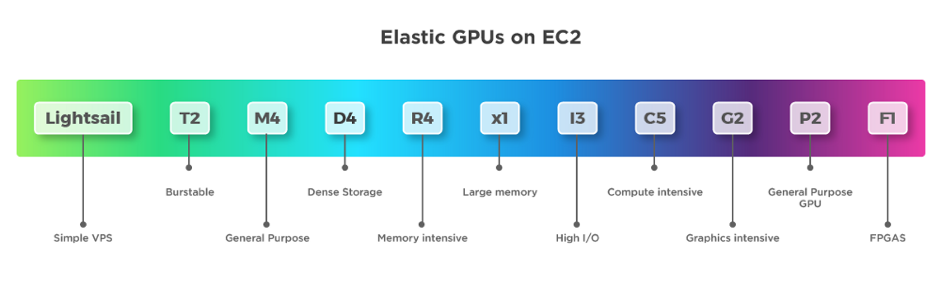
    On AWS we have different instance types that we can use depending on the workload we have. It’s important to choose the right instance type.

    AWS instance types


    If you don’t know which to use, read this blog.

    Definitely using the correct instance type for our WordPress will help, as well as selecting the number of resources for it to run.

    And there you have it —you now know how your site can support millions of page views with a distributed system.

    Backup and Disaster Recovery

    It is essential to have a backup strategy as well as a disaster recovery solution in case something happens to our WordPress installation or our environment. Luckily, AWS offers a lot of redundancy between all its services.

    There are different ways in which we can protect our application and users’ data:

    1. WordPress plugins to back up the site (S3).
    2. Disaster recovery for infrastructure (physical).
    3. Backup for user data (DB — RDS).
    4. Backup for application code.

    Amazon Web Services already provides different backup solutions for all its services, so we can create backups for the RDS with one click and perform the configurations for backups with EC2.

    Pro Tips

    1. To increase the performance use a database, query and page caching plugin.
    2. Increase the RDS performance with a dedicated Aurora RDS.
    3. Use S3 and CloudFront to deliver the content faster.
    4. Enable alarms on AWS Cloudwatch.
    5. Enable the billing alarm to avoid unwanted charges for usage.
    6. Use Reserved Instances—if you are going to stay in AWS for a long time reserve, it can save you up to 30 percent.
    7. Use a version control system to track your changes and deploy to the instances.

    Conclusion

    This article outlines what I consider an ideal architecture for a high-performance/high-traffic WordPress site. As you can see, Amazon provides us with all the tools and technologies to do it, but sometimes it can be challenging.

    As always, if you think I missed anything, please post it in the comments!

    If you would like to get more techie blogs, subscribe to our newsletter.

    — Guillermo Vélez