Access to Dynatrace’s Software Intelligence Platform through the Microsoft Azure Marketplace empowers global organizations to accelerate digital transformation
WALTHAM, MASS, March 16, 2021 – Software intelligence company Dynatrace (NYSE: DT) announced today an expanded strategic collaboration with Microsoft. As part of this, Dynatrace now delivers its observability platform for purchase through the Microsoft Azure Marketplace. This means Microsoft customers can now easily implement Dynatrace’s automatic and intelligent observability for their Microsoft Azure and hybrid-cloud environments through a streamlined process covering everything from procurement to automated deployment and configuration.
The collaboration also includes joint go-to-market activities, including:
- Microsoft Azure customers can now use their committed Azure spend to purchase Dynatrace®.
- Microsoft and Dynatrace are engaging in joint marketing, including events, sponsorships, and customer solutions workshops.
- Microsoft and Dynatrace will provide their sales representatives with co-selling incentives to encourage a simple, unified go-to-market motion.
“We are pleased that Dynatrace has made their observability platform available in the Azure Marketplace, so customers can easily implement automatic and intelligent observability for their Azure and hybrid-cloud environments,” said Casey McGee, Vice President of Global ISV Sales at Microsoft. “The Dynatrace platform enables customers’ business transformation by providing real-time information about application performance and security, underlying infrastructure, and user experiences, so they can focus on driving innovation and delivering new value.”
“We designed the Dynatrace platform to enable the largest organizations in the world to accelerate their digital transformations,” said Mike Maciag, Chief Marketing Officer at Dynatrace. “Together with Microsoft, we’re making it even easier for our joint customers to build, deploy, and grow applications in Azure and hybrid environments at scale. In addition to the metrics, logs, and traces of observability, our unique approach unifies AIOps and continuous automation to help organizations innovate faster and achieve better business results with greater efficiency and confidence.”
Visit the Microsoft Azure Marketplace to get started with Dynatrace today. To learn more about how Dynatrace complements and enhances Microsoft Azure, visit the Dynatrace website.
About Dynatrace
Dynatrace provides software intelligence to simplify cloud complexity and accelerate digital transformation. With automatic and intelligent observability at scale, our all-in-one platform delivers precise answers about the performance and security of applications, the underlying infrastructure, and the experience of all users to enable organizations to innovate faster, collaborate more efficiently, and deliver more value with dramatically less effort. That’s why many of the world’s largest enterprises trust Dynatrace® to modernize and automate cloud operations, release better software faster, and deliver unrivalled digital experiences.
Curious to see how you can simplify your cloud? Let us show you. Visit our trial page for a free 15-day Dynatrace trial.
To learn more about how Dynatrace can help your business, visit www.dynatrace.com, visit our blog and follow us on Twitter @dynatrace.







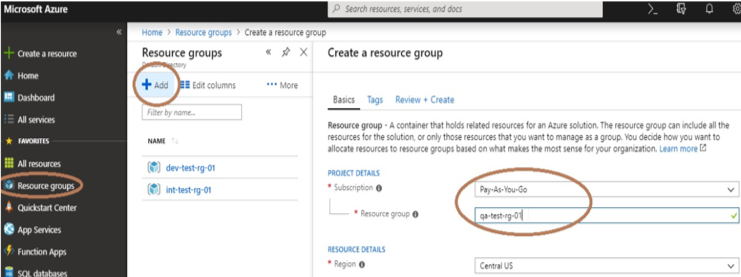 Once you have a subscription in Azure, you need to create a resource group to manage resources in Azure. The best practice is to maintain a separate resource group for each environment (DEV, INT, QA, STAG, PERF, PROD) and follow the proper naming conventions. To create a resource group, select Resource Group from left-side blade, click on +Add, then select Subscription, give a proper name to the resource group and click on Review + Create.
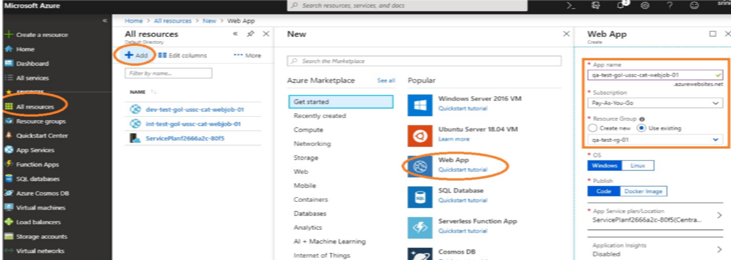 Click on All resources from the left-side blade of the panel and click on Add, then select Web App and give a proper name to your app service. Then select Subscription and select the existing resource group. Keep the remaining option as default. and click on Create.
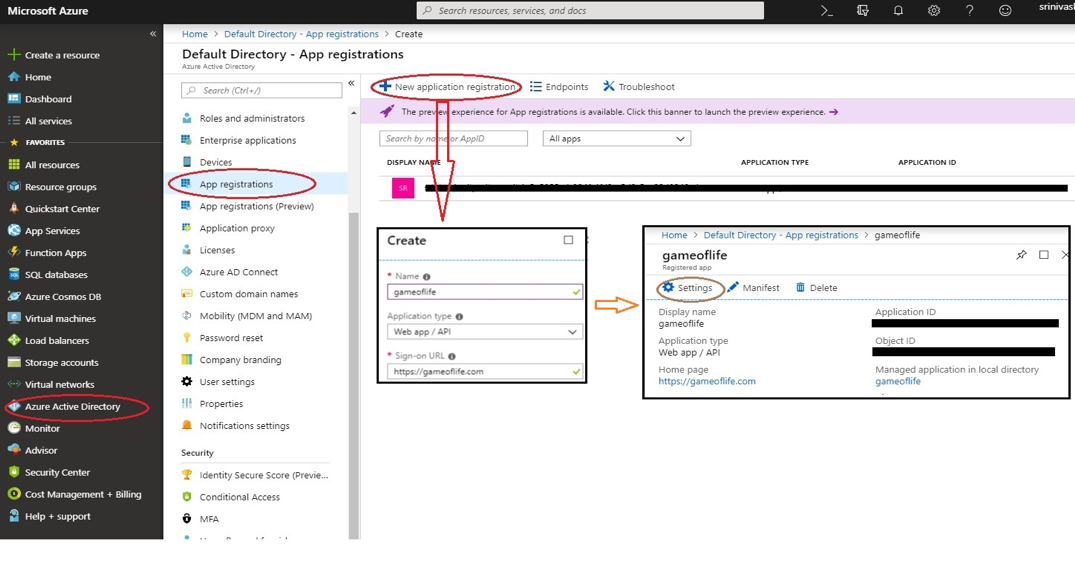

 To create a new project, click on Create new project, give a proper name to your project and select create. Then go to Repos, click on Import, then select source type, type in the above URL in the Clone URL tab and select Import. The source code will import into your repository.
 We need give service connections to our project, so go to project settings from the bottom of blade in our project home directory and then select Service Connections -> New Service connection -> Azure Resource Manager. Click on “Use the full version of the service connection dialog” from the pop-up, then paste the Application ID into the Service principal client ID tab and the secret key value into the Service principal key tab (which you saved during app registration creation). Then click OK.
 Creating a Continuous Integration (CI) Build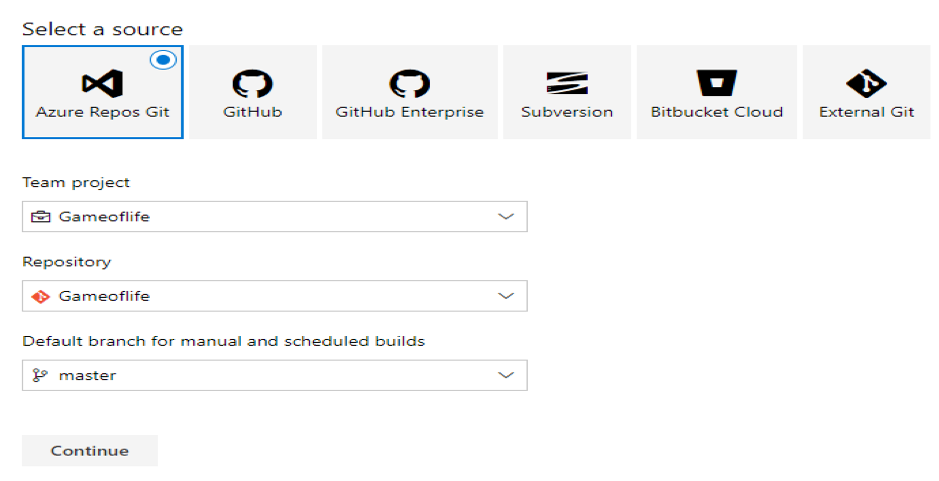

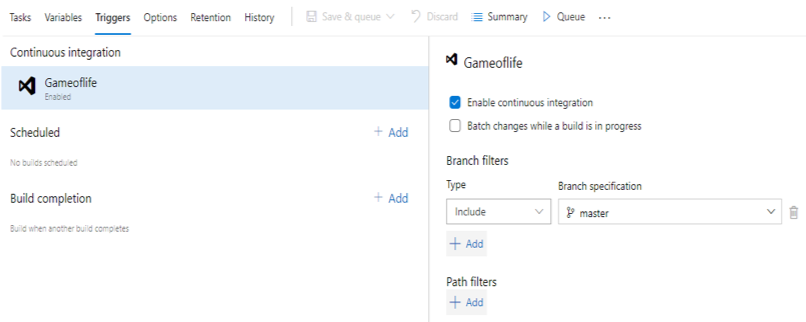 Next, select a template Maven, type in the pipeline name and select Hosted VS2017 for the Agent pool, and click on pom.xml in the Maven POM file. There you can list the goal(s) as Clean Package and select Copy Files. At the contents section please enter **/*.war then go to Publish Artifact: drop, list the artifact name as Gameoflife and keep all remaining options as default values. Then, under Triggers, select Enable continuous integration and give branch filters listed at right, which enables the continuous integration feature. Once a developer commits their changes into master, the CI build will trigger automatically.
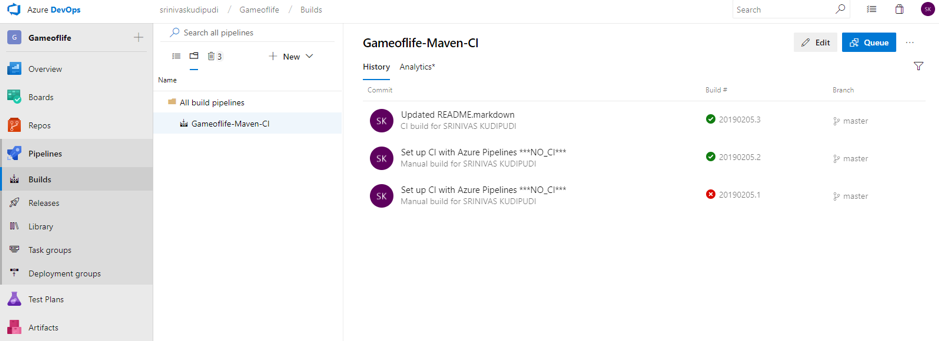 Once the configuration is complete, click on Save and Queue from top of pipeline to trigger a CI build. (Every commit into master will trigger a new build.)
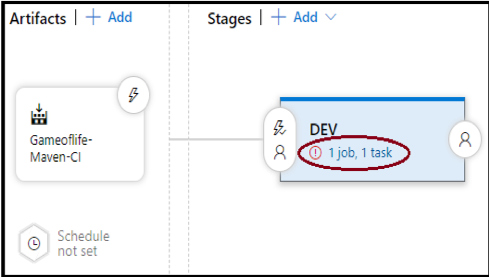 Go to Pipelines -> Releases -> New Release Pipeline, then select the template Azure App Service deployment, list the stage name as DEV and click on Add an artifact. Select project and source (build pipeline), then select default version as Latest, click on Add. Cick on Task (below the DEV), select Run on agent and select agent pool as Hosted VS2017, then click on the plus(+) symbol, search for template File Rename and select the .war file from source file and give it the new name ROOT.war.
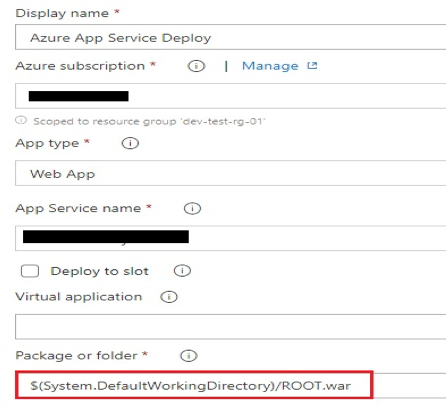
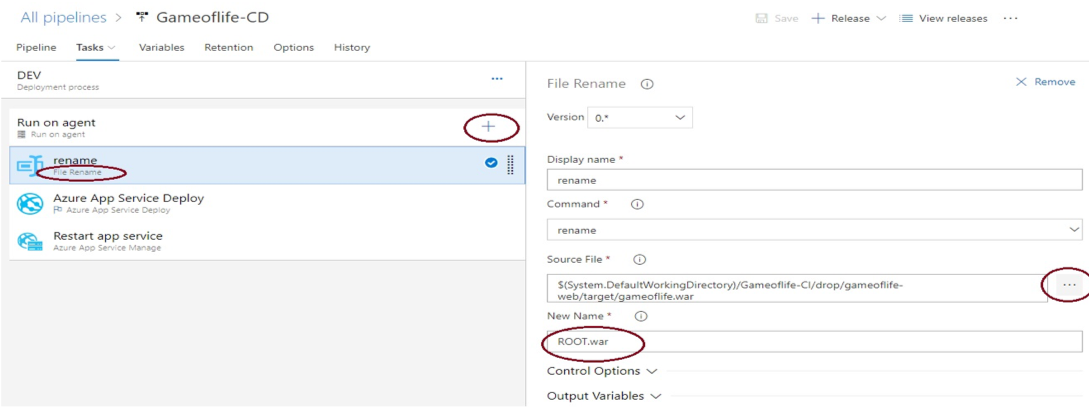 In the Display name box, list Azure App Service Deploy. In the Azure subscription field, you need to select a service principal name to authorize the resources. Then choose the App type and App Service name. In the Package or folder selection, select war file and rename it ROOT.war, because for java-based applications we need to deploy our app into a proper directory structure.
 Finally, select the template Azure App service manager and select the Restart option, making sure to select the same subscription and app service name you selected in the Azure app service deploy window. Click on Save, then click on Release -> Create a release -> select artifact build number -> create. Build will then trigger and deploy into the app service.