Tag: AWS

  • Amazon Simple Notification Service (SNS)

    Amazon Simple Notification Service (SNS)

    Amazon has packed a box full of services and covered nearly every aspect in making cloud a smooth experience for developers to put up exceedingly operational and structurally complex applications on AWS. Large numbers of cloud-based systems feel the dire need of or dependency on sending out emails on a subscription basis to end users. But it is unfortunate that the internet today is brimming with spammers who refuse to stop sending requests and retarded emails from servers with objectionable SPF configuration.

    Taking care of the above mentioned issues, AWS publicized an exceptionally great service known as Simple Notification Service (SNS), designed to the needs of genuine notification delivery.

    What is Amazon Simple Notification Service (SNS)?

    The Amazon Simple Notification Service (SNS) has made it straightforward and trouble-free for you to construct and put together an application in its own way.

    Amazon SNS is a speedy, adaptable, flexible, entirely commanded and managed push messaging service that allows you without any difficulty to set up, operate and send notifications to all your subscribers. It brings in the simple and cost-effective push notification service to Apple, Google, Fire OS, and Windows devices even, including all the Android devices in China with Baidu Cloud Push. It can also be used to push notifications to internet connected with all distributed services and smart devices.

    It is capable of creating topics, subscribe to topics and even publish topics in an exceedingly scalable, flexible and beneficial manner. By means of Amazon SNS, you can direct event driven messages from your applications to your users. In order to bar and avoid any sort of message loss, all the messages broadcasted across the multiple availability zones to Amazon SNS are stored constantly.

    Screen Shot 2015-03-01 at 9.01.07 PM


    Let’s deep dive into the block displayed in the figure:

    1. Topics: These are the access points or named groups of events for each identifying a specific subject, content or event type. Every single topic carries along a Unique Identifier (UI) that helps in identifying the SNS endpoint for publishing and subscribing.
    2. Owners: Owners are those who create topics and have a complete admittance and access to the topic.
    3. Subscribers: These are the clients usually the end-users, servers, applications or other devices that desire to receive notifications on particular topics of their interest.
    4. Publishers: They are responsible for sending messages to topics. Now SNS matches up the topic with the list of subscribers interested in the topic and distributes the message to each one of them.

    Features and Benefits:

    Amazon SNS has come up with sufficiently great benefits over the complications of developing custom messaging resolutions in support of a system that demands to be supervised, managed and maintained on site. Following are some of the key benefits and features of Amazon SNS.

    1. Reliable: Whenever Amazon SNS streams inside Amazon’s verified network infrastructure and data centers, all topics will be available each time applications calls for them. All messages broadcasted to Amazon SNS are stocked redundantly throughout numerous servers and data centers in order to prevent message loss.
    2. Scalable: Amazon SNS is modeled to encounter the demand of most needy and demanding applications which permit event driven limitless amount of messages at any time.
    3. Simple: For the majority number of cases the developer just by using only three API’S, can get started with the Amazon SNS which are: Create Topic, Subscriber and Publish. To provide you with intuitive functionality additional APIs are also made accessible.
    4. Flexible: With Amazon SNS, applications as well as end-users on different devices are able to receive notifications with the help of Mobile Push notification (Apple, Google and Kindle Fire Devices), Email/Email-JSON, HTTP/HTTPS, SMS or Amazon Simple Queue Service (SQS) queues.
    5. Secure: Amazon SNS is a secure service and makes sure that topics and messages are secure from any unauthorized access. All the Topic holders have a full authority of setting policies for each topic to put limit on who can publish or subscribe to a topic and can even make sure of the encryption via marking that the delivery procedure ought to be in HTTPS.
    6. Inexpensive: Pay-as-you-go method helps in saving a lot of money of Amazon SNS customers. There are no beforehand fees or commitments. It only charges you per-request for the messages, notification delivery and transfer fees that are sent through Amazon SNS.

    Amazon Simple Notification Service also supports SMS (Simple Messaging Service)

    Amazon SNS leaves no means of notification untouched and comes with SMS feature to subscribe a phone number via an SNS topic. Notifications can directly be addressed as text messages to cell phones, Smartphone as well as on any other SMS-enabled device. Amazon CloudWatch users who are actually responsible for monitoring and controlling their applications that are running on AWS are capable of receiving the timely updates for actions of interest or alarms as they set. Content delivery is also possible to the mobile device through email to the existing Amazon SNS users. Developers can combine mobile applications in conjunction with Amazon SNS to not only send messages but even take delivery of notifications over SMS.

    Here’s a figure to better explain how Amazon SNS supports SMS

    Screen Shot 2015-03-01 at 9.03.35 PM


    Pricing:

    For Amazon SNS usage you can pay-as-you-go and have no upfront costs. You pay money according to the number of notifications that you are publishing and delivering. You even have to pay if you use additional APIs for managing topics and subscriptions. Price of delivering these notifications varies according to the endpoint type.

    Below are the tables that will provide you with full details:

    Publishers:

    Currently, Amazon SNS only permits maximum limit of 256 KB for published messages. Each 64KB block of published data is billed as 1 request.

    Screen Shot 2015-03-01 at 10.10.28 PM

    Fig: 3

    Notification Deliveries:

    Screen Shot 2015-03-01 at 10.11.38 PM

    Fig: 4

    Data Transfer: Data transfer ‘IN’ is for $0.000 per GB.

    Below is the pricing table for Data transfer ‘OUT’:

    Screen Shot 2015-03-01 at 10.13.05 PM

    Fig: 5

    Conclusion:

    Amazon SNS is designed to use with other Amazon Web Services such as Amazon SQS and EC2. For example, applications which are running in EC2 have the capability of publishing event/information updates to Amazon SNS and transfer them immediately to all other end-users. In addition to this the subscriber can also choose and select Amazon SQS as a delivery protocol that delivers notifications to multiple SQS queues in parallel format keeping in mind the perseverance of messages and a formal assurance that the messages would be delivered. If you are an Amazon SNS user then use must enable this service to your mobile devices and experience its benefits.


  • Composable Environments for Continuous Delivery

    Composable Environments for Continuous Delivery

    The Continuous Deployment model discussed below requires some very specific properties for its platform substrate. Currently AWS is the the only environment that supports all the features needed to implement this. So when we start talking about implementation details in this, and future articles, we will be targeting AWS.

    The title of this article is actually reversed from what it should be. This article isn’t as much about using reproducible Composable Environments for Continuous Delivery (CD) as it is about using Continuous Delivery to build reproducible Composible Environments. The Composable Environment is the important piece. Why? To understand that we need to understand what such an environment is. An Environment is a self contained, full software stack that includes every component needed to support the stack along with a version controllable description of that stack. For example, an Environment for a website might be the all of the machines that run the HTTP Servers, other machines that run the RESTful Web Servers, databases, AMQP providers etc. It would also include any infrastructure required for auto scaling, fault recovery etc. This Environment would be completely described in a declarative way by one or more files that are under version control. That description contains every virtual machine image, database schema, DNS server, DNS entry, etc needed to standup a system in a self contained, replicable form that can be put under version control. This description is versioned in a sane way and reproducible through the execution of a single command. A good example of this concept is Cloud Formation Stacks. Stacks declaratively describe a full environment and the Cloud Formation infrastructure takes those stacks and, on request, vivifies them into full running system. Our concept of environment takes that further with ideas around isolation of environments and accessibility via DNS, but these examples provide a good seed for the concept we are describing.

    Reproducible Composable Environments are a simple concept that has profound implications. A few of the most important are:

    • A completely reproducible environment is self contained. Multiple instances of that environment don’t interfere with one another.
    • A declaratively described environment can be changed algorithmically. That is, it can be easily changed via some automated process.
    • An environment can be deployed algorithmically can also be un-deployed algorithmically.

    Once we have created an environment with these properties, we can use it to accomplish things that where not previously possible. It opens up new opportunities through a combination of Testability, Composability and Deployability. You might notice that this sounds like the move towards Structured Programming that happened in the programming community in the 1960s. That transition had a profound and continuing impact on how we create software systems and I think this approach to Devops will have a similar impact on how we create and manage environments.

    Why Environments are Important

    These environments are useful through out the software development process. Start with the individual developer writing and iteratively testing the system. Having such an environment allows him to truly test the changes that he is making by standing up a full environment, including all its participating parts, and testing that system in context. The next big place for using such a system is during Continuous Integration, henceforth CI. At the end of the build cycle the CI system creates an environment, publishes the changes into that environment, stands up the complete system and runs the full test suite for the entire system. The ability to standup the full system in context massively reduces risk in rolling out changes. Being able to roll out, at need, an environment with updated components in an ad-hoc or automated manner improves the testability of our system.

    Automated processes are the correct method to build and modify environments, and are required for Continuous Delivery.

    Continuous Delivery

    I define Continuous Delivery as a idempotent, automated process that is primarily designed to update a reproducible Composable Environment with new, well tested artifacts.

    We can think of Continuous Delivery as a process with a set of well-defined inputs and a set of well-defined outputs. The process itself is composed of a set of stages, each of which have its own inputs and outputs. This allows us to compose stages and even whole CD processes into different processes that serve new purposes.

    For the simplest CD process, the main input is source code and the main outputs are the services that are stood up as part of that system. To be more specific, the outputs are a set of endpoints to which you or your customers connect. In examples I will provide, these will take the form of DNS entries. Knowing the inputs and the outputs, we can now start to think about the process in between.

    The Stages of CD

    The standard CI pipeline is composed of five parts: Develop, Test, Publish, Deploy and Promotion

    Stage: Develop

    The Develop stage is essentially the individual developers development process. Its only input is the output of the CD process that automatically creates and provisions the Development Box as well as the related environment. This is the first example of a CD input being the output of another CD process.

    The reason Development box is necessary is so that the developer can test his work in an environment that exactly matches that of the CI server. It should also exactly match the system that every other developer is working on. This is critical, and often overlooked. Currently, developers rarely write code in development environments that match each others, let alone ones that match the CI server.

    Stage: Test

    The Test stage is where we take the artifacts produced in the Develop stage and test their viability in context. The output of the test phase is usually a more complete set of artifacts published into the environments.

    These Stage usually takes the form of taking developer code, compiling it, turning it into some package-like structure and publishing it to an environment specific known location. The structure is usually an actual package: a LXC/Jail container like a Docker image, a virtual machine image like an EC2 AMI, or some combination of the three.

    During the test phase, the target environment is stood up with the new artifacts, and a series of integration/release tests are run. Test reveal the viability of the changes within the context of the environment as a whole.

    Stage: Publish

    The Publish stage takes the output of the Test phase and publishes those artifacts in a way that makes them available to the Deploy stage. This usually involves putting the packages in a publicly accessible place.

    You may have noticed our heavy reliance on some packaging model. That is intentional. You need turn your system into a manageable unit in order to make it work correctly as part of the process.

    Stage: Deploy

    The final stage is Deploy. This is where the published packages are used as inputs to update the environment. The output of this stage is the canonical environment updated and vivified with the newly published artifacts. The running systems, provisioned databases, accessible URLs, etc are all updated in place.

    Stage: Promotion

    Finally we have the optional step of promotion. This simply involves moving the artifacts outputted from the Deploy state to a new environment. A common example of this is the promotion of a beta environment to production, where some secondary process has been run that has validated the environment making it available to consumers.

    Overcoming Technological Constraints

    I am not going to lie to you. It is non-trivial to get started with this process. Up until a very few years ago, I would have said it is impossible. But, the world has changed, and it is now possible, even approachable. There are some prerequisites that we have to get it working. You must have the ability to programmatically configure your network, configure your DNS, provision hardware etc. I can accomplish this with a mix of new technologies like OpenStack, OpenFlow and customized DNS among other things. Most of us don’t have the ability to implement those technologies in our data center. Fortunately, we have AWS. Between EC2, Route 53 and especially CloudFormation, we have nearly everything needed to make this happen. Over the next few articles, we are going to take the model described here and apply them on a production system. At the series conclusion, you will be able to apply this model in your own AWS-based environments. You should still be able to adapt and apply parts of this model in non-AWS environments, as well.

    And, my team will keep implementing and refining our ideas for composable environments for continuous delivery towards having a more complete solution. Stay tuned!

  • The One Where All Hell Breaks Loose

    The One Where All Hell Breaks Loose

    Don’t you love a good story? This one is a DevOps story in a fictional enterprise. It’s the kind of story you’ve seen replayed countless times in large organizations. So settle in for a read.

    The backstory

    DChip Tech is a semiconductor company. They’re in the business of making chips for wearable computing since acquiring Enogo, a startup in France for simulated testing in wearable technology.

    Three months into the acquisition on a late Sunday night in France, the VP of Operations at Enogo considers his late evening ahead.

    Chandler is not a happy man despite his recent appointment as the VP of Operations. How can he be? How can a 40-person company in France give him so many sleepless nights? And tonight is no exception.

    DChip’s strategic momentum in the last months had everything to do with it. To leverage the cream of the crop engineering talent in wearable tech, DChip, the San Francisco Bay area chip giant invested in Enogo.

    • Now DChip wants Enogo systems fully integrated into its OpenStack datacenter to reduce infrastructure costs.
    • Although Enogo hosts on AWS, DChip doesn’t want to integrate AWS Europe into the corporate network. They want to keep the intellectual property in the US.
    • It falls on Chandler’s lap to integrate the systems of both the companies and reorganize IT, to speed up DChip releases from once every six months to the weekly push like at Enogo. Imagine all that.

    Tall order, he thinks wryly, gulping down another cup of coffee to keep him awake for the Monday morning US time leadership meeting.

    Where all the action happens

    He dials into the video conference warily, his head already starting to throb. First to appear on the screen, Phoebe, the CIO is looking none too happy either. Soon all the division heads appear on separate screens including the engineering and QA heads from Enogo.

    Dismissing the usual small talk, Phoebe launches right to the point. We have a firm deadline to move out of AWS cloud in three months. Yet, where do we stand now? Can someone explain why the delay in integrating the systems of both companies? Do you know how much this is slowing down our go-to-market strategy?

    Monica, the Chief Architect in charge of the Datacenter OpenStack cluster, says, “We’d love Enogo to move to OpenStack today. But it’s not fully stable.”

    As if to emphasize the point, Rachel the engineering manager whose team is building the wearable emulation test software adds, “We can’t wait for the OpenStack cluster to work. Our engineers need test environments like yesterday. That’s why using AWS makes sense.”

    The marketing and sales VPs quietly watch as everyone joins in the blame game.

    Not to be left out, Joey the Enogo QA Manager complains that he can’t deploy the image that contains the emulation software because OpenStack is corrupting it. “All the more reason to support AWS,” he quips.

    The ultimatum

    I’ve heard enough; Phoebe bellows over the din of the meeting. She turns slowly to glare at Chandler through the video camera. “Chandler, do you care to explain why we have an unforeseen $100,000 dollar expense this month? I want an explanation.”

    “It’s a case of a simple, human error; it can happen to anyone Phoebe,” Chandler tried calmly to explain. “One of the devs launched instances and forgot about it until we got the bill.”

    “Yea” piped up Janice, the VP of Finance. You’ve been paying the AWS bills out of your credit card, Chandler, and then billing the company after the fact,” she so helpfully points out.

    Chandler stands dumbfounded as Phoebe’s final words struck his heart: “I told you to shut down operations on AWS. I want to move to our datacenter on OpenStack. No more bills from AWS Chandler, you hear me?”

    Her words rang late into the night and the next day.

    To be continued…

    (What do you think will happen next? Watch this space for our next episode of the DevOps story. Any resemblance to these characters or events in real life is purely coincidental.)

  • Optimize your spend on AWS through Reserved Instances

    Optimize your spend on AWS through Reserved Instances

    Over the last few years Amazon has gradually raised its compute capacity and provided the user with a set of advanced analytical and structural services. For each service, you can expand precisely for the amount of resources you actually need and shall pay for each resource usage at the end of each month.

    In the spotlight, Amazon EC2 instances which carry along an entire surplus of attributes to help you in deploying, managing and scaling up your applications, Reserved Instances(RI) are another feature making itself really useful in resource management. In this blog we will see what actually are these Reserved Instances also known as RI and why are they named so and how are they cost effective.

    Reserved Instances:

    Reserved Instances are the best money saving technique considering cloud costs. Here’s the catch ” they  require  no methodological optimization effort, no Devops wizardry and no auto scaling structure”.

    RI gives you the power to escalate the roof of your savings by encountering all your business’s call.

    1). Term: 1 or 3 years is time period proposed by AWS for Reserved Instances usage.

    2). Region: Reserved Instances are accessible in all AWS regions. They are also obtainable in Amazon VPC and Dedicated Instances.

    3). Operating System: Platforms for which Reserved Instances can be purchased are Microsoft SQL Server, Amazon EC2 running Linux/UNIX, Microsoft Windows Server, SUSE Linux and Red Hat Enterprise Linux.

    4). Payment Option: There are three payment alternatives provided by RI which are as follows:

    a). Upfront Option: With upfront payment you pay in once for whole RI and you get an extensive discount over On-Demand Instance pricing.

    b). Partial Upfront Option: In this payment option, you are charged a discounted hourly rate as a low upfront payment for the Instance for time span of the RI term.

    c). No Upfront Option: This option provides a discounted hourly rate for the time span of the term and does not require any upfront payment.

    Why Is It called “Reserved”?

    These Instances are named as “Reserved Instances” as they reserve the server capacity. They provide you with a formal assurance that you will be able to launch these RI fully whenever you need them without a popup of insufficient capacity, any time you attempt to start an EC2 instance.

    HOW RESERVED INSTANCES WORK:

    I assume the information above makes you well acquainted with what Reserved Instances are and why they are named so. Now lets consider their functioning.

    To work with your reserved capacity, directly launch an EC2 instance with the same configuration as the reserved capacity that you are capable of purchasing. Instance comprises of varying combinations of platform type, memory, storage, availability zone and instance type. As long as you have an active Reserved Instance, AWS will automatically apply the discounted hourly rate for your EC2 instances. If at any point your purchased Reserved Instance gets expired, then at this situation you will be charged on the basis of On-Demand pricing until and unless you purchase new Reserved Instance of the same capacity.

    All these reservations are applied at the infrastructure level. Once you have a single account, your reservation will be shared amongst the different instances based on run-time. Incase you are a multiple account holder under the same parent account, your reservation gets shared across all accounts.

    There’s also an option available to purchase as well as sell these Reserved Instances through the EC2 Reserved Instance Marketplace thus providing you with the flexibility to sell unused Reserved Instances to any other businesses and organizations.

    Benefits:

    1). Cost Effective: RI equips you with a sufficient discount which is nearly around 75% when compared to On-Demand Instance pricing.

    2). Modifiable: If there arises a situation where you are required to change the zone of your RI then it can be easily done by moving your RI to another available Zone within the same region, by changing its Network Platform as well as instance size of your reservation to another size of the same instance type at no extra cost.

    3). Reliable: To build up your confidence, RI supplies you with a capacity reservation to launch the number of instances you have stockpiled when you need them.

    4). Easy to use: RI usage is similar to that of EC2. While evaluating the bill , system will undoubtedly apply RI rates to reduce your costs.

    5). Marketplace Available:If you want to impose any sudden or planned changes than RI marketplace gives you the opportunity to sell these Reserved Instances.

    Reserved Instance Pricing:

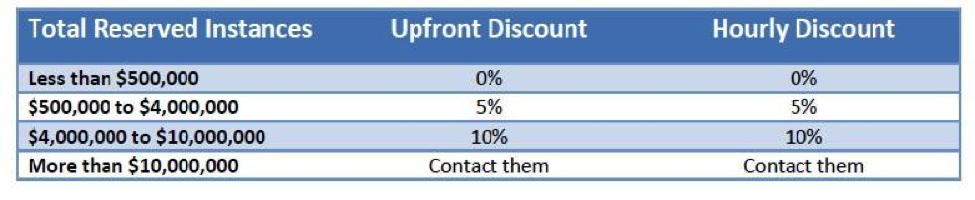
    It’s pretty undoubted that if used with a fair setup, RI helps you to save dollars on AWS in many ways. But if you purchase a massive number of RI in an AWS region, you will automatically be receiving discounts on your upfront fees and hourly fees for future purchase of RI in that AWS region.

    The figure below represents the RI Tiers pricing list:


    RI

           Fig: 1

    So far Amazon Web Services has created exceptionally compelling and powerful features with the Reserved Instances. They not only provide cost benefits but even warranty on the capacity. Though, to be flexible it requires cautious guardianship of your cloud substructure and reservation inventory. So go ahead with reserved instances if you’re looking to deploy a wide scope of apps and websites with a long term no hassle approach.

  • AWS Key Management Service

    AWS Key Management Service

    Security of data and applications whether stored on-premises or in the cloud has always been a supreme issue of influence. To date AWS has provided it’s customers with services that help in securing and encrypting the data e.g., Amazon S3, Amazon Elastic Block Store(EBS) which is a server-side encryption service, Amazon Redshift, Amazon RDS for SQL and many more. All these services make use of the “master keys” that are created, stored and managed within the AWS.

    Recently AWS launched a new and even more secure option for Key Management which will help in managing the keys for the applications and services running both in the cloud and on-premises.

    Introduction to AWS Key Management

    AWS Key Management Service is a fully managed service that helps you in providing a uniform, centralized control over your encryption keys. It makes use of the Hardware Security Modules (HSMs) to protect the security of your keys and empowers you to easily encrypt your data across your AWS infrastructure plus within your own applications by providing a highly available key storage facility, management where you can create, rotate, disable, define the usage and perform auditing solution to examine carefully the use of encryption keys used to encrypt your data.

    AWS Key Management service provides:

    1. One click encryption
    2. Full control over your encryption keys
    3. A centralized place to manage keys
    4. Forced-key rotation policies

    AWS KEy Management

    Key Management Service components:

    There are three major components of AWS Key Management Service and they are:-

    1. Create and Manage keys:

    All the encrypted keys of your organization are stored and viewed in a single place thus easy to implement creation, rotation, usage policies and auditing.

    2. Use Keys to encrypt your data:

    AWS Key Management Service works with SDK for simple integration of encryption into your application. It integrates with AWS services like Amazon S3, Amazon EBS and Amazon Redshift.

    3. Audit Key usage:

    It provides all the audit trail information to CloudTrail that helps in meeting the regulatory and compliance requirement by providing logs that examines and verifies who used which keys, on which resource and when.

    Key Benefits:

    AWS Key Management Service provides high accessibility, low latency and a high level of persistence for your keys. Following are some benefits provided by AWS Key Management Service:

    1. Centralized Key Management

    It provides you with a uniform, centralized control over your encryption keys. You can easily create, rotate, disable, define the usage and enable logging either from AWS Management Console or by using API. The entire keys that are being used in the organization KMS provides a single view of them.

    2. Integrated with AWS services

    AWS Key Management Service (KMS) is unified with Amazon S3, Amazon EBS and Amazon Redshift so to simplify encryption of your data within those services. With these integration encryption and decryption are done automatically. You just have to choose the KMS master key with which you want to do the encryption or decryption.

    3. Encryption for all your applications

    AWS Key Management Service integrates with the SDK and the Command Line Interface. It provides a programmatic integration of your encryption and key management into your applications. Regardless of the storage of the data, KMS makes it easy to organize the encryption key used to encrypt data.

    4. Built-in Auditing

    AWS Key Management Service operates with AWS CloudTrail that supply you with logs of API calls made by or made to KMS which even helps developers in auditing. These logs helps you in examining and verifying who used which keys, on which resource and when.

    5. Fully Managed

    Accessibility, physical security and hardware maintenance of the infrastructure is managed by the AWS. Whereas AWS key management prime attention is on the encryption needs of your applications.

    6. Low-cost

    You just have to pay for the supplementary master key that you have created and for your key usage. Storage of the default keys in your account is charge free.

    7. Secure

    AWS Key Management provides you a secure location so that no one access to your master keys. It makes use of the hardened systems where your unencrypted keys are only used in the memory. Any update on the service is managed by a multi-level approval process that is examined, verified and evaluated by an independent group within Amazon.

    AWS Key Management Use with the example:

    In this example and usage we will

    1. Create a key in AWS KMS
    2. Use this key to encrypt a file in S3 bucket
    3. Modify access permission of this key
    4. Audit all activity related to this key

    Example:
    Here three IAM users are called which are named as

    1. Admin1- An Administration
    2. User1- A user of Financial Report
    3. User2- A compliance officer

    Creating Keys Using AWS Key Management Service

    Sign in to an AWS management console and click on IAM.
    On the IAM dashboard you will see the encryption key at the bottom of the detail section

    clicking on this option you will reach to AWS KMS console.
    AWS KMS keys are region specific and can only be used in the region they are created. For this example we click on US West (Oregon).

    Next click on create key to start the three step process of creating a master key

    1. First step is to give a name to a master key called Allias. Allias is display name of the master key and is required field. Here we define

    Allias name – “Financial_Report”

    Description key option is also displayed with the name option. This key is used to give a meaningful description and what master key will be protecting. We define it as

    Description key -Protected_Corporate_Financial_Data

    We Click on Next Step.

    2. Here in this step we define Key Administrators for the Financial_Reports master key we are creating.

    After you click on next step a screen appears where you can define which IAM users are allowed to administer the new key by choosing one or more IAM users and/or roles. Users added here can edit, enable, disable and rotate the master key. They can also encrypt and decrypt data with the help of this master key. From this screen we select Admin1 and make him/her enable and click on next step option.

    3. In this step we decide which users, roles and other AWS accounts are allowed to use the key to encrypt and decrypt data. Users, roles we select can use the Financial_Report key within their applications or within AWS KMS.

    Here we select the option of User1.
    If you want to allow another AWS account to be able to use this key then you can enter the account or Amazon resource name in the external accounts option.

    To complete key creation process we click on Finish button. Once this master key is created we will use this Financial_Report key to protect the file that we have uploaded to Amazon S3.

    Using Key with Amazon S3

    1. Now once we are in Amazon S3 console our foremost step is to create a bucket and upload a Financial_Report document in the bucket and encrypt this document using Financial_Report key that you have created.

    We will click on create bucket to get started and enter

    Name – Finance.Reports.US.2014

    Region – Oregon

    Make sure that region you select should match the region you have created for master key. Now click on create bucket option.

    2. Once bucket is created we have to upload this document. To do so we click on Action button and then click on upload.

    Click on set details button to select the encryption option we want for this file. Two options will appear on the screen out of which first is default key option so we choose second key option.

    When we choose second option a drop down list appears which will ask for your master key name. Once you write your master key name Financial_Report, all the other details like description, account, key ID will automatically get filled. After filling and checking all details click on Start Upload Button.

    Modify and Audit all activity related to this key

    Now let’s assume that compliance officer who is User2 also needs to use encrypted file to Audit and he needs access to the Financial_Report key to decrypt the file in that bucket. We can grant bucket access to him by using Amazon S3 console. This can be done by making few simple changes.

    For this first go back to AWS KMS console. When screen appears click on Financial_Report key on this page under the key usage section click on ADD button and a list of users and roles appears click on User2 and then click on attach.

    User2 will now have access to encrypt and decrypt files using the Financial_Report master key. When User2 no longer want access of the key you can come back to the same page and click on User2 and click on Remove.

    AWS KMS master key can be disabled and enabled according to your own need. All the data that is protected with that key becomes inaccessible as long as the key is disabled thus removing your charge from the key. To do this we first go to the encryption page and select Financial_Reports option and then go to Key Action option and select disable and same way you can make it enable.

  • AWS Best Practices – Enterprise Perspective

    AWS Best Practices – Enterprise Perspective

    Amazon AWS has changed the IaaS game for startups and growth companies. There are several practices we must acknowledge the importance of during the adoption and implementation of AWS services. Readers are more than welcome to comment, suggest modifications and even add their own little practices they follow during roll outs and implementations. As clients start piloting cloud initiatives it is best to avoid common pitfalls. The below best practices are a good first step in that effort. Below we have compiled a top ten list to be expanded in the future of best practices we have learned during our aws deployments. We look forward to expanding this list in the future.

    1.   Choose your VPC infrastructure carefully

    a. As you move into the AWS environment often the first thing firms want to do is create a VPC, the question is what type of architecture is appropriate for you?  The answer to this question is driven by the intended use case.  Often internet based organizations will opt to go with a VPC containing Public and Private Subnets. Opting for this type of VPC ensures the services that don’t require direct access to the internet are in a segregated subnet while locating public services access to the public subnet.

    b.   Existing enterprise firms intending to burst into the cloud often don’t intend to utilize public facing services and may opt instead for private only subnet and create a secure tunnel between their enterprise and the public cloud.

    c.   The architecture with the greatest flexibility tends to be a public/private subnet ensuring the public subnet is available if necessary and can remain unpopulated if not needed.

    2.   CIDR Block Selection is driven by two realities: VPC address space is fixed and can’t be changed after it is created.

    a.Ensure your VPC address space doesn’t overlap with your corporate space, for internet based firms this is less of an issue, however for enterprise firms this can prevent the need to rebuild the environment after a significant investment in time and resources

    b. While AWS allows CIDR blocks to be as large as /16 don’t waste space, having several very large subnets reduces one flexibility as needs arise to support multi-AZ services, or other eventual requirements.  On the other hand don’t overly constrain your environment.

    3.   Environment Isolation is an important consideration, the same isolation that’s present in the physical environment should be present in the cloud environment.  The cloud give firms more flexibility in implementation of this isolation, in an effort to control cost, development, integration/test and production environments can be registered under separate accounts ensuring accurate billing and cost controls.

    4.   Security: Use security groups to isolate services and management rules

    a. Separate public traffic from private using subnets

    b. Create a SSH gateway as an entry point for SSH communication

    c. Create a VPN tunnel for management access

    5.   VPC/Enterprise Integration

    When integrating AWS into an existing enterprise environment planning will ensure minimal rework.  Often the key consideration is assigning IP ranges to AWS that do not overlap with the corporate space.  In this way routing between the corporate LAN and AWS will be seamless.

    6. IAM: The primary AWS account should be treated like the traditional root user in Linux systems.

    a. Create a separate account specifically for administration, with the minimum permissions necessary to perform the task at hand.

    b. Create separate accounts for each user, or service to ensure audit traceablity

    c. Permissions should be assigned to groups and users to the group, this will minimize duplication of effort

    d. All users should utilize strong passwords, in this case refer to your corporate password policy.  Cloud passwords should be as secure as the corporate infrastructure.

    e. Don’t share credentials this will wreck audit traceability, and corporate policy, use roles to assign permissions.

    f.  Rotate credentials on a regular basis, the same way corporate credentials are rotated.

    7.   Disaster Recovery :Remember Disaster Recovery is designed to get backup after a failure.  Traditional enterprise environments are often limited by the question do we need to building a duplicate system for recovery or can we through vendor SLAs perform a data recovery.  In terms of the cloud enterprise customers are able to (at a lower cost) duplicate their environments across availability zones, regions and vendors to create an exceptionally resilient service offering.

    a. Do create multiple availability zones.

    b. Do use an automated CM tool to maintain your configurations

    c. Do create snapshot of your volumes.

    d. Do run drills to ensure everything operates as it was architected.

    e. Do run drill more than once.

    f. Do ensure everyone relevant is aware of the procedure

    g. Do architect you environment with sufficient redundancy, to minimize the need recovery efforts.

    8.   Security Groups: Security Groups like traditional firewalls should be set with the least permission necessary to accomplish the mission.

    a. Decide on a security group methodology; by creating groups to manage access to services ie allow access to ports 80 and 443 for nodes that will be a web server.

    b. Create a ssh gateway/ Bastion node and group:

    i. Only allow external SSH access to the SSH Gateway

    ii.Only allow local SSH access from within a security group, or from the gateway node, this minimized an attackers ability to traverse the networks between zones.

    c. Define an enterprise naming convention and stick to it.

    d.Utilize the ability to assign multiple security groups to a single asset (up to 5 groups per asset).

    9.   Naming Conventions: AWS assets should be named in such a way they can be readily identified, a suggested standardization around the purpose of the Instance, its environment, its region, and its sequence number.  An example of this might be haddop_dn_prod_usw1_001, this represents a production Hadoop data node, in the US-West 1 region.

    a. When naming an AMI its a good practice to include the creation date as part of its name, and a complete description. This will minimize confusion when selecting ami for new instances.

    b. When naming security groups and key pairs, continue to use the convention purpose, environment, region, function.  For example db_prod_usw1_key or ws_prod_usw1_sg

    10. Elastic Load Balancing: Use multiple availability zones to balance traffic in the event of an environment failure (this can still happen within the cloud)

    a. Use Route53 to balance traffic between regions, this is not supported by ELB

    b. Use ELBs for more than just web traffic, most any protocol can be supported by the ELB, ensure your service can support it

    c. ELB timeout after 40 seconds, ensure your application touches the socket before then to prevent the session from timing out.

    These are my top 10.  Let me know what you think I missed.

  • Scripts or Machine Images, What is the Best Way to bootstrap

    Scripts or Machine Images, What is the Best Way to bootstrap

    Between the advent of handy tools, like Chef and Puppet, and virtual machine infrastructures, like VMWare and AWS, I feel like there has been a great debate about how to bootstrap machines.   It seems like there are two extremes.  On one side is heavy reliance on machine images (AMIs, in AWS speak) or scripting (recipes, in Chef speak) on the other with a bunch of grey in the middle.  Naturally, there are pros and cons with each so let’s explore them.

    Machine Images

    The great thing about machine images are you get from zero to a fully functional machine in the time it takes to create the virtual machine.  This can be an extremely valuable thing when you need to spin up or down quickly.  However, they become dated with the rate at which your configuration changes.

    Scripts

    With the all scripts approach you are immune to the out of date issue encountered with machine images.  The big drawback is that it can take a long time to spin up a new machine off of scripts, especially when you have to compile one or many components.  In my opinion, this approach is most valuable when your system configuration changes quickly and there is some tolerance with regard to spin latency.

    Either approach is suitable for things like auto-scaling and unlocks the elasticity of the cloud, so which is the best?  To help you decide on which approach, or blend there of, best suits your situation. These may seem obvious, but I think you must weigh three major trade-offs or benefits afforded by scripting or imaging.

    • Time to being service ready

    How much time can you afford to spend from the time you start bootstrapping a new machine until handling live traffic?  To meet our on-demand scale requirements, at Clip, we have a target of 10 minutes from when the virtual machine is requested to handling live traffic.

    • Resilience to change

    How dynamic is your environment?  How often are new services deployed, dependencies added, or code deployed?  At Clip, we add new services on a fairly regular basis and our systems change frequently from both the code and dependencies stand point.

    • Cross platform support

    How many platforms do you need to support?  Platform, in this case, could be interpreted as operating systems, cloud providers and/or virtual or physical hardware.  To date we have been able to minimize any cross platform issues.

    Since we value flexibility and have the luxury of an acceptable spin up time of 10 minutes, we have chosen to lean heavily on Chef for our bootstrap process and only use basic machine images.  However, as the product and business requirements evolve, the time to being service ready is gaining more emphasis, so our process will also change.  At other companies, spin up time is so important, their CI system builds a new machine image for each version of the product that is deployed, so they can scale as quickly as possible.  Regardless of the technology or process used, it is most important to satisfy business needs in terms of service ready time, resilience to change and cross platform support and continue to adapt as the requirements change.

  • The evolution of built-in DevOps features in cloud platforms

    The evolution of built-in DevOps features in cloud platforms

    These days DevOps is being widely adopted by many IT organizations. Such IT organizations become more agile and reliable, deploying code more frequently with fewer bugs and failures. DevOps helps to get better IT performance and build additional competitive advantages, and companies with high-performing IT organizations are twice as likely to exceed their profitability, market share and productivity goals.

    The adoption of DevOps is being driven by factors such as agile development methodology, significantly increased rate of production releases, wide choice of public and private cloud platforms, and a wide range of tools for data center automation and configuration management.

    Today there are many different automation tools on the market that are used by DevOps teams for provisioning, orchestration and configuration management (Puppet, Chef, CFengine, bcfg2, Vagrant, Fai, Kickstart, Preseed, Cobbler), for build and deployment automation (Jenkins, Maven, Ant, Cruisecontrol, Capistrano), for infrastructure monitoring (Zabbix, Nagios) and application performance measurement (NewRelic, AppDynamics, DripStat).

    However IT organizations still struggle with assisting both developers and administrators that prioritize two completely different goals – speed of application development and feature completion versus production stability and uptime. Automation tools vendors promote their products to solve the challenge of DevOps teams, but still very often fail to face the complexity of workflows for operations engineers, or application releases and deployment speeds desired by developers.

    Another issue is that IT organizations with application release and deployment issues usually use some kind of automation, but they want to have more flexibility to manage their automation without the need to invoke everything manually at the command-line. Ideally, this automation should be available for developers in their development environments to give developers more control of the environment and understanding of the infrastructure usage.

    These issues have driven the evolution of DevOps tools. Today, cloud platform vendors consolidate and integrate automation and management tools directly into their cloud platforms. As a result, IT organizations can get better automation features in the same turnkey cloud platform. We can claim that PaaS solutions will become the next generation of DevOps tools. Cloud platforms have already removed the need to worry about many aspects of provisioning and configuration management of virtual machines/containers. These cloud platforms solve it in a very efficient way, because they have more control of resources and events, they manage the whole cluster of resources and take into account different metrics and status indicators at the same time. As a result, these platforms provide significantly better density of resource, better utilization, smart distribution of the load across the cluster, automation of new release deployments, automation of scalability and maintenance, out-of-the-box high availability and fault tolerance features.

    In fact, many IT organizations use automation tools such as Puppet and Chef to solve the challenges of template management, updating middleware stacks, application configuration management and zero-downtime deployment of new releases. However, the latest cloud solutions include more “native cloud” features designed to solve the same tasks. There are many examples of this trend for cloud platforms to evolve in this new, DevOps, direction, providing  native automation features in popular cloud platforms.

    Let’s take one of the visionaries in the cloud computing industry – Amazon Web Services. One of their cloud services, CloudFormation (http://aws.amazon.com/cloudformation/) allows developers and administrators to create and manage resources, middleware stacks and application templates. It helps to manage configurations and updates of already provisioned resources and applications. Literally, it‘s designed to solve the same tasks as Puppet and Chef. You can find many threaded discussions related to the comparison of CloudFormation vs Puppet/Chef. OpsWorks (http://aws.amazon.com/opsworks/) is another service for application management that simplifies application deployment and lifecycle management. It helps to define application topology, specification of package installations and software and resource configurations. In addition, this service includes automation for scaling based on time or load and allows scripting of these tasks.

    Another good example of DevOps evolution is the new cloud services released by Google Cloud Platform. Recently this public cloud platform released several different features that help to solve similar tasks to those mentioned above – Replica Pool (https://developers.google.com/compute/docs/replica-pool/), Startup Scripts https://developers.google.com/compute/docs/howtos/startupscript  and Cloud Deployment Manager https://developers.google.com/deployment-manager/. These natively integrated cloud tools provide the ability to create and manage sets of virtual machines (VMs) from common templates, resize, update, or delete them, define different configuration attributes such as base image, attached disk details, attached networking objects and scripts to be executed after the boot, install new software and updates, define environment/OS variables persistently available to VMs whenever it starts. In addition it provides the ability to easily declare, deploy, and maintain complex applications using a simple template mechanism. It provisions, scales, and monitors VMs and applications. Moreover, it can perform regular health checking and can restart or re-build sets of VMs that fail to respond appropriately. Recently announced Cloud Debugger and Cloud Trace (http://googlecloudplatform.blogspot.com/2014/06/enabling-developers-to-tame-production-systems-in-the-cloud.html?utm_source=feedburner&utm_medium=feed&utm_campaign=Feed%3A+ClPlBl+%28Cloud+Platform+Blog%29) allow developers simply setting a watchpoint on a line of code and to get a snapshot of all the local variables, parameters, instance variables and a full stack trace. It helps quickly identify and fix performance bottlenecks and enables engineers to compare performance from release to release with a detailed report. It works with zero setup uptime and no complex configuration, and is suitable for use in production. The tools described above cover a large breadth of DevOps tasks.

    Docker (http://www.docker.com/) is another good example of a tightly integrated cloud automation mechanism and a further example of DevOps evolution. The promise and focus of this automation solution are to remove complexity of configuration and deployment into different environments. Many cloud vendors have announced integration with Docker. Many observers believe that Docker is still at an early stage and not yet production ready, but the product has generated lots of industry buzz and the technology seems to be significant.

    In addition, there is something even bigger in the DevOps evolution – the open initiative for unification of cloud automation as Topology and Orchestration Specification for Cloud Applications (TOSCA) https://www.oasis-open.org/committees/tc_home.php?wg_abbrev=tosca. The goal of TOSCA is to enhance the portability of cloud applications and services, enabling the interoperable description of cloud services and relationships between parts of cloud services and operational behaviors. Examples are template configuration and provisioning, application deployment, software patches and updates, application scaling and maintenance, etc. In other words, it drives a unified standard for independent cloud platform vendors or cloud hosting service providers. As a result, it should simplify the work and tasks of DevOps teams by creating a vendor-neutral ecosystem enabling portable deployment to any compliant cloud platforms, smoother migration of existing applications to the cloud and the ability to build and run multi-cloud provider applications.

    In conclusion, the future will bring more cloud native absorption of different automation features for DevOps needs.  The evolution of cloud platforms in the DevOps direction is extremely beneficial for IT organizations because they do not need to manage and learn different tools and approaches for automation. This unneeded complexity will be replaced by seamless integration of different automation features inside the same cloud platform. It means in the near future very popular DevOps tools like Puppet and Chef will compete with built-in functionalities of cloud platforms.

    However, during the evolution period, choosing the right cloud platform is critical. It should allow IT organizations to use multiple approaches – the old legacy automation methods and the new native features to give the maximum flexibility from built-in automation and an already collected knowledge base. Flexibility of choice is the key point in the DevOps evolution for IT organizations – the ability to use both worlds at the same time: the old automation tools and the next generation features of cloud platforms.

    In addition, it makes sense to mention the importance of seamless integration between PaaS and IaaS for the evolution of DevOps. The public cloud platforms discussed above (AWS and Google Cloud) provide merged solutions today. The integration of both layers is very important for enterprises that heavily use private and hybrid clouds, as it replaces the unneeded maintenance complexity of two different solutions and removes extra overhead on integration of products from different vendors.  In other words, merging PaaS and IaaS provides extreme flexibility of automation and ease of use in the same solution. Seamless cloud platforms provide the best combination of the automation features in the same turnkey cloud solution that help to drive innovation and maintain legacy apps.

    The next generation of cloud platforms will establish a win-win relationship between the dev and ops departments, and when the outcome of dev and ops interactions is a win-win, IT organization performance wins as well.

    ruslan4

    About the Author

    Ruslan Synyntsky, is founder and CTO of Jelastic. With over 15 years in the IT industry, Ruslan is an expert in large-scale distributed Java applications and enterprise platforms. Before founding Jelastic, he led engineering teams a and at the Space Agency, Ukrainet iQueLab, SolovatSoft, Datamesh.

  • How	 Ansible makes automation easy

    How Ansible makes automation easy

    Continuing our series of videos from the recent Gluecon 2014 conference, here is our next one again courtesy of CloudSoft. In this video Peter Sankauskas talks about using Ansible to make automation easy especially with AWS.  Hope you enjoy it.

  • Security automation with DevOps: show me the code!

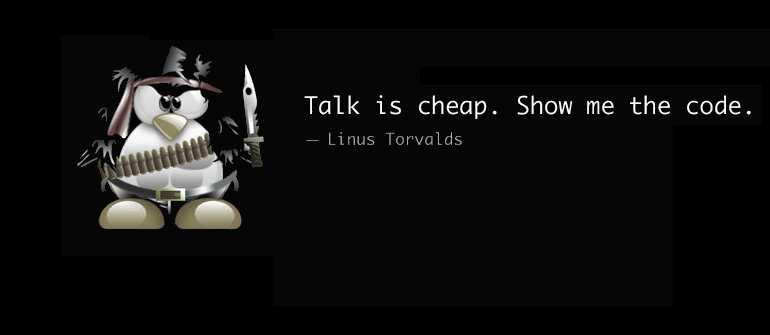
    Security automation with DevOps: show me the code!

    Last week Andrew Storms put up a good post hinting at the promise of security automation in [SecDevOps: Security Automation By Example – The Firewall Change]. He included an example of automating a series of actions when a firewall rule is changed. It’s a good article, although I’m increasingly convinced there’s no such thing as SecDevOps. In my book, it’s all DevOps, but that’s fodder for another post (when I’m not battling a stomach bug). However, what Andrew describes is more of what I consider an automated assist. It isn’t necessarily full automation, since it triggers on a manual firewall rule change. Ideally we rarely manually change a firewall (or Security Group) rule, and rely more on self-configuring based on policies. Yeah, I know, the usual analyst BS, so here’s a bit of process, and a bit of code. Let’s approach this differently. Take Andrew’s process, but let’s have the security group or host firewall self configure based on the asset. My example is going to be Amazon Web Services specific, since I have some code snippets to show off how it works. (Sorry, I don’t have the time or intestinal fortitude to write out all the code today; seriously, where did this bug come from?!?) There are two techniques I generally see forming the core of dynamic Security Group policy enforcement:

    1. Tags
    2. Configuration Management integration

    Some cloud services, like AWS, support tags at the object (in this case, instance) level. These tags can tie internally to policies while also being consumable for external tools. Here is a policy I use that restricts access to an object if the “SecurityStatus” tag is “IR” (for “Incident Response”):

    {  
      "Version": "2012-10-17",  
      "Statement": [  
        {
          "Action": "*",
          "Condition": {  
            "StringEquals": {
              "ec2:ResourceTag/SecurityStatus": "IR"
              }
              },
              "Resource": [
              "*"
                          ],
              "Effect": "Deny"
          }
          ]  
        }         
    

    I could apply that tag manually or automatically, and in either case the instance can no longer be managed by any account this policy is applied to. Now this doesn’t help us change firewall/Security Group rules, since you can’t manage those directly in EC2 based on tags (but I had the policy handy to demo, so there you go). For that to work, you need to write your own code to scan for tags and then take actions. I don’t have exactly the right code examples on hand. but here are some snippets to get you close. Most of these are cribbed from my SecuritySquirrel proof of concept on GitHub. They are all in Ruby, using the AWS 2.0 developer preview SDK. First, to pull a list of all instances with a certain tag, you can use the following:

    def testing
     # testing some tag code
     instancelist = @@ec22.describe_tags(
     filters: [
     {
       name: "key",
       values: ["SecurityStatus"]
     }
     ]
     )
     puts instancelist.to_h
    end  
    

    That shows everything with the SecurityStatus tag (instances and values, shown as a hash), but you could also filter on value. From there, you could pull the instance IDs with a map (you might want to further filter only on instances, but if you made it this far you can figure that out):

     instances = instancelist.map(&:resource_id)  
    

    Then you can pump those into a method to change the Security Group. Here’s the one from SecuritySquirrel that places an instance into a “Quarantine” group:

    def quarantine
      #this method moves the provided instance into the Quarantine security group defined in the config file.
      puts ""
      puts "Quarantining #{@instance_id}..."
      quarantine = @@ec22.modify_instance_attribute(instance_id: "#{@instance_id}", groups: ["#{@QuarantineGroup}"])
      puts "#{@instance_id} moved to the Quarantine security group from your configuration settings."
    end  
    

    Want to trigger some scanning? Here’s a code snippet to trigger a Qualys scan on an instance from a virtual appliance in your AWS account (keep in mind, I’m skipping a bunch of important pieces, like configuring the service and authenticating):

      instance_IP = instance_details.reservations.first.instances.first.private_ip_address
     timestamp = Time.new
     scan =(HTTParty.post("https://qualysapi.qg2.apps.qualys.com/api/2.0/fo/scan/",
          :basic_auth => @qualysauth,
          :query => { 
            :action => "launch",
            :scan_title => "SecuritySquirrel Scan at #{timestamp}", 
            :ip => "#{instance_IP}",
            :option_title => "Initial Options",
            :iscanner_name =>  "us-west-2" 
          },
          :headers => { "X-Requested-With" => "ruby httparty"}))
          puts "Launching Qualys scan named: SecuritySquirrel Scan at #{timestamp}"  
    

    Or want to change the CloudPassage Halo host firewall rules? Well, that code uses a pre-release of their Ruby SDK, so I’ll save it for another day (I’m not employed by them, but they let me play with the pre-release gem). These examples are all based on tags, but remember that if you use a tool like Chef or Puppet you can do the exact same thing based on what software is configured and running within the instance. For example, you could create a policy to quarantine all SSL when the Heartbleed vulnerability hit by closing off port 443 on any server running the vulnerable OpenSSL package, then remove the rule when it is updated to the patched version. I’m a bit rusty since I don’t code every day, but I could probably pop that code off in an hour or two, it isn’t that hard. Also my tool is designed for demos, and doesn’t run in the background, but clearly you could have it running all the time, adjusting things based on tags or even attributes of software deployed in the instance. Security automation is insanely powerful. It can completely automate complex security tasks, or, as in Andrew’s example, supplement manual activities and policy changes. Hopefully my snippets give you some ideas, and pop me over any good examples if you are willing to share.