
There’s no getting around the fact that security is one of the most essential factors in day-to-day operations for most software developers. From proprietary code to sensitive customer data and everything in between, there are hundreds – if not thousands – of crisis scenarios that can result from gaps in security.
Data security is an issue that every company faces, no matter how large or small. Developers look for security solutions that follow today’s data and application security best practices in order to reduce risk and provide the most secure experience possible to the end user.
A common debate among both users and developers is whether open source software is more or less secure than closed source alternatives. While there are a variety of different schools of thought as to what makes for a truly secure environment, there is good reason to believe that open source software is the superior option for those looking to prioritize security.
While open source code may not be inherently more secure than its closed source brethren, here are a few reasons why it almost certainly can be — so long as you take the right approach.
Open Source Offers True Transparency
Both well-established tech giants and up-and-coming startups work with some of the brightest minds in the development community to bring valuable proprietary software products and services to market. At the end of the day, however, users have no choice but to trust what a vendor says about how a particular piece of software actually “works.” Since you can’t see the code itself, there’s no way to really verify whether or not what you’re being told – about features, functionality and security – is accurate.
This can be problematic for a host of reasons—not least of which being the threat of potential security flaws. A company might boast about its commitment to user security and privacy through savvy public relations and product marketing efforts. But, by no means does this provide the user with anything more than lip service if the code doesn’t measure up; even if it’s rock-solid, the question of “How truly secure is this?” can never be answered with confidence.
Open source software offers greater transparency to the teams that use it; visibility into both the code itself and how it is maintained. Giving organizations access to the source code allows them the opportunity to evaluate the security of the code for themselves. Additionally, users have more visibility into how and what changes are made to the code base, including the pre-release review process, how often dependencies are updated and how developers and organizations respond to security vulnerabilities. As a result, open source software users have a more complete picture of the overall security of the software they’re using.
Open Source Encourages Community Input
Another major benefit is found in the communities which drive the growth and development of open source software. The vast majority of open source software is backed by communities of forward-thinking developers, many of whom use the same software they build and maintain as a primary means of communicating with team members. Open source developers and the communities around the software value users’ input to a significant degree, and many user suggestions end up getting incorporated into new versions. The community involvement and investment ultimately leads to many more responsible vulnerability disclosures than would likely occur if the software was closed source.
When vulnerability reports do occur, they tend to be more detailed because the code is open source; often, they even come with code suggestions for how to remedy a given issue. This is incredibly helpful and can dramatically speed up patching the vulnerability, as it allows developers to move faster without spinning wheels and getting stuck in the diagnostic process.
Faster Security Updates
Within the framework of closed source software, users are at the mercy of the companies behind those products or services when it comes to receiving software updates―open source tends to be a different story. Fully open source projects even allow users and developers to take things into their own hands and contribute feedback and fixes, should they choose to do so.
More often than not, updates and fixes for high-profile closed source applications involve a great deal of complex planning. If it’s not in the budget, for example, users may not see a new update for weeks, months, or even longer—security flaws or not.
In most circumstances, open source tends to move faster than closed source when it comes to iterating and releasing new versions. This is true for a handful of reasons, including the fact that open source software tends to have more eyes on the source code at any given time, as well as a community-driven interest in bettering the product whenever possible. If a significant security flaw is uncovered, users may even choose to fix the code themselves, resulting in a level of control that can never be achieved in a closed source environment.
Open Source Offers Flexibility, Collaboration and Enhanced Security
An open source methodology, in and of itself, is no guarantee of security, but it does offer teams greater insight and control over the software they rely on. And as open core and source-available software are more broadly adopted, they offer a wealth of opportunities to build incredibly secure environments without sacrificing usability for end users or support from official maintainers.


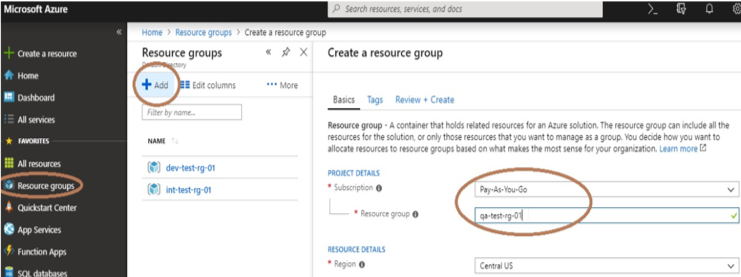 Once you have a subscription in Azure, you need to create a resource group to manage resources in Azure. The best practice is to maintain a separate resource group for each environment (DEV, INT, QA, STAG, PERF, PROD) and follow the proper naming conventions. To create a resource group, select Resource Group from left-side blade, click on +Add, then select Subscription, give a proper name to the resource group and click on Review + Create.
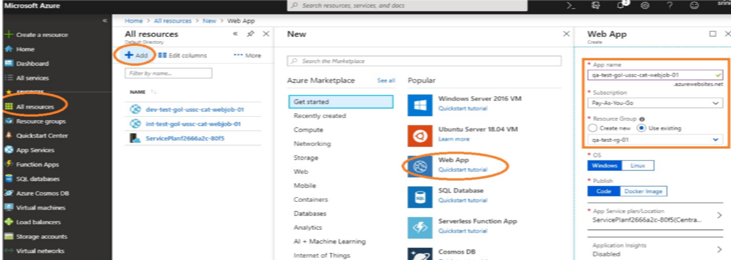 Click on All resources from the left-side blade of the panel and click on Add, then select Web App and give a proper name to your app service. Then select Subscription and select the existing resource group. Keep the remaining option as default. and click on Create.

 To create a new project, click on Create new project, give a proper name to your project and select create. Then go to Repos, click on Import, then select source type, type in the above URL in the Clone URL tab and select Import. The source code will import into your repository.
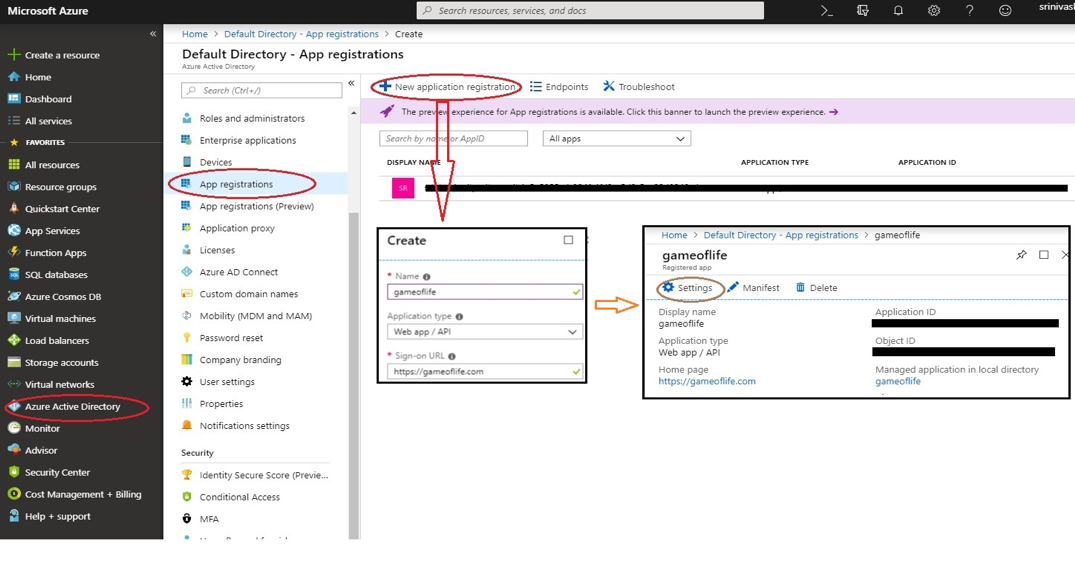
 We need give service connections to our project, so go to project settings from the bottom of blade in our project home directory and then select Service Connections -> New Service connection -> Azure Resource Manager. Click on “Use the full version of the service connection dialog” from the pop-up, then paste the Application ID into the Service principal client ID tab and the secret key value into the Service principal key tab (which you saved during app registration creation). Then click OK.
 Creating a Continuous Integration (CI) Build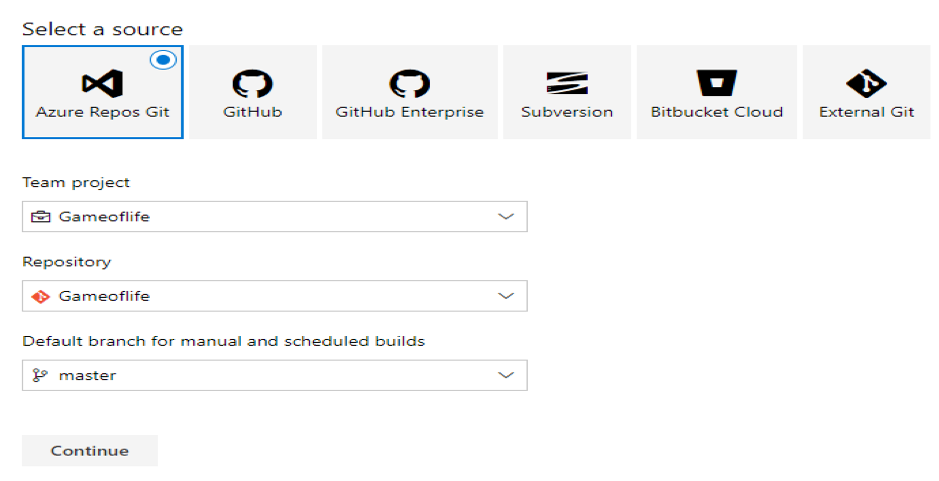

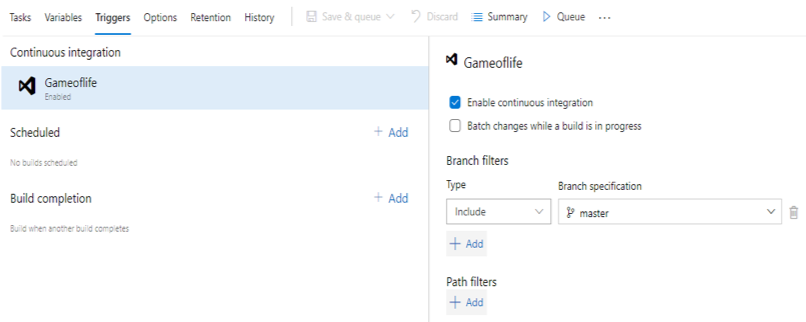 Next, select a template Maven, type in the pipeline name and select Hosted VS2017 for the Agent pool, and click on pom.xml in the Maven POM file. There you can list the goal(s) as Clean Package and select Copy Files. At the contents section please enter **/*.war then go to Publish Artifact: drop, list the artifact name as Gameoflife and keep all remaining options as default values. Then, under Triggers, select Enable continuous integration and give branch filters listed at right, which enables the continuous integration feature. Once a developer commits their changes into master, the CI build will trigger automatically.
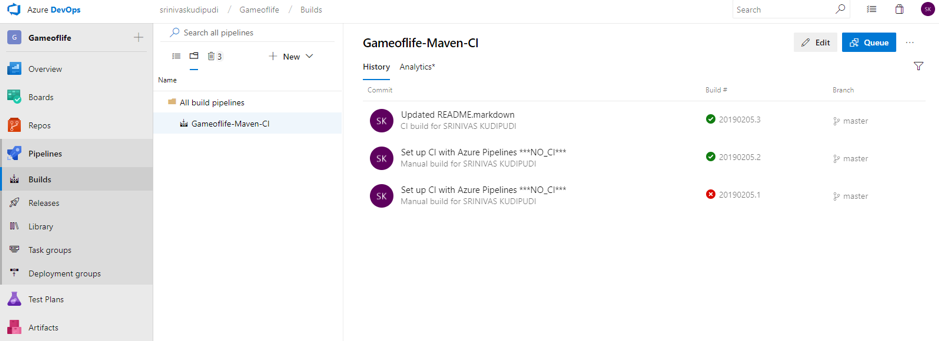 Once the configuration is complete, click on Save and Queue from top of pipeline to trigger a CI build. (Every commit into master will trigger a new build.)
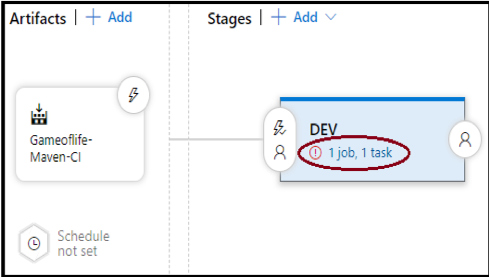 Go to Pipelines -> Releases -> New Release Pipeline, then select the template Azure App Service deployment, list the stage name as DEV and click on Add an artifact. Select project and source (build pipeline), then select default version as Latest, click on Add. Cick on Task (below the DEV), select Run on agent and select agent pool as Hosted VS2017, then click on the plus(+) symbol, search for template File Rename and select the .war file from source file and give it the new name ROOT.war.
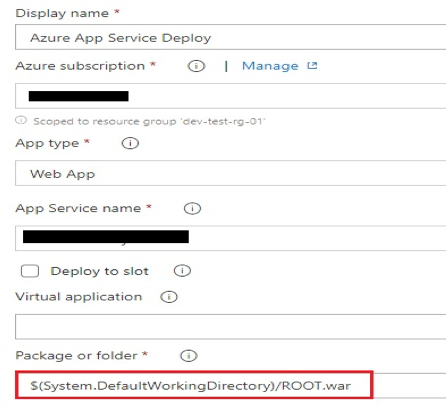
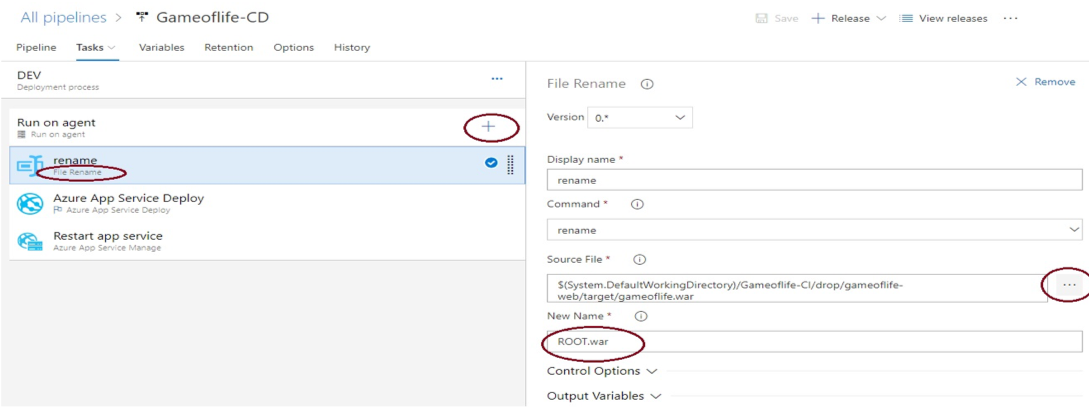 In the Display name box, list Azure App Service Deploy. In the Azure subscription field, you need to select a service principal name to authorize the resources. Then choose the App type and App Service name. In the Package or folder selection, select war file and rename it ROOT.war, because for java-based applications we need to deploy our app into a proper directory structure.
 Finally, select the template Azure App service manager and select the Restart option, making sure to select the same subscription and app service name you selected in the Azure app service deploy window. Click on Save, then click on Release -> Create a release -> select artifact build number -> create. Build will then trigger and deploy into the app service.