
Being a good engineering manager means that, to some degree, you have a natural affinity for the work involved. And if you’re a good developer, you likely already have some of those innate skills and attributes.
But simply having the skills doesn’t mean you’ll enjoy being an engineering manager. For example, the nature of the role is that you’re no longer the one writing the code. I’ve known great architects who became great managers, but they ended up going back to being individual contributors (ICs) because they missed working with nitty-gritty coding details and the joy that brought them.
It helps to take a realistic inventory of your skillset and preferred working style before making the transition. There are certain competencies you should have completely dialed in, and other tips to know that will help your transition.
Basic Skills of a Good Engineering Manager
If you’re a good engineer, you likely already have the following foundational skills that also make a good engineering manager. With these in your toolbox, you’ll have a better chance at success.
1. Attention to detail. The buck stops with the engineering manager. You need to know when to push and ask questions and how to set outcomes for your team’s accountability. If you work loosely as an IC and need reminders about your own work, you probably won’t do well as a manager.
2. Amazing personal planning skills. As an engineering manager, you’ll be planning an entire team’s work. If you’re terrible at planning your own work, maybe the engineering manager role isn’t for you.
3. Speak intelligently about broad technical topics. If you’re a good developer, this shouldn’t be a concern. You’ll need this knowledge to advocate for your team and justify their work to upper management.
4. Team player attitude. Even as an IC, you should have a collaborative, team-oriented mindset. It goes without saying that you’ll need this when leading others.
5. Interest in managing others. This might seem obvious, but if you don’t have a natural interest in managing others and in the people side of engineering, you’ll be unhappy as an engineering manager.
Making the Transition From Developer to Engineering Manager
If you can do all of the above and are ready to make the transition from developer to engineering manager, here’s what to be aware of as you navigate that process. These tips aren’t meant to deter or discourage you but rather provide a helpful dose of reality.
Satisfaction in your work takes new forms. If you’re an excellent developer, you know the value you bring and likely get personal satisfaction out of the contributions you make. As a manager, it’s harder to see the direct value you provide. Shift your mindset and realize that now, you’re the one enabling developers to do that rewarding work, and that’s the value you provide. You’ll learn to take enjoyment and fulfillment from your team’s accomplishments.
People take up a lot of your time. What most frequently catches new engineering managers off guard are the people-related aspects of the role. They’re not prepared for how much time managing people takes. I’ve seen it over and over again where a new manager thinks they can still set aside time to code, but you really have to prioritize learning the craft of management.
Remember to communicate upward. In the absence of information, it’s human nature to assume the worst. When I was at BitBucket, I assumed that because I had always done a good job, the leaders would think my team was crushing it. The opposite was true; leadership thought everything was on fire.
I started sending updates every two weeks to various levels of management, and that’s when I learned the power of upward communication. I realized I needed to sell my team’s work, contributions and challenges. Learn what higher-level leaders are looking for and then give them that information regularly.
Context-switching is part of the job. As an IC, constant context switches kill your day. But being an engineering manager means dealing with endless context-switching. Going to multiple meetings is baked into the job, and you’ll still have to find ways to block off time to get other work done.
Shield your team. You also need to be prepared to help protect your team from context-switching. You might learn information that’s important to your team during your many meetings, but not all of that needs to be communicated with them. Filter out the junk so it doesn’t rain down on them and they can maintain their flow.
Being an engineering manager can be a rewarding role that has a considerable impact on an organization. The more prepared you are for the realities of the role and its differences from being a developer, the more you’ll enjoy it and the more successful you’ll be.








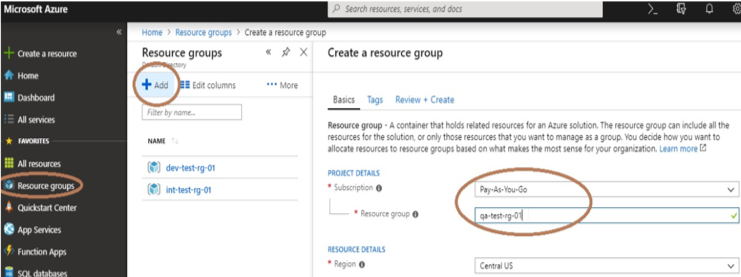 Once you have a subscription in Azure, you need to create a resource group to manage resources in Azure. The best practice is to maintain a separate resource group for each environment (DEV, INT, QA, STAG, PERF, PROD) and follow the proper naming conventions. To create a resource group, select Resource Group from left-side blade, click on +Add, then select Subscription, give a proper name to the resource group and click on Review + Create.
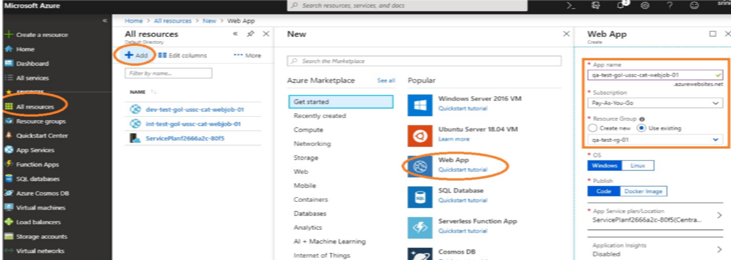 Click on All resources from the left-side blade of the panel and click on Add, then select Web App and give a proper name to your app service. Then select Subscription and select the existing resource group. Keep the remaining option as default. and click on Create.

 To create a new project, click on Create new project, give a proper name to your project and select create. Then go to Repos, click on Import, then select source type, type in the above URL in the Clone URL tab and select Import. The source code will import into your repository.
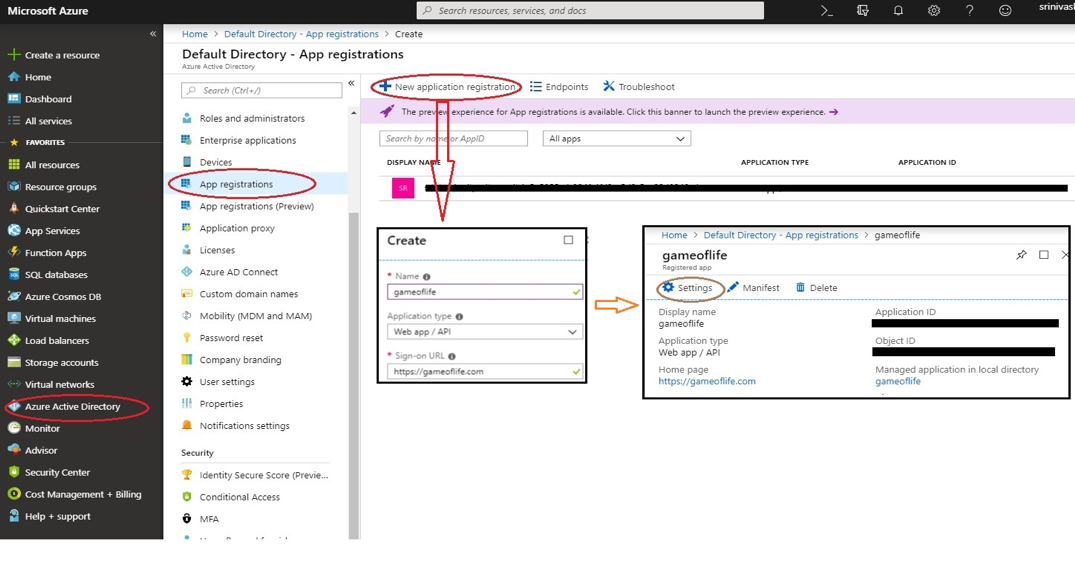
 We need give service connections to our project, so go to project settings from the bottom of blade in our project home directory and then select Service Connections -> New Service connection -> Azure Resource Manager. Click on “Use the full version of the service connection dialog” from the pop-up, then paste the Application ID into the Service principal client ID tab and the secret key value into the Service principal key tab (which you saved during app registration creation). Then click OK.
 Creating a Continuous Integration (CI) Build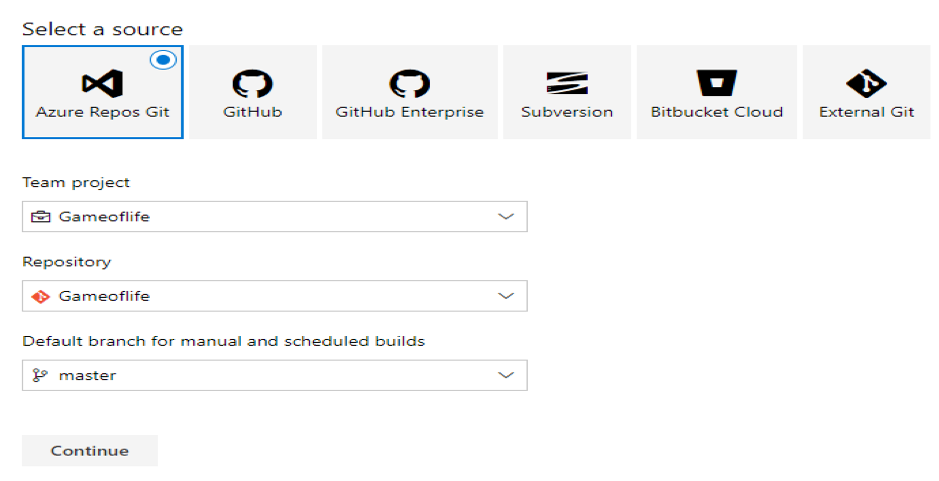

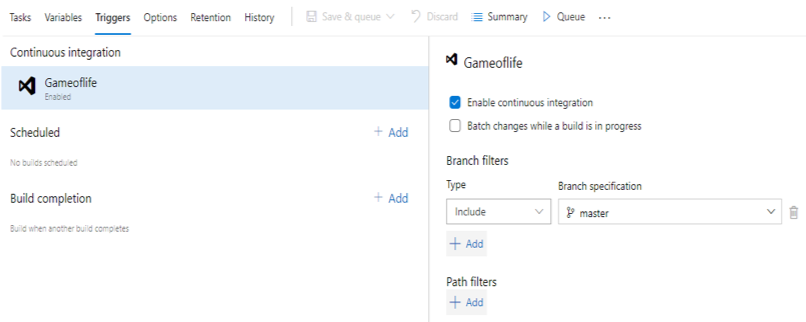 Next, select a template Maven, type in the pipeline name and select Hosted VS2017 for the Agent pool, and click on pom.xml in the Maven POM file. There you can list the goal(s) as Clean Package and select Copy Files. At the contents section please enter **/*.war then go to Publish Artifact: drop, list the artifact name as Gameoflife and keep all remaining options as default values. Then, under Triggers, select Enable continuous integration and give branch filters listed at right, which enables the continuous integration feature. Once a developer commits their changes into master, the CI build will trigger automatically.
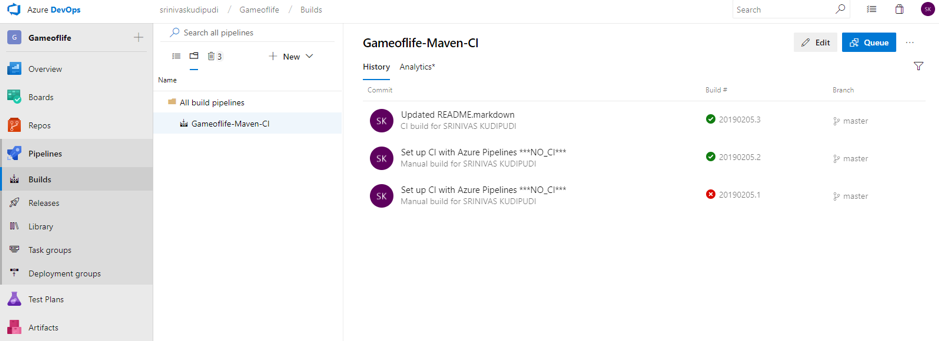 Once the configuration is complete, click on Save and Queue from top of pipeline to trigger a CI build. (Every commit into master will trigger a new build.)
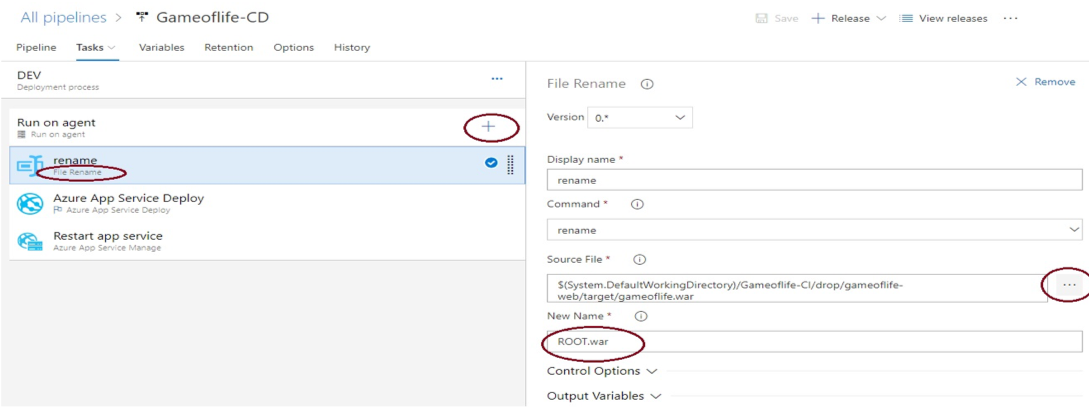
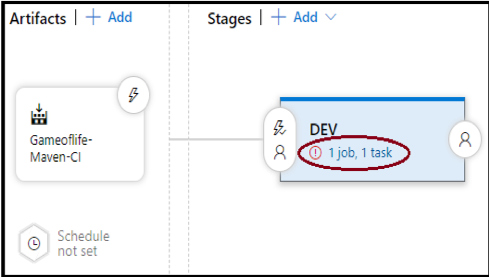 Go to Pipelines -> Releases -> New Release Pipeline, then select the template Azure App Service deployment, list the stage name as DEV and click on Add an artifact. Select project and source (build pipeline), then select default version as Latest, click on Add. Cick on Task (below the DEV), select Run on agent and select agent pool as Hosted VS2017, then click on the plus(+) symbol, search for template File Rename and select the .war file from source file and give it the new name ROOT.war.
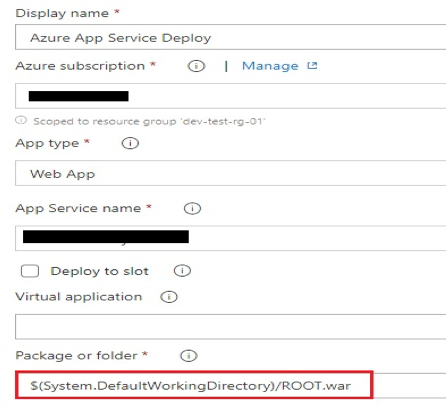
 In the Display name box, list Azure App Service Deploy. In the Azure subscription field, you need to select a service principal name to authorize the resources. Then choose the App type and App Service name. In the Package or folder selection, select war file and rename it ROOT.war, because for java-based applications we need to deploy our app into a proper directory structure.
 Finally, select the template Azure App service manager and select the Restart option, making sure to select the same subscription and app service name you selected in the Azure app service deploy window. Click on Save, then click on Release -> Create a release -> select artifact build number -> create. Build will then trigger and deploy into the app service.