Author: Elamaran Shanmugam

  • Run Event-Driven Workflows With Amazon EKS and AWS Step Functions

    Run Event-Driven Workflows With Amazon EKS and AWS Step Functions

    by Elamaran Shanmugam, Hari Ohm Prasath, and Re Alvarez-Parmar 

    Introduction

    Event-driven computing is a common pattern in modern application development with microservices, which is a great fit for building resilient and scalable software in AWS. Event-driven computing needs to be push-based with event-driven applications that are run on-demand when an event triggers the functional workflow. Tools that help you minimize resource usage and reduce costs are essential. Instead of running systems continuously while you wait for an event to occur, event-driven applications are more efficient because they start when the event occurs and terminate when processing completes. Additionally, event-driven architectures with Smart Endpoints and Dump Pipes patterns further decouple services, which makes it easier to develop, scale, and maintain complex systems.

    This post demonstrates a proof-of-concept implementation that uses Kubernetes to execute code in response to an event. The workflow is powered by AWS Step Functions, which is a low-code, visual workflow service that helps you build distributed applications using AWS services. AWS Step Functions integrates with Amazon Elastic Kubernetes Service (Amazon EKS), making it easy to build event-driven workflows that orchestrate jobs running on Kubernetes with AWS services, such as AWS Lambda, Amazon Simple Notification Service (Amazon SNS), and Amazon Simple Queue Service (Amazon SQS), with minimal code.

    Calling Amazon EKS with AWS Step Functions

    AWS Step Functions integration with Amazon EKS creates a workflow that creates and deletes resources in your Amazon EKS cluster. You also benefit from built in error-handling that handles task failures or transient issues.

    AWS Step Functions provide eks:runJob service integration that allows you to run a job on your Amazon EKS cluster. The eks:runJob.sync variant allows you to wait for the job to complete and retrieve logs.

    We use AWS Step Functions to orchestrate an AWS Lambda function and a Map state ("Type": "Map") that runs a set of steps for each element of an input array. A Map state executes the same steps for multiple entries of an array with the state input.

    Solution overview

    The following diagram demonstrates the solution to run a sample event-driven workflow using Amazon EKS and AWS Step Functions.
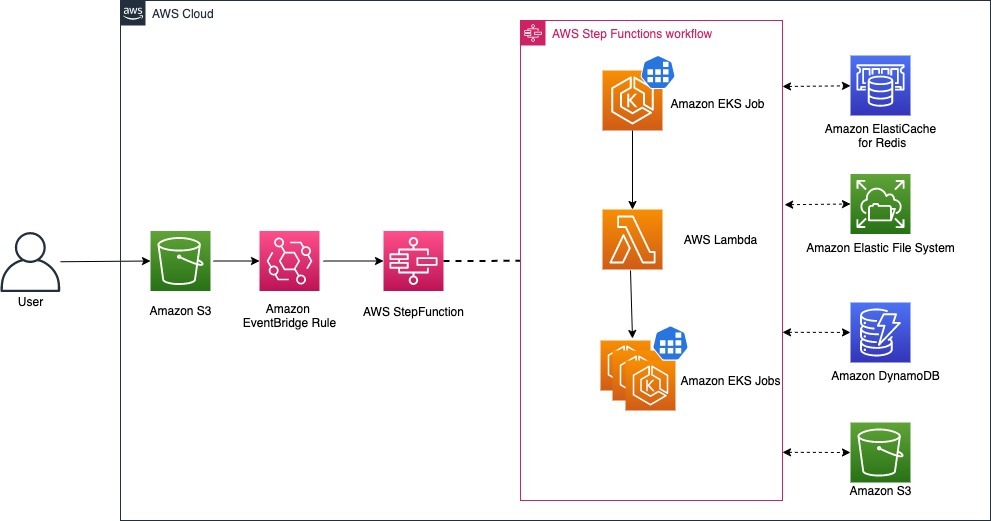
    For this demonstration, we use AWS Cloud Development Kit (AWS CDK) and first deploy a set of AWS CDK stacks to create and deploy necessary infrastructure, as shown in the previous diagram. AWS Step Functions invoke when an input file appears in the configured Amazon Simple Storage Service (Amazon S3) bucket.

    AWS Step Functions starts the following process when a new file appears in the Amazon S3 bucket:

    • AWS Step Functions create a File Splitter Kubernetes job that runs in an Amazon EKS cluster. The job reads the input file from the Amazon S3 bucket and splits the large input file into smaller files, saving them to an Amazon Elastic File System (Amazon EFS) persistent volume.
    • File Splitter Kubernetes job uses the unix split command to chunk the large files into smaller ones, with each file containing a maximum of 30,000 lines (which is configured using MAX_LINES_PER_BATCH environment variable).
    • File splitter Kubernetes job saves the path of the split files in Amazon ElastiCache (Redis) that are used for tracking the overall progress of this job. The data in the Redis cache gets stored in the following format:

    Screenshots showing the format of data stored in Redis cache.

    • AWS Step Functions orchestrate a Split-file-lambda AWS Lambda function that reads the Redis cache and returns an array of split file locations as the response.
    • AWS Step Functions orchestrate a Map state that uses split files array as input and create a parallel Kubernetes jobs in your Amazon EKS cluster to process these split files in parallel, with a MaxConcurrency = 0. Each Kubernetes job receives one split file as input and performs the following:
      • Read the individual split file from the Amazon EFS location.
      • Process each row in the file and generate ConfirmationId for each OrderId field available for each row in the input file which inserts this information to orders Amazon DynamoDB table. All DynamoDB writes are batched to a maximum of 25 rows per request.
      • Create a Comma-separated values (CSV) file in a Amazon EFS file location, with each row of the file containing both ConfirmationId and OrderId written in batch.
      • Update Amazon ElastiCache by removing the split file (path) from Redis set using rdb.SRem command.
      • Finally, merge the output split files in the Amazon EFS directory and upload them to the Amazon S3 bucket.
    • It’s very important to settle on a right value for the maximum number of rows a split input file can contain. We set this value via MAX_LINES_PER_BATCH environment variable. Giving a smaller value will end up with too many split files creating many Kubernetes jobs, whereas setting a large value eaves too little scope for parallelism.

    Walkthrough

    Prerequisites

    You need the following to complete the steps in this post:

    Let’s start by setting a few environment variables:

    git clone https://github.com/aws-samples/containers-blog-maelstrom
    cd containers-blog-maelstrom/batch-processing-with-k8s/
    yarn install
    

    Bootstrap AWS Region

    The first step to any AWS CDK deployment is bootstrapping the environment. cdk bootstrap is a tool in the AWS CDK command-line interface (CLI) responsible for preparing the environment (i.e., a combination of AWS account and Region) with resources required by AWS CDK to perform deployments into that environment. If you already use AWS CDK in a Region, then you don’t need to repeat the bootstrapping process.

    Execute the following commands to bootstrap the AWS environment:

    cdk bootstrap aws://$ACCOUNT_ID/$AWS_REGION

    Deploy the stack

    The AWS CDK code create one stack with the name file-batch-stack, which creates the following AWS Resources:

    • An Amazon VPC and all related networking components (e.g., subnets).
    • An Amazon EKS cluster
    • An AWS Step Function with different states to orchestrate the event-driven batch workload process
    • An Amazon S3 bucket to store the input file and merged output file
    • An Amazon EvenBridge rule to trigger an AWS Step Function based on write events to Amazon S3 bucket
    • An Amazon ElastiCache (Redis) to store split file details
    • An AWS Lambda to create an array of split files
    • An Amazon EFS file store to store temporary split files
    • An Amazon DynamoDB Orders table to store the output details of processed order

    Run cdk list to see the list of the stacks to be created.

    $ cdk list
    file-batch-stack
    

    Run the following command to start the deployment:

    cdk deploy --require-approval never

    Please allow a few minutes for the deployment to complete. Once the deployment is successful, you will see the following output:

    ✅ file-batch-stack
    Outputs:
    file-batch-stack.KubernetesFileBatchConstructInputBucketName610D8598 = file-batch-stack-kubernetesfilebatchconstructinpu-<xxxxx>
    file-batch-stack.KubernetesFileBatchConstructMultithreadedstepfuctionF3358A99 = KubernetesFileBatchConstructfilebatchmultithreaded0B80AF5A-<xxxxxx>
    file-batch-stack.KubernetesFileBatchConstructfilebatchEFSFileSystemId9139F216 = fs-<xxxxxx>
    file-batch-stack.KubernetesFileBatchConstructfilebatcheksclusterClusterName146E1BCB = KubernetesFileBatchConstructfilebatchekscluster6B334C7D-<xxxxx>
    file-batch-stack.KubernetesFileBatchConstructfilebatcheksclusterConfigCommand3063A155 = aws eks update-kubeconfig —name KubernetesFileBatchConstructfilebatchekscluster6B334C7D-<xxxxx> —region us-east-2 —role-arn arn:aws:iam::<account_id>:role/file-batch-stack-KubernetesFileBatchConstructfileb-<xxxxx>
    file-batch-stack.KubernetesFileBatchConstructfilebatcheksclusterGetTokenCommandAD6928E0 = aws eks get-token —cluster-name KubernetesFileBatchConstructfilebatchekscluster6B334C7D-<xxxxx> —region us-east-2 —role-arn arn:aws:iam::<account_id>:role/file-batch-stack-KubernetesFileBatchConstructfileb-<xxxxx>
    file-batch-stack.KubernetesFileBatchConstructfilebatcheksclusterMastersRoleArn52BC348E = arn:aws:iam::<account_id>:role/file-batch-stack-KubernetesFileBatchConstructfileb-<xxxxx>
    
    Stack ARN:
    arn:aws:cloudformation:us-east-2:<account_id>:stack/file-batch-stack/<stack_id>
    

    Start the workflow

    To verify that the deployed solution is working, you can upload sample file test.csv under the payload folder to the input bucket. Run the following command from the root directory:

    S3_BUCKET_NAME=$(aws cloudformation describe-stacks \
      --stack-name "file-batch-stack" \
      --region $AWS_REGION \
      --query 'Stacks[0].Outputs[?starts_with(OutputKey,`KubernetesFileBatchConstructInputBucketName`)].OutputValue' \
      --output text)
    echo $S3_BUCKET_NAME
    aws s3api put-object \
      --bucket $S3_BUCKET_NAME \
      --key test.csv \
      --body payload/test.csv
    

    The following image shows a line from the input file:

    Screenshot showing the format of data in the input file.

    When a new file is uploaded to the Amazon S3 bucket, the AWS Step Function state machine is triggered using an Amazon EventBridge Rule. Navigate to the AWS Managed Console and select the state machine created by the AWS CDK (the CDK output includes the name).

    The AWS Step Function execution looks like the execution details, as described in the Solution overview section, and shown in the following diagram:
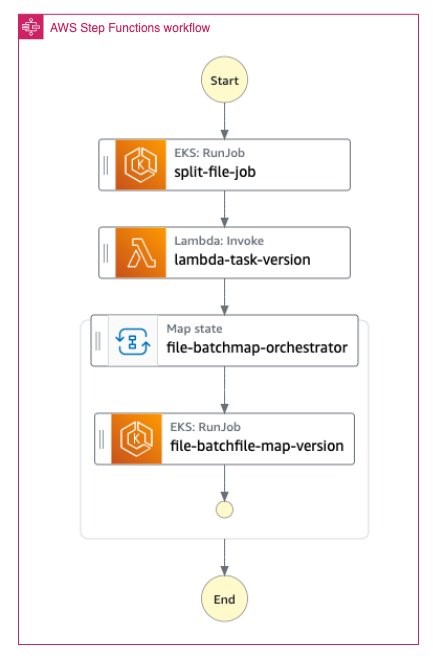
    Diagram showing the AWS Step Function execution.

    Once the workflow completes successfully, you can download the response file from the Amazon S3 bucket.

    Run following command:

    aws s3 cp s3://$S3_BUCKET_NAME/test.csv_Output .

    DynamoDB table

    Cleanup

    You continue to incur cost until you delete the infrastructure that you created for this post. Use the following command to clean up the resources created for this post:

    aws s3 rb s3://$S3_BUCKET_NAME --force
    aws dynamodb delete-table --table-name Order
    cdk destroy
    

    AWS CDK asks you:

    Are you sure you want to delete: file-batch-stack (y/n)?

    Enter y to delete.

    Conclusion

    This post showed how to run event-driven workflows at scale using AWS Step Functions on Amazon EKS and AWS Lambda. We provided you with AWS CDK code to create the cloud infrastructure, Kubernetes resources, and the application within the same codebase. Whenever you upload a file to the Amazon S3 bucket, the event triggers a Kubernetes job.

    You can follow the details in this post to build your own serverless event-driven workflows that run jobs in Amazon EKS clusters.

  • How to Use Application Load Balancer and Amazon Cognito to Authenticate Users for Your Kubernetes Web Apps

    How to Use Application Load Balancer and Amazon Cognito to Authenticate Users for Your Kubernetes Web Apps

    by Elamaran Shanmugam, Jayaprakash Alawala, and Re Alvarez-Parmar 
    This post describes how to use Amazon Cognito to authenticate users for web apps running in an Amazon Elastic Kubernetes Services (Amazon EKS) cluster. 
    Behind any identity management system resides a complex network of systems meant to keep data and services secure. These systems handle functions such as directory services, access management, identity authentication, and compliance auditing. Building such a system from scratch requires specialized expertise that many dev teams lack. Customers have told us that instead of implementing the same authentication code across multiple applications, they prefer using a service that manages and secures user identity for them.Services like Amazon Cognito allow customers to add authentication, authorization, and user management to web and mobile apps without creating and managing an identity management system. Using Amazon Cognito, you can enable your users to sign in directly with a user name and password or through a third party such as Facebook, Amazon, Google, or Apple.Amazon EKS customers that use Application Load Balancer (ALB) can use Amazon Cognito to handle user registration and authentication without writing code to handle routine tasks such as user sign-up, sign-in, sign-out, and so on. This is because Application Load Balancer has built-in support for user authentication. In addition to Amazon Cognito, ALB natively integrates with any OpenID Connect protocol compliant identity provider (IdP), providing secure authentication and a single sign-on experience across your applications.

    Authentication using Application Load Balancer

    The architecture presented in this post authenticates users as they access the sample application. The application is exposed publicly using an Application Load Balancer. ALB securely authenticates each request when users visit the app and selectively forwards authenticated requests to the app.

    ALB checks users’ request headers for an AWSELB authentication session cookie. For an unauthenticated session, the cookie is absent. Therefore, ALB redirects unauthenticated users to a login page, which is hosted by Amazon Cognito hosted UI. Amazon Cognito hosted UI authenticates or registers the user. When users successfully sign in, Amazon Cognito redirects them back to the ALB with an authorization grant code.

    The ALB presents the authorization grant code back to Amazon Cognito’s token endpoint and receives ID and access tokens. Next, the ALB exchanges the access token with Amazon Cognito user info endpoint for user claims, which contain user details such as the user’s email, phone number, and so on. Then the ALB redirects the user back to the original URI, this time setting the AWSELB authentication session cookie.

    When ALB receives a request with AWSELB cookie, it validates it and forwards the user info to backends with the X-AMZN-OIDC-* HTTP headers set. The application decodes these headers to get user information.

    The application doesn’t handle user authentication, registration, or managing session timeout in this scenario. We don’t even create a login page. We offload that responsibility to Amazon Cognito hosted UI.

    Solution

    We will use a sample application called Yelb for this demo. Yelb’s user interface will be exposed to users on the internet using an ALB. For DNS, we will use Amazon Route 53, and we’ll get a TLS certificate from AWS Certificate Manager (ACM).

    You will need a registered domain name to follow along. You can use any registered domain, even one that you may not have registered using Route 53.

    Prerequisites

    You will need the following to complete the tutorial:

    Note: We have tested the CLI steps in this post on Amazon Linux 2.

    Let’s start by setting a few environment variables:

    COK_AWS_REGION=us-west-2 <-- Change this to match your region
    COK_ACCOUNT_ID=$(aws sts get-caller-identity --query 'Account' --output text)
    COK_EKS_CLUSTER_NAME=eks-cognito-sample
    COK_MY_DOMAIN=mydomain.com <-- Change this to match your domain
    COK_ECR_REPO=sample-ui
    Bash

    Create an EKS cluster using eksctl:

    eksctl create cluster \
      --name $COK_EKS_CLUSTER_NAME \
      --region $COK_AWS_REGION \
      --managed
    Bash

    You can proceed to the next steps while you wait for cluster creation.

    Configure name resolution

    When users visit the sample app at https://sample.{your-domain}.com, Route 53 will route traffic to the ALB that exposes the user interface. Let’s create a Route 53 hosted zone and a record named sample.{your-domain}.com:

    COK_HOSTED_ZONE_ID=$(aws route53 create-hosted-zone \
      --name "sample.${COK_MY_DOMAIN}." \
      --caller-reference "external-dns-test-$(date +%s)" \
      --query 'HostedZone.Id' \
      --output text)
      
    cat << EOF > route53_change_recordset.json
    {
       "Changes":[
          {
             "Action": "UPSERT",
             "ResourceRecordSet":{
                "Name": "sample.${COK_MY_DOMAIN}",
                "Type": "NS",
                "TTL": 300,
                "ResourceRecords": [
                   {
                      "Value": "$(aws route53 list-resource-record-sets \
                      --hosted-zone-id $COK_HOSTED_ZONE_ID \
                      --query 'ResourceRecordSets[0].ResourceRecords[0]' \
                      --output text)"
                   },
                   {
                      "Value": "$(aws route53 list-resource-record-sets \
                      --hosted-zone-id $COK_HOSTED_ZONE_ID \
                      --query 'ResourceRecordSets[0].ResourceRecords[1]' \
                      --output text)"
                   },
                   {
                      "Value": "$(aws route53 list-resource-record-sets \
                      --hosted-zone-id $COK_HOSTED_ZONE_ID \
                      --query 'ResourceRecordSets[0].ResourceRecords[2]' \
                      --output text)"
                   },
                   {
                      "Value": "$(aws route53 list-resource-record-sets \
                      --hosted-zone-id $COK_HOSTED_ZONE_ID \
                      --query 'ResourceRecordSets[0].ResourceRecords[3]' \
                      --output text)"
                   }
                ]
             }
          }
       ]
    }
    EOF
    Bash
    aws route53 change-resource-record-sets \
      --hosted-zone-id $(aws route53 list-hosted-zones \
        --query "HostedZones[?Name == '${COK_MY_DOMAIN}.'].Id" \
        --output text) \
      --change-batch file://route53_change_recordset.json 
    Bash

    Get a public certificate

    Users will access our application securely at https://sample.{your-domain}.com, so we also need a TLS certificate. AWS Certificate Manager can create a TLS certificate that we can use with ALB.

    Request an ACM certificate:

    COK_ACM_CERT_ARN=$(aws acm request-certificate \
      --domain-name sample.${COK_MY_DOMAIN} \
      --validation-method DNS \
      --idempotency-token 1234 \
      --options CertificateTransparencyLoggingPreference=DISABLED \
      --region $COK_AWS_REGION \
      --query 'CertificateArn' \
      --output text)
    Bash

    Before the Amazon certificate authority (CA) can issue a certificate for your site, ACM must prove that you own or control the domain. We will use DNS validation.

    Create a record in the Route53 hosted zone so ACM can validate domain ownership:

    cat << EOF > validate_acm_cert_dns.json
    {
       "Changes":[
          {
             "Action": "UPSERT",
             "ResourceRecordSet":{
                "Name": "$(aws acm describe-certificate --certificate-arn $COK_ACM_CERT_ARN --query 'Certificate.DomainValidationOptions[].ResourceRecord[].Name' --output text)",
                "Type": "CNAME",
                "TTL": 300,
                "ResourceRecords": [
                   {
                      "Value": "$(aws acm describe-certificate --certificate-arn $COK_ACM_CERT_ARN --query 'Certificate.DomainValidationOptions[].ResourceRecord[].Value' --output text)"
                   }
                ]
             }
          }
       ]
     }
    EOF
    Bash
    aws route53 change-resource-record-sets \
      --hosted-zone-id $COK_HOSTED_ZONE_ID \
      --change-batch file://validate_acm_cert_dns.json
    Bash

    Wait for two minutes and  verify that the certificate has been issued:

    aws acm describe-certificate \
      --certificate-arn $COK_ACM_CERT_ARN \
      --region $COK_AWS_REGION \
      --query 'Certificate.Status'
    Bash

    The output should be ISSUED. We recommend using watch to run the above command until the certificate is issued.

    Create a user directory

    As users register to access our sample application, their information is securely stored in the Amazon Cognito user pool. A user pool is a user directory in Amazon Cognito. In addition to providing user directory management and user profiles, user pools also provide a built-in, customizable web UI called Amazon Cognito hosted UI to sign in and register users. We will use this web UI to sign in and register users.

    Create an Amazon Cognito user pool:

    COK_COGNITO_USER_POOL_ID=$(aws cognito-idp create-user-pool \
      --pool-name MyUserPool \
      --username-attributes email \
      --username-configuration=CaseSensitive=false \
      --region $COK_AWS_REGION \
      --query 'UserPool.Id' \
      --auto-verified-attributes email \
      --account-recovery-setting 'RecoveryMechanisms=[{Priority=1,Name=verified_email},{Priority=2,Name=verified_phone_number}]' \
      --output text)
    Bash

    Create a user pool app client:

    COK_COGNITO_USER_POOL_CLIENT_ID=$(aws cognito-idp create-user-pool-client \
      --client-name MyAppClient \
      --user-pool-id $COK_COGNITO_USER_POOL_ID \
      --generate-secret \
      --region $COK_AWS_REGION \
      --query 'UserPoolClient.ClientId' \
      --output text)
    Bash

    Configure the app client:

    aws cognito-idp update-user-pool-client \
      --client-id $COK_COGNITO_USER_POOL_CLIENT_ID \
      --user-pool-id $COK_COGNITO_USER_POOL_ID \
      --region $COK_AWS_REGION \
      --allowed-o-auth-flows code \
      --callback-urls "https://sample.${COK_MY_DOMAIN}/oauth2/idpresponse" \
      --allowed-o-auth-flows-user-pool-client \
      --allowed-o-auth-scopes openid \
      --supported-identity-providers COGNITO
    Bash

    You can find detailed information about app client settings terminology in Amazon Cognito documentation.

    Amazon Cognito allows you to use your own domain for the web UI used to sign in and sign up users. Alternatively, you can use an Amazon Cognito domain (amazoncognito.com) and customize the domain prefix. When you use an Amazon Cognito domain, the domain for your app is https://<domain_prefix>.auth.<region>.amazoncognito.com.

    We will use an Amazon Cognito domain for this demo. Create a domain using the hosted Amazon Cognito domain:

    COK_COGNITO_DOMAIN=(sample$(whoami))
    
    aws cognito-idp create-user-pool-domain \
      --user-pool-id $COK_COGNITO_USER_POOL_ID \
      --region $COK_AWS_REGION \
      --domain $COK_COGNITO_DOMAIN
    Bash

    Install AWS Load Balancer Controller

    Let’s return to the EKS cluster. The first thing we need to install in the EKS cluster is the AWS Load Balancer Controller, which is a controller that manages AWS Elastic Load Balancers for a Kubernetes cluster.

    Run the following commands to install the AWS Load Balancer Controller into your cluster:

    ## Download the IAM policy document
    curl -o iam_policy.json https://raw.githubusercontent.com/kubernetes-sigs/aws-load-balancer-controller/v2.3.0/docs/install/iam_policy.json
    
    ## Create an IAM policy 
    aws iam create-policy \
      --policy-name AWSLoadBalancerControllerIAMPolicy-COGNITODEMO \
      --policy-document file://iam_policy.json 2> /dev/null
      
    ## Associate OIDC provider
    eksctl utils associate-iam-oidc-provider \
      --cluster $COK_EKS_CLUSTER_NAME \
      --region $COK_AWS_REGION \
      --approve
    
    ## Create a service account 
    eksctl create iamserviceaccount \
      --cluster=$COK_EKS_CLUSTER_NAME \
      --region $COK_AWS_REGION \
      --namespace=kube-system \
      --name=aws-load-balancer-controller \
      --override-existing-serviceaccounts \
      --attach-policy-arn=arn:aws:iam::${COK_ACCOUNT_ID}:policy/AWSLoadBalancerControllerIAMPolicy-COGNITODEMO \
      --approve
    
    ## Get EKS cluster VPC ID
    export COK_VPC_ID=$(aws eks describe-cluster \
      --name $COK_EKS_CLUSTER_NAME \
      --region $COK_AWS_REGION  \
      --query "cluster.resourcesVpcConfig.vpcId" \
      --output text)
    
    helm repo add eks https://aws.github.io/eks-charts && helm repo update
    
    kubectl apply -k "github.com/aws/eks-charts/stable/aws-load-balancer-controller//crds?ref=master"
    
    helm install aws-load-balancer-controller \
      eks/aws-load-balancer-controller \
      --namespace kube-system \
      --set clusterName=$COK_EKS_CLUSTER_NAME \
      --set serviceAccount.create=false \
      --set serviceAccount.name=aws-load-balancer-controller \
      --set vpcId=$COK_VPC_ID \
      --set region=$COK_AWS_REGION
    Bash

    Deploy ExternalDNS

    Next, we’ll deploy ExternalDNS, which is an open-source Kubernetes controller that synchronizes exposed Kubernetes services and ingresses with DNS providers like Route 53.

    ExternalDNS will automatically create an alias record in Route 53 that will route users to the application’s ALB. You also have the option of not using ExternalDNS and managing Route 53 or your DNS provider directly.

    The steps in this post assume that you will use ExternalDNS along with Route 53 for DNS management.

    Create an IAM policy that will allow the ExternalDNS controller pod to update the Route53 record:

    cat << EOF > external_dns.json
    {
      "Version": "2012-10-17",
      "Statement": [
        {
          "Effect": "Allow",
          "Action": [
            "route53:ChangeResourceRecordSets"
          ],
          "Resource": [
            "arn:aws:route53:::hostedzone/*"
          ]
        },
        {
          "Effect": "Allow",
          "Action": [
            "route53:ListHostedZones",
            "route53:ListResourceRecordSets"
          ],
          "Resource": [
            "*"
          ]
        }
      ]
    }
    EOF
    
    aws iam create-policy \
        --policy-name AWSR53HZIAMPolicy \
        --policy-document file://external_dns.json
    Bash

    In production environments, consider scoping the policy to only permit updates to explicitly mentioned hosted zone IDs.

    Create a service account and associate it with the IAM policy we just created:

    eksctl create iamserviceaccount \
      --cluster=$COK_EKS_CLUSTER_NAME \
      --namespace=sample \
      --name=external-dns \
      --attach-policy-arn=arn:aws:iam::${COK_ACCOUNT_ID}:policy/AWSR53HZIAMPolicy \
      --region $COK_AWS_REGION \
      --approve --override-existing-serviceaccounts
    Bash

    eksctl will also create a namespace called sample.

    Install ExternalDNS:

    cat << EOF > cognito-external-dns.yaml
    apiVersion: rbac.authorization.k8s.io/v1
    kind: ClusterRole
    metadata:
      name: external-dns
      namespace: sample
    rules:
    - apiGroups: [""]
      resources: ["services","endpoints","pods"]
      verbs: ["get","watch","list"]
    - apiGroups: ["extensions","networking.k8s.io"]
      resources: ["ingresses"]
      verbs: ["get","watch","list"]
    - apiGroups: [""]
      resources: ["nodes"]
      verbs: ["list","watch"]
    ---
    apiVersion: rbac.authorization.k8s.io/v1
    kind: ClusterRoleBinding
    metadata:
      name: external-dns-viewer
      namespace: sample
    roleRef:
      apiGroup: rbac.authorization.k8s.io
      kind: ClusterRole
      name: external-dns
    subjects:
    - kind: ServiceAccount
      name: external-dns
      namespace: sample
    ---
    apiVersion: apps/v1
    kind: Deployment
    metadata:
      name: external-dns
      namespace: sample
    spec:
      strategy:
        type: Recreate
      selector:
        matchLabels:
          app: external-dns
      template:
        metadata:
          labels:
            app: external-dns
        spec:
          serviceAccountName: external-dns
          containers:
          - name: external-dns
            image: registry.k8s.io/external-dns/external-dns:v0.7.3
            args:
            - --source=service
            - --source=ingress
            - --domain-filter=${COK_MY_DOMAIN} 
            - --provider=aws
            - --policy=sync
            - --aws-zone-type=public 
            - --registry=txt
            - --txt-owner-id=${COK_HOSTED_ZONE_ID}
          securityContext:
            fsGroup: 65534 
    EOF
    kubectl apply -f cognito-external-dns.yaml
    Bash

    You can verify that ExternalDNS deployed successfully by checking logs:

    kubectl logs -f $(kubectl get po -n sample | egrep -o 'external-dns[A-Za-z0-9-]+') -n sample
    Bash

    The output should look something like this:

    Deploy the demo application

    Now that we have configured the EKS cluster, Amazon Cognito, and Route53, and we have a TLS certificate from ACM, it’s time to deploy the demo application.

    Create an Amazon ECR repository where we will store the container image for the demo application:

    COK_ECR_REPO_URI=$(aws ecr create-repository \
      --repository-name $COK_ECR_REPO \
      --region $COK_AWS_REGION \
      --query 'repository.repositoryUri' \
      --output text)
      
    aws ecr get-login-password --region $COK_AWS_REGION | 
      docker login --username AWS --password-stdin $COK_ECR_REPO_URI
    Bash

    Clone the sample code repository and then build, push, and deploy the application:

    git clone https://github.com/aws-samples/containers-blog-maelstrom.git
    cd containers-blog-maelstrom/cognito-alb-blog/sample-ui-code
    docker build --no-cache  -t $COK_ECR_REPO .
    docker tag ${COK_ECR_REPO}:latest ${COK_ECR_REPO_URI}:latest
    docker push ${COK_ECR_REPO_URI}:latest
    
    cd ..
    kubectl apply -f sample_namespace.yaml
    sed -i -e "s#IMAGE_URI#${COK_ECR_REPO_URI}:latest#g" -e "s#COK_AWS_REGION#$COK_AWS_REGION#g" sample_deployment.yaml
    
    kubectl apply -f sample_deployment.yaml
    Bash

    Create a Kubernetes ingress to expose the service:

    cat << EOF > sample_ingress.yaml
    apiVersion: extensions/v1beta1
    kind: Ingress
    metadata:
      name: sample.${COK_MY_DOMAIN}
      namespace: sample
      annotations:
        kubernetes.io/ingress.class: alb
        alb.ingress.kubernetes.io/scheme: internet-facing
        alb.ingress.kubernetes.io/tags: Environment=test,Project=cognito
        external-dns.alpha.kubernetes.io/hostname: sample.${COK_MY_DOMAIN} 
        alb.ingress.kubernetes.io/listen-ports: '[{"HTTP": 80}, {"HTTPS":443}]'
        alb.ingress.kubernetes.io/actions.ssl-redirect: '{"Type": "redirect", "RedirectConfig": { "Protocol": "HTTPS", "Port": "443", "StatusCode": "HTTP_301"}}'
        alb.ingress.kubernetes.io/auth-type: cognito
        alb.ingress.kubernetes.io/auth-scope: openid
        alb.ingress.kubernetes.io/auth-session-timeout: '3600'
        alb.ingress.kubernetes.io/auth-session-cookie: AWSELBAuthSessionCookie
        alb.ingress.kubernetes.io/auth-on-unauthenticated-request: authenticate
        alb.ingress.kubernetes.io/auth-idp-cognito: '{"UserPoolArn": "$(aws cognito-idp describe-user-pool --user-pool-id $COK_COGNITO_USER_POOL_ID --region $COK_AWS_REGION --query 'UserPool.Arn' --output text)","UserPoolClientId":"${COK_COGNITO_USER_POOL_CLIENT_ID}","UserPoolDomain":"${COK_COGNITO_DOMAIN}.auth.${COK_AWS_REGION}.amazoncognito.com"}'
        alb.ingress.kubernetes.io/certificate-arn: $COK_ACM_CERT_ARN 
        alb.ingress.kubernetes.io/target-type: 'ip'
    spec:
      rules:
        - host: sample.${COK_MY_DOMAIN} 
          http:
            paths:
              - path: /*
                backend:
                  serviceName: ssl-redirect
                  servicePort: use-annotation
              - path: /*
                backend:
                  serviceName: sample-ui
                  servicePort: 80
    EOF
    kubectl apply -f sample_ingress.yaml
    Bash

    Notice the annotations in the ingress manifest.

    • alb.ingress.kubernetes.io/listen-ports: configures the ALB with HTTP and HTTPS listener ports
    • alb.ingress.kubernetes.io/certificate-arn: Configures the secure listener with an ACM provided certificate
    • alb.ingress.kubernetes.io/auth*: enable authentication in ALB using Amazon Cognito
    • alb.ingress.kubernetes.io/auth-idp-cognito: provides the UserPool’s Arn, UserPoolClientId, and UserPoolDomain
    • alb.ingress.kubernetes.io/auth-on-unauthenticated-request: configures ALB to authenticate unauthenticated requests

    With this step, we have completed the deployment. Let’s test the setup and verify that the sample application is only available to authenticated users.

    Test authentication

    Point your browsers to the URL of the sample app in your cluster. You can get the URL using the previously configured environment variable.

    $ echo sample.${COK_MY_DOMAIN}
    Bash

    Your browser will be redirected to a sign-in page. This page is provided by Amazon Cognito hosted UI.

    Since this is your first time accessing the application, sign up as a new user. The data you input here will be saved in the Amazon Cognito user pool you created earlier in the post. For security reasons, we recommend using a disposable email address.

    Once you sign in, ALB will send you to the sample app’s UI:

    The application gets the user’s identity by parsing request headers.

    Extracting an authenticated user’s identity

    You may be asking, “How does the application identify the user?”

    After ALB authenticates a user successfully, it sends the user claims received from Amazon Cognito to the application. The ALB signs the user claim so that applications can verify the signature and verify that the load balancer sent the claims.

    The load balancer adds the following HTTP headers:
    x-amzn-oidc-accesstoken: The access token from the token endpoint, in plain text.
    x-amzn-oidc-identity: The subject field (sub) from the user info endpoint, in plain text.
    x-amzn-oidc-data: The user claims, in JSON web tokens (JWT) format.

    The target application gets the user identity by decoding x-amzn-oidc-data HTTP headers as shown in sample-ui-code/app.py:

    from flask import Flask, render_template, request
    import jwt
    import requests
    import base64
    import json
    Python
    # Step 1: Get the key id from JWT headers (the kid field)
     headers = dict(request.headers)
     encoded_jwt=""
     for k, v in headers.items():
       if k == 'X-Amzn-Oidc-Data':
          encoded_jwt=v
          break
    
    jwt_headers = encoded_jwt.split('.')[0]
    decoded_jwt_headers = base64.b64decode(jwt_headers)
    decoded_jwt_headers = decoded_jwt_headers.decode("utf-8")
    decoded_json = json.loads(decoded_jwt_headers)
    kid = decoded_json['kid']
    
    # Step 2: Get the public key from regional endpoint
    url = 'https://public-keys.auth.elb.' + region + '.amazonaws.com/' + kid
    req = requests.get(url)
    pub_key = req.text
    
    # Step 3: Get the payload and user identity Information
    payload = jwt.decode(encoded_jwt, pub_key, algorithms=['ES256'])
    sub = payload['sub']
    email = payload['email']
    phone_number=payload['phone_number']
    Python

    Cleanup

    Use the commands below to delete resources created during this post:

    kubectl -n sample delete ingress sample.${COK_MY_DOMAIN} 
    cd ../../../
    sed -i -e "s#UPSERT#DELETE#g"  validate_acm_cert_dns.json
    aws route53 change-resource-record-sets \
      --hosted-zone-id $COK_HOSTED_ZONE_ID \
      --change-batch file://validate_acm_cert_dns.json
    aws route53 delete-hosted-zone --id $COK_HOSTED_ZONE_ID
    aws acm delete-certificate --certificate-arn $COK_ACM_CERT_ARN --region $COK_AWS_REGION 
    kubectl delete ns sample
    helm delete aws-load-balancer-controller -n kube-system
    eksctl delete iamserviceaccount --cluster $COK_EKS_CLUSTER_NAME --name external-dns --namespace sample --region $COK_AWS_REGION
    eksctl delete iamserviceaccount --cluster $COK_EKS_CLUSTER_NAME --name aws-load-balancer-controller --namespace kube-system --region $COK_AWS_REGION
    
    aws iam delete-policy --policy-arn $(echo $(aws iam list-policies --query 'Policies[?PolicyName==`AWSR53HZIAMPolicy`].Arn'))
    aws iam delete-policy --policy-arn $(echo $(aws iam list-policies --query 'Policies[?PolicyName==`AWSLoadBalancerControllerIAMPolicy-COGNITODEMO`].Arn'))
    aws cognito-idp delete-user-pool-domain --domain $COK_COGNITO_DOMAIN --user-pool-id $COK_COGNITO_USER_POOL_ID --region $COK_AWS_REGION
    aws cognito-idp delete-user-pool --user-pool-id $COK_COGNITO_USER_POOL_ID --region $COK_AWS_REGION
    eksctl delete cluster --name $COK_EKS_CLUSTER_NAME --region $COK_AWS_REGION 
    Bash

    Conclusion

    This post demonstrates how you can use ALB’s built-in authentication to authenticate users without writing authentication code in your application. Your Kubernetes web apps that use an ALB as Kubernetes Ingress can authenticate users by using Amazon Cognito user pool as an identity provider. Additionally, Amazon Cognito hosted UI provides you an OAuth2.0 compliant authorization server that provides default implementation of end user flows such as registration, authentication, and so on.

    With this architecture, you don’t have to code authentication flows such as user sign-in or sign-up in your applications. ALB handles user registration and authentication and passes the user’s identity to your applications.